Plant Overview
Often called the Cunjevoi Lily or the Spoon Lily, this Australian native is a true rainforest giant. Its massive, spade-shaped leaves look like they belong in a prehistoric jungle, adding a bold, architectural feel to any landscape or large indoor space. While it shares the "Elephant Ear" look with many exotic cousins, this species is a hardy survivor from the misty bushlands of the East Coast.
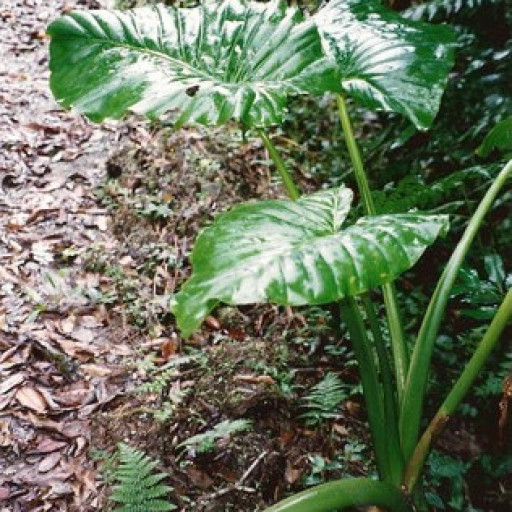
🔍 How to Identify
- 🍃 Massive Foliage: Large, glossy green leaves that grow upright, shaped like broad hearts or arrowheads with wavy edges and prominent, deep-set veins.
- 🍦 Scented Blooms: It produces a "spathe and spadix" flower that looks like a creamy-white or greenish spoon. These emit a heavy, sweet fragrance that is particularly strong at night.
- 🪵 Thick Stems: The plant grows from a thick, fleshy underground rhizome that eventually rises above the soil like a miniature tree trunk as the plant matures.
🏡 In Your Garden
- 💧 Rainforest Roots: Because its ancestors lived on the damp floor of the Australian rainforest, it craves high humidity. If the air is too dry, those majestic leaves may develop crispy, brown edges.
- ⛅ The Light Balance: It prefers "dappled" sunlight, mimicking the light filtered through a forest canopy. While it can handle more sun than other Alocasias, direct midday rays will scorch the leaves.
- 🥣 Well-Draining Soil: It loves consistent moisture but "hates wet feet." Using a chunky, aerated potting mix is vital to prevent the thick rhizome from rotting in stagnant water.
⚠️ Safety & Toxicity
- 🚫 Toxicity Status: Highly Toxic.
- 🐾 Risk Details: All parts of the plant contain needle-like calcium oxalate crystals. If any part is chewed or swallowed, it causes intense burning and immediate swelling of the mouth and throat.
- 🧤 Skin Irritant: The milky sap can cause skin irritation or rashes for some people. It is best to wear gloves when pruning or repotting and keep the plant well out of reach of curious pets and children.
✨ Fun Fact
In Australian bushcraft lore, the crushed sap of the Cunjevoi was traditionally used as a remedy for the excruciating sting of the Gympie-Gympie (Stinging Tree). However, this is a "pro-only" move—the plant itself is so caustic that handling it improperly can be just as painful as the sting!

Detailed Care Instructions
To grow an Alocasia brisbanensis plant, follow these steps:
- Choose a suitable location: Alocasia brisbanensis requires bright, indirect sunlight. Avoid placing it in direct sunlight as it can scorch the leaves. It also prefers warm and humid conditions, so ensure the environment is adequately heated and has good airflow.
- Select the right soil: These plants thrive in well-draining soil that retains some moisture. A mixture of peat moss, perlite, and a quality potting mix or regular garden soil can work well. Ensure the soil pH is slightly acidic, around 5.5 to 6.5.
- Potting: Use a pot with good drainage holes that is large enough to accommodate the plant's growth. Fill the pot with the prepared soil mixture, leaving enough space for the plant's roots. Gently place the plant in the pot and cover the roots with the soil, ensuring it's firmly settled.
- Watering: Keep the soil consistently moist but not overly wet. Water thoroughly when the top inch of soil feels dry. Alocasia brisbanensis prefers higher humidity, so misting the leaves or using a humidifier can help create the ideal environment.
- Fertilizing: Feed the plant with a balanced, water-soluble fertilizer every four to six weeks during the growing season (spring and summer). Dilute the fertilizer according to the package instructions to avoid over-fertilization.
- Pruning: Remove any yellow or dead leaves to maintain the plant's appearance and overall health. You can also trim any overly long or straggly stems to encourage bushier growth.
- Repotting: As the plant grows, it may outgrow its pot. When this happens, repot it into a slightly larger container to give the roots more room to grow. Repotting is typically done every two to three years.
- Pest control: Watch out for common pests like spider mites, mealybugs, and aphids. If you notice any signs of infestation, treat the plant with natural or chemical insecticides accordingly.
Remember, Alocasia brisbanensis can be toxic to pets and humans when ingested, so keep it out of reach. Also, be patient as these plants grow slowly, especially when they are young.

Place in a window with dappled sun or a spot in the middle of a room. Or directly in a window facing west or east.

Alocasia Brisbanensis is a type of tropical plant that requires a certain amount of moisture to thrive. Here's how to water it:
1. Check the soil: Before watering your plant, check the soil to make sure it's dry. Insert a finger about an inch into the soil - if it feels dry, it's time to water.
2. Watering schedule: Water your Alocasia Brisbanensis plant regularly, but be careful not to overwater. It's better to let the soil dry out a bit before watering again. Aim to water every 7-10 days, depending on the humidity in your environment.
3. Watering method: When watering, pour water into the soil around the base of the plant until it comes out the bottom drainage holes. Avoid watering the leaves as this can cause damage and encourage fungal growth.
4. Consider the environment: Adjust your watering schedule and amount based on the humidity and temperature in your environment. If it's particularly dry or hot, you may need to water more often.
5. Monitor moisture: Keep an eye on the soil moisture level to make sure it's not too wet or too dry. Wet soil can lead to root rot, while dry soil can stress the plant and cause wilting. Adjust your watering habits accordingly.
- Use a balanced fertilizer with equal amounts of nitrogen, phosphorus, and potassium.
- Dilute the fertilizer to half strength and apply it to the soil around the plant.
- Do not fertilize during the winter months when growth is slower.
- Monitor the plant for signs of over-fertilization such as burnt leaf tips or discoloration.
- Water the plant thoroughly after fertilizing to ensure the nutrients reach the roots.
- Repeat fertilization every 4-6 weeks during the growing season.
The ideal soil for this plant is well-draining, rich in organic matter, and slightly acidic. It should contain a mixture of peat moss, perlite, and sand to promote proper drainage and aeration while retaining moisture. The soil pH should be between 5.5 and 6.5 for optimal growth. Use a potting mix that is specifically formulated for tropical plants. It is recommended to avoid too much fertilization as this can cause damage to the roots.
To propagate this plant, you will need to select a healthy and robust mother plant that is established and growing well in a suitable environment. Choose a stem or leaf from the plant that is free from diseases and pests, and make a clean cut using a sharp and sterilized knife or scissors. It is essential to ensure that the cutting has at least one node, which is where new roots and shoots will emerge.
Prepare a well-draining potting mix that is rich in organic matter and perlite or sand to prevent waterlogging. Moisten the mix with a spray bottle or watering can to make it slightly damp but not waterlogged. Insert the cutting into the soil with the node buried about an inch deep and cover it loosely with soil. Place the pot in a warm and bright location, but not in direct sunlight or drafts.
Keep the soil moist but not too wet, and provide humidity by covering the pot with a clear plastic bag or dome. This will help to retain moisture and create a greenhouse effect that encourages rooting. After a few weeks to a month, you should start to see new growth emerge from the node, indicating that the cutting has rooted successfully.
Once the new plant has established roots and grown a few healthy leaves, you can transplant it into a larger pot or in the garden if the conditions are suitable. Be patient and gentle with the young plant, and continue to provide it with the same care and attention as the mother plant. With time, the new plant will grow to maturity and produce its own offspring, continuing the cycle of life.
Common pests of the elephant's ear include Mealybugs, spider mites, fungus gnats, aphids, thrips. Make a habit of checking your elephant's ear frequently for pests so that any infestations can be caught and managed early.


