Plant Overview
Often called the Tiger Aloe or Partridge-breasted Aloe, this striking succulent is a master of camouflage in its native South African deserts. Its leaves are arranged in three neat ranks, creating a beautiful geometric spiral that looks like a piece of living, green sculpture. Historically prized for its resilience, it is one of the most popular "window sill" succulents for collectors who appreciate architectural beauty.
🔍 How to Identify
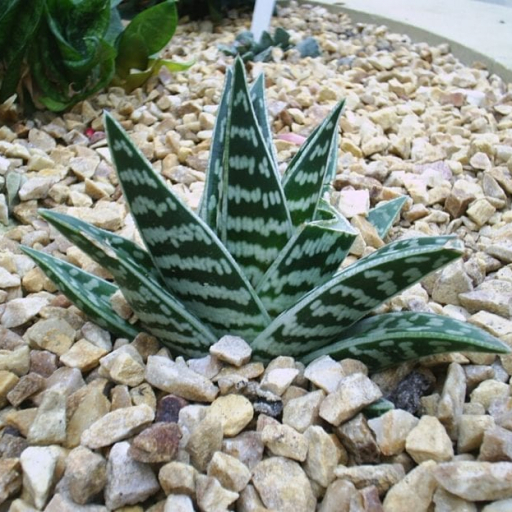
- 📐 Triangular Leaves: The thick, fleshy leaves grow in three distinct columns (ranks), often forming a compact, upright rosette.
- 🐅 Tiger Stripes: The dark green surface is broken by horizontal white bands or mottled spots, giving it a pattern reminiscent of a partridge's chest or a tiger’s stripes.
- 🦷 Smooth Edges: Unlike many of its "toothed" Aloe cousins, the leaf edges are relatively smooth with tiny, blunt white margins that aren't sharp to the touch.
🏡 In Your Garden
- 🏜️ Drought Specialist: This plant is highly susceptible to root rot; it thrives on "calculated neglect." It is essential to let the soil dry out completely between waterings, as the thick leaves store an incredible amount of moisture.
- ☀️ Light Logic: While it craves bright light to keep its markings vivid, the Tiger Aloe can "tan" or turn a reddish-brown if exposed to intense, direct midday sun for too long.
- 🪴 Slow & Steady: It is a slow grower and prefers being slightly root-bound. You won't need to repot it often, and it will reward your patience by producing small "pups" (offsets) around the base.
⚠️ Safety & Toxicity
- 🐾 Toxic to Pets: Like most members of the Aloe family, the Tiger Aloe contains saponins and anthraquinones.
- 🤢 The Risk: If ingested by cats or dogs, it can cause vomiting, lethargy, and digestive upset. It is best kept on high shelves or in hanging pots away from curious chewers.
✨ Fun Fact
In its native habitat, the Tiger Aloe is a winter bloomer. Its bright orange-pink tubular flowers produce copious amounts of nectar, specifically evolved to attract Sunbirds, which act as its primary pollinators!

Detailed Care Instructions
To grow Aloe Variegata plants, also known as Tiger Aloe or Partridge Breast Aloe, follow these steps:
- Choose the right conditions: Aloe Variegata thrives in bright, indirect sunlight. Place the plant near a window that receives ample light, but avoid direct sunlight, as it can scorch the leaves. It prefers temperatures between 60-85°F (15-29°C).
- Use well-draining soil: Aloe Variegata requires well-draining soil to prevent root rot. Use mixtures specifically designed for succulents or cacti, or make your own by combining equal parts potting soil, perlite, and coarse sand.
- Plant in a suitable container: Select a pot that has drainage holes to allow excess water to escape. Aloe Variegata prefers to be slightly root-bound, so choose a pot that is only slightly larger than the plant's root ball.
- Water properly: Aloe Variegata is a drought-tolerant plant and requires less water compared to many other houseplants. Wait for the soil to dry almost completely between waterings. Water deeply and thoroughly, and allow excess water to drain out of the pot to prevent waterlogging.
- Fertilize occasionally: Aloe Variegata does not require frequent fertilization. Use a balanced, water-soluble fertilizer specifically made for succulents or cacti, following the instructions on the packaging. Apply the fertilizer once or twice a year during the growing season (spring and summer).
- Ensure good air circulation: Adequate air circulation helps prevent disease and keeps the plant healthy. Avoid crowding the plant with other objects or plants.
- Propagation: Aloe Variegata can be propagated through offsets or pups that grow from the mother plant. Gently separate the pups from the main plant and allow the cut ends to dry for a day or two. Plant the pups in a separate pot using well-draining soil and care for them as you would a mature plant.
- Prune as needed: To maintain the overall appearance and health of the plant, remove any dead or decaying leaves gently. If necessary, you can also trim overgrown or damaged parts of the plant.
Remember, Aloe Variegata is a slow-growing plant, so be patient with its growth. With proper care and maintenance, it can make a beautiful addition to your indoor or outdoor garden.

Place in a window with dappled sun or a spot in the middle of a room. Or directly in a window facing west or east.

To water this plant, you should first check the soil and make sure it is dry to the touch before watering. Once you have determined that it needs water, slowly pour water into the soil around the base of the plant. Be sure not to get any water on the leaves or stem, as this can cause damage or rotting. Wait until the soil has fully absorbed the water before watering again. In general, this plant should be watered sparingly and should be allowed to fully dry out between waterings. Overwatering can cause root rot and other issues. Additionally, this plant prefers well-draining soil and should never be left in standing water.
To fertilize this plant, mix a balanced fertilizer at half strength and apply it to the soil every two weeks during the growing season. Do not fertilize during the dormant season. Make sure to water the plant before and after fertilizing to ensure the fertilizer is distributed evenly throughout the soil. Avoid getting fertilizer on the leaves as it may cause damage.
The ideal soil for Aloe Variegata plants is a well-draining, porous mixture with a slightly acidic to neutral pH (between 6.0 and 7.0). Aloe Variegata plants prefer sandy, mineral-rich soil that contains a significant amount of perlite, pumice, or coarse sand to promote drainage and prevent soil compaction. Additionally, some gardeners recommend adding organic matter such as compost or peat moss to improve the soil's fertility and water-holding capacity. It is important not to overwater Aloe Variegata plants as they are susceptible to root rot in overly moist soil, so it's recommended to water sparingly and allow the soil to fully dry out between watering sessions.
The first step in propagating this plant is to carefully select a healthy mature specimen. Once selected, identify a healthy leaf that is not damaged and remove it from the plant using a sharp knife. It is important to take care not to damage the leaf or the parent plant during this process.
Once the leaf has been removed, allow it to rest for a few days to allow the cut end to dry, this will help prevent the wound from getting infected. Once the cut end is dry it can be planted in a well-draining soil mix. Ensure that only a small portion of the leaf is inserted into the soil and that it is placed in a well-lit spot, but away from direct sunlight.
Over time, roots will start to form from the base of the leaf and a new plant will develop. It's important to keep the soil lightly moist but not overly wet during this process. Once the new plant has developed several leaves and has established a good root system, it can be transplanted into a larger container or onto the garden bed.
Propagation through offshoots is also possible, once the plant matures, they will start to produce small baby plants that can be carefully removed and transplanted separately.


