Plant Overview
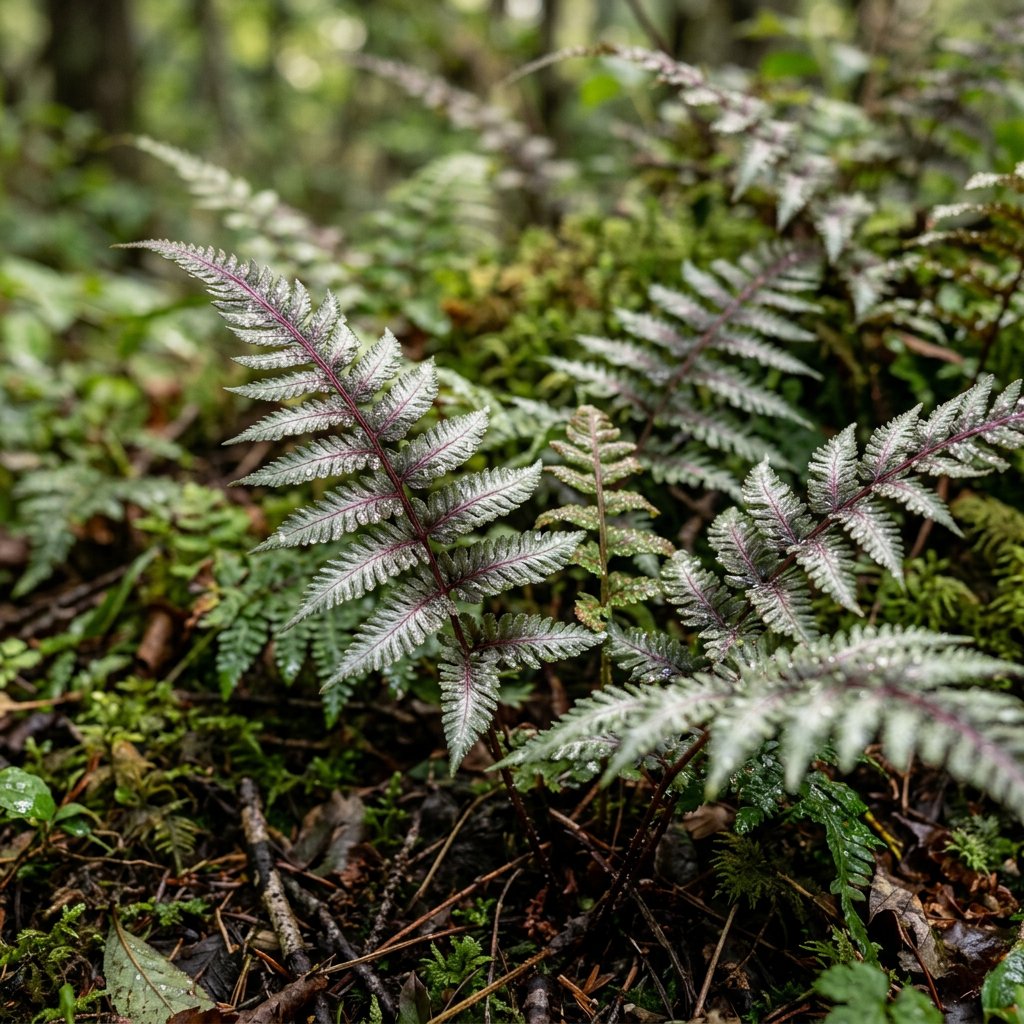
Often referred to as the "living watercolor" of the forest floor, the Japanese Painted Fern is a masterpiece of natural texture. Unlike the solid greens of most ferns, this deciduous beauty looks as though a Victorian artist meticulously brushed metallic silver and deep burgundy onto its fronds. It is a slow-growing treasure that brings a sophisticated, "ghostly" glow to the darkest corners of a shade garden.
🔍 How to Identify
- 🎨 The Fronds: Triangular, arching fronds that display a unique metallic, silvery-grey color with hints of soft blue.
- 🍷 The Stems: Striking wine-red or deep maroon midribs (rachis) that provide a sharp, beautiful contrast to the pale foliage.
- 🌿 Growth Habit: A low, mounding habit that typically reaches 12 to 18 inches in height, creating a dense tuft of delicate foliage.
🏡 In Your Garden
- ⛅ The Color Secret: To get the best colors, this fern needs "bright shade." While it hates the afternoon sun, a little bit of morning light actually intensifies its metallic sheen; in total darkness, the colors may fade to a duller green.
- 💧 Moisture Balance: It thrives in rich, moist soil but is prone to crown rot if the ground stays soggy during the winter. It is a "late riser" in the spring, so don't be worried if it takes a while to emerge from dormancy!
⚠️ Safety & Toxicity
- ✅ Status: Generally non-toxic and safe.
- 🐾 Details: This fern is widely considered safe for households with cats, dogs, and children. However, it is an ornamental plant, not an edible one, and ingestion of any garden plant may still cause mild stomach upset in sensitive pets.
✨ Fun Fact
- 🏆 Plant Royalty: In 2004, the Japanese Painted Fern was named the "Perennial Plant of the Year" by the Perennial Plant Association—a prestigious and rare honor for a fern, cementing its status as a must-have for garden designers.

Detailed Care Instructions
To grow Anisocampium Niponicum (Japanese Painted Fern) plant, follow these steps:
- Choose a suitable location: Select a shady or partially shaded spot in your garden with well-draining soil. Japanese Painted Ferns prefer moist soil and cooler temperatures.
- Prepare the soil: Amend the soil with organic matter, such as compost, to improve its moisture retention and drainage. This will ensure the ideal growing conditions for the plant.
- Planting: Dig a hole that is twice as wide and as deep as the plant's root ball. Place the root ball in the hole and backfill with soil, gently firming it around the plant. Ensure that the crown is level with the soil surface.
- Watering: Water the plant thoroughly after planting to settle the soil and help the roots establish. Keep the soil consistently moist but not waterlogged. Regular watering is essential, especially during dry periods.
- Mulching: Apply a layer of organic mulch, such as shredded bark or compost, around the base of the plant. This will help to conserve moisture, suppress weeds, and keep the roots cool.
- Fertilizing: Japanese Painted Ferns do not require much fertilizer. Apply a balanced slow-release fertilizer in early spring or use a diluted liquid fertilizer once a month during the growing season. Be cautious not to over-fertilize, as it can damage the plant.
- Pruning: Remove any dead or damaged fronds during the growing season. Pruning is not typically necessary for Japanese Painted Ferns unless they become overcrowded.
- Winter care: Anisocampium Niponicum is hardy and can withstand cold temperatures, but mulching around the plant's base during winter will help protect its roots from extreme freeze-thaw cycles.
- Division: Over time, Japanese Painted Ferns may form clumps. When the clump becomes crowded, usually after a few years, you can divide the plants in early spring. Dig up the clump and carefully separate it into smaller sections, each with its own roots and fronds, and replant them individually.
By following these steps, you should be able to successfully grow Anisocampium Niponicum (Japanese Painted Fern) plants in your garden.

Place in a window with dappled sun or a spot in the middle of a room. Or directly in a window facing west or east.

Watering this plant requires a delicate balance. While it needs to be kept moist, it should not be overwatered as it may lead to root rot. It is important to allow the top layer of soil to dry out slightly before watering again. When you do water it, thoroughly soak the soil until the water drains out of the bottom of the pot. It is best to use room temperature or lukewarm water and avoid harsh tap water if possible. You may also want to consider misting the leaves occasionally to increase humidity around the plant.
To fertilize the plant, use a balanced fertilizer that contains equal amounts of nitrogen, phosphorus, and potassium. Apply the fertilizer during the active growing season, typically in the spring and summer months. Mix the fertilizer with water according to the manufacturer's instructions and apply it to the soil around the base of the plant. Be sure to water the plant thoroughly after fertilizing to help distribute the nutrients. Avoid over-fertilizing, as this can damage the plant.
Anisocampium Niponicum plant prefers well-draining soil that is rich in organic matter and nutrients. The soil should have a slightly acidic to neutral pH range, with a pH level between 5.5 and 7.5. It is important to ensure that the soil is not too compact or heavy, as this can impede root growth and cause waterlogging. Sandy or loamy soils are ideal, as they provide good drainage and aeration for the roots. When planting Anisocampium Niponicum, it is a good idea to mix in some compost or organic fertilizer to help improve soil quality and fertility. Regular soil testing can also help ensure that the soil remains within the ideal pH range and nutrient levels for optimal growth and health of the plant.
To propagate this plant, you will need to select a healthy mature plant. Using a clean sharp knife, carefully cut a section of the stem that is about 4-6 inches in length. Remove any leaves from the lower two-thirds of the stem.
Prepare a small pot with well-draining soil and moisten it with water. Dip the cut end of the stem into rooting hormone powder, if available. This helps promote root growth. Place the stem into the soil, gently firming the soil around the stem.
Cover the pot with a plastic bag or clear plastic wrap to create a mini greenhouse and keep the soil moist. Place the pot in a brightly lit, warm area, away from direct sunlight.
Keep the soil moist but not waterlogged, and periodically remove the covering to ensure airflow. Within a few weeks, you should start to see new roots forming.
Once the new plants have established themselves and are growing well, they can be transplanted into larger pots or directly into the garden.
Common pests of the japanese painted fern include Mealybugs, spider mites, aphids. Make a habit of checking your japanese painted fern frequently for pests so that any infestations can be caught and managed early.