Plant Overview
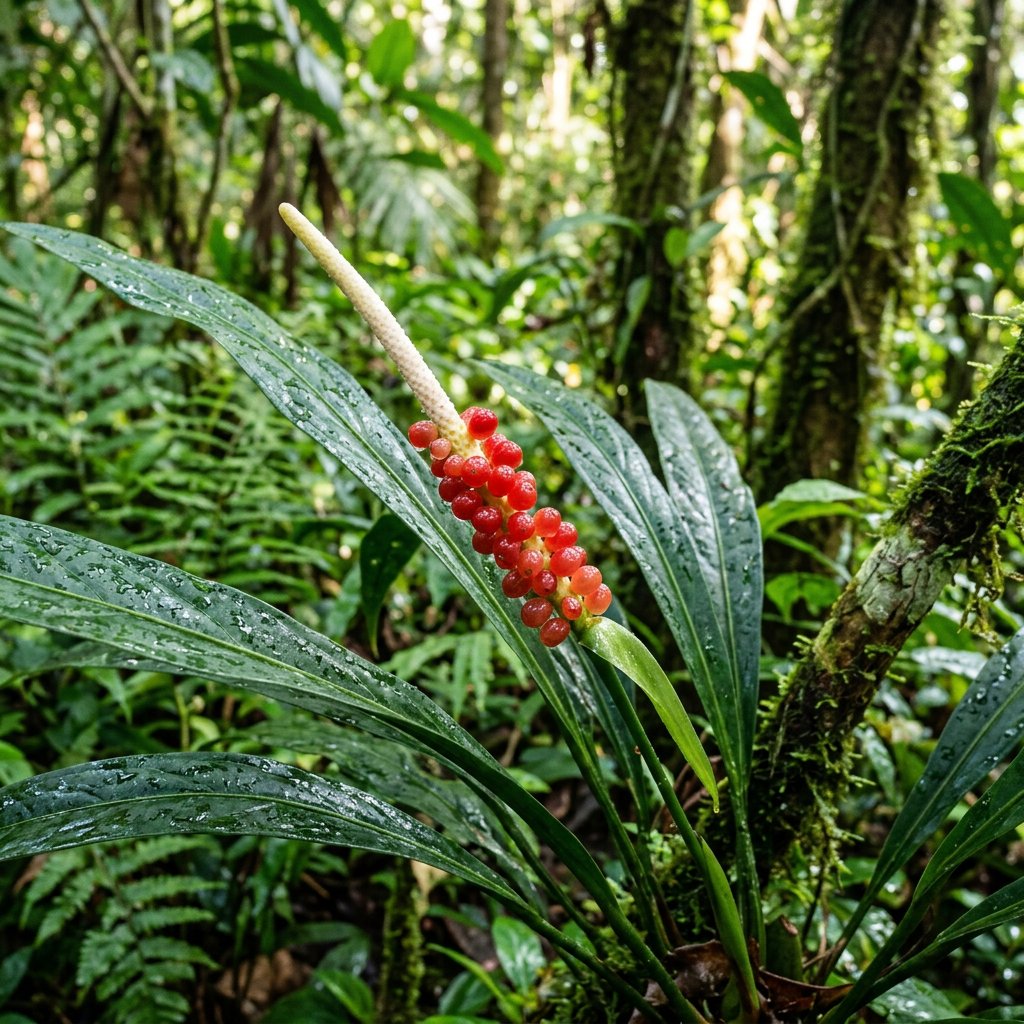
Often called the Red Pearls Anthurium, this elegant epiphyte is a far cry from its showy, wax-flowered cousins. Native to the humid rainforests of Central and South America, it trades giant colorful spathes for long, pendulous leaves and stunning strings of ruby-red berries. It is a favorite for terrarium lovers and "jungle-style" interior designers who appreciate its hanging, wild silhouette.
🔍 How to Identify
- 🍃 The Foliage: Long, narrow, lance-shaped leaves that drape gracefully downward. They are leathery to the touch with a deep, matte green finish.
- 🧶 The Roots: Distinctive thick, white aerial roots that look like tangled yarn. In the wild, these roots cling to tree bark to collect moisture from the air.
- 🍒 The Fruit: The most recognizable feature is the spadix, which transforms into a cluster of bright, glossy red berries that look like tiny jewels or pearls.
🏡 In Your Garden
- 🪵 The Epiphyte Lifestyle: Because this plant naturally grows on trees rather than in soil, it hates "wet feet." It thrives best in a chunky, airy mix—think orchid bark, perlite, and charcoal—rather than standard potting soil.
- ☁️ Humidity Lover: It is a child of the tropics and craves moisture in the air. While it is more resilient than other rare Anthuriums, it will show its displeasure with crispy leaf tips if the indoor air becomes too dry.
⚠️ Safety & Toxicity
- 🚫 Mildly Toxic: Like all members of the Araceae family, the plant contains insoluble calcium oxalate crystals.
- 🐾 Pet & Child Warning: If chewed or swallowed, it can cause immediate oral irritation, swelling of the mouth and throat, and digestive upset. It is best kept on high shelves or in hanging baskets away from curious pets and toddlers.
✨ Fun Fact
Unlike many of its relatives that require specific forest insects for pollination, Anthurium gracile is often self-fertile. This means even a lone plant in your living room can produce those iconic red berries without any help from outside pollinators!

Detailed Care Instructions
To grow an Anthurium Gracile plant, follow these steps:
- Choose a suitable location: Select a spot with bright, indirect sunlight. Anthuriums thrive in temperatures between 65-80°F (18-27°C).
- Select the right soil: Use a well-draining, loose potting mix that retains some moisture but doesn't become waterlogged. A mixture of peat moss, perlite, and/or orchid bark works well.
- Choose the right pot: Use a pot with drainage holes to prevent waterlogged soil. Anthurium Gracile plants prefer slightly crowded root conditions, so choose a pot that is only slightly larger than the root ball.
- Watering: Water regularly to keep the soil slightly moist but not soaked. Allow the top inch of soil to dry out between waterings. Anthuriums do not tolerate overwatering.
- Humidity: Anthuriums appreciate high humidity levels. Mist the leaves regularly with water or place a humidifier nearby. You can also place the pot on a tray filled with water and pebbles to increase humidity.
- Fertilization: Feed your Anthurium Gracile plants with a balanced, water-soluble fertilizer once a month during the growing season (spring and summer). Follow the instructions on the fertilizer package for application rates.
- Pruning: Remove any dead or yellowing leaves by cutting them off close to the stem. This promotes healthy growth and prevents the spread of diseases.
- Repotting: Anthuriums generally prefer slightly crowded root conditions, but if the roots become completely compacted, it might be time to repot. Do this during the growing season, using fresh potting soil.
- Pests and diseases: Watch out for pests like aphids, mealybugs, and spider mites. Treat any infestations promptly with insecticidal soap or neem oil. Anthuriums can also be susceptible to bacterial or fungal diseases; ensure good air circulation and avoid overwatering to prevent them.
- Propagation: Anthurium Gracile plants can be propagated through division or by taking stem cuttings. Division involves separating the plant into smaller sections, each with roots attached. Stem cuttings can be rooted in a moist soil mix or in water, ensuring the cut end has calloused over before planting.
Monitor the plant closely for any signs of stress or issues and adjust care accordingly to keep it healthy and thriving.

Place in a window with dappled sun or a spot in the middle of a room. Or directly in a window facing west or east.

Anthurium Gracile plants require moist soil to grow properly. Water the soil once it has dried out completely. While watering, ensure that you avoid the leaves and the flowers and pour the water only on the soil. Overwatering must be avoided at all costs since it could lead to root rot, which can be fatal to the plant. It is best to water these plants during the morning or evening when the temperatures are cooler. This helps prevent the water from evaporating too quickly and ensures that the roots have enough time to absorb any moisture that they require.
To fertilize this plant, use a balanced, water-soluble fertilizer that is formulated for indoor plants. Dilute the fertilizer to half strength and apply it every two weeks during the growing season, which is typically from spring through summer. Avoid fertilizing during the winter months when the plant is dormant. Be sure to follow the manufacturer's instructions for application rates and frequency.
Anthurium Gracile plants require well-draining soil that is rich in organic matter. It should have a pH level between 5.5 to 6.5 and be kept moist but not waterlogged. The soil should have a good balance of nutrients to promote healthy growth and prevent nutrient deficiencies. Avoid using heavy clay soils as they can retain too much water and lead to root rot. Adding perlite or sand to the soil can improve drainage and soil structure. Use a high-quality potting mix or create a soil mix with equal parts of peat moss, perlite, and vermiculite.
Anthurium Gracile is typically propagated by taking stem cuttings. The cutting should be taken from a healthy plant and should be at least 4-6 inches long with a few leaves attached. Remove any lower leaves from the cutting to prevent them from rotting. Dip the end of the cutting in rooting hormone and plant it in a well-draining potting mix. Water the cutting and cover it with a plastic bag to create a humid environment. Place the cutting in a bright, indirect light and keep the soil moist until roots begin to form. Once the cutting has rooted, it can be transplanted into a larger pot with fresh potting soil.
Common pests of the red pearls anthurium include Mealybugs, spider mites, thrips. Make a habit of checking your red pearls anthurium frequently for pests so that any infestations can be caught and managed early.


