Plant Overview
Often called the "Strap-leaf Anthurium," this South American beauty is the ultimate "curtain plant" for indoor jungles. Unlike many of its heart-shaped cousins, it produces incredibly long, ribbon-like leaves that gracefully cascade downward from its perch. It brings a sophisticated, prehistoric vibe to any room, especially when allowed to trail from a high shelf or hanging basket.
🔍 How to Identify
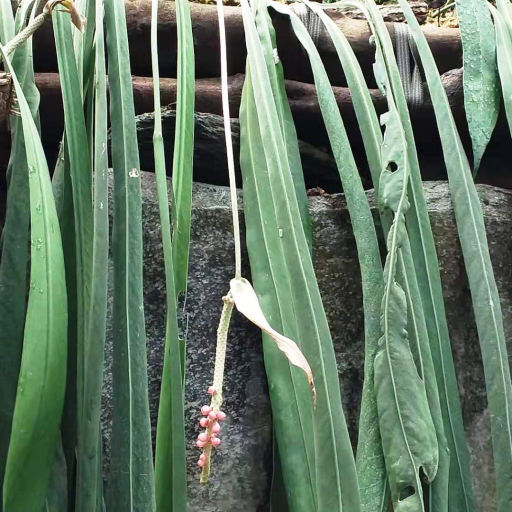
- 🍃 Leaf Shape: Characterized by extremely long, narrow, and pendant-shaped leaves that can reach lengths of 4 to 6 feet in mature specimens.
- 🎨 Texture & Color: The foliage is a deep, matte forest green with a slightly leathery feel and a prominent midrib running the entire length.
- 🍒 Berries: When successfully pollinated, it produces small, decorative red or pinkish berries along a thin flowering spike (spadix).
🏡 In Your Home
- 🧺 Epiphytic Nature: In the wild, this plant grows on trees rather than in soil. At home, it hates "wet feet," so it requires a very chunky, airy orchid-style mix to keep its roots oxygenated.
- ☁️ Humidity is Key: Because its leaves are so long, the tips are prone to browning if the air is too dry. It thrives best in environments with at least 60% humidity.
- ☀️ Light Nuance: It prefers bright, filtered light. Direct afternoon sun will scorch the narrow leaves, but too little light will cause the new growth to stay short and stunted.
⚠️ Safety & Toxicity
- 🚫 Status: Toxic to humans and pets.
- 🐾 Details: This plant contains calcium oxalate crystals. If chewed or ingested, it can cause immediate mouth irritation, swelling of the tongue, and digestive distress. Keep it high up—not just for the aesthetic of the trailing leaves, but to keep it out of reach of curious cats and dogs.
✨ Fun Fact
In its native Amazonian habitat, the Anthurium vittarifolium acts as a "trash basket" plant. Its long, hanging leaves help funnel falling organic debris toward its root system, creating its own personal compost pile high up in the rainforest canopy!

Detailed Care Instructions
To successfully grow an Anthurium Vittarifolium plant, follow these steps:
- Suitable growing conditions: Anthurium Vittarifolium plants thrive in warm and humid environments, with temperatures ranging between 60-85°F (15-29°C). They need bright, indirect light, so place the plant near a window where it receives filtered sunlight or use artificial grow lights.
- Soil and potting: Use well-draining soil or a mixture of equal parts peat moss, perlite, and orchid bark. Ensure that the pot has adequate drainage holes to prevent excessive moisture buildup and root rot. The right pot size is one that allows the root system to grow comfortably.
- Watering: Anthurium Vittarifolium plants prefer moderately moist soil. Avoid overwatering, as it can lead to root rot. Instead, wait until the top inch of soil feels slightly dry before watering. Ensure that excess water drains out of the pot promptly.
- Humidity: These plants require high humidity levels. Mist the leaves regularly with a spray bottle, place a tray of water nearby, or use a humidifier to maintain a humid environment. Avoid placing the plant near air-conditioning vents or dry heaters.
- Fertilization: Feed the Anthurium Vittarifolium plant with a balanced liquid fertilizer every 2-4 weeks during the growing season (spring and summer). Follow the instructions on the fertilizer packaging for proper dilution and application.
- Pruning: Prune any dead or yellowing leaves to promote better air circulation and to maintain the plant's appearance. Use clean, sharp pruning shears to avoid damaging the healthy foliage.
- Repotting: Repot the Anthurium Vittarifolium every 1-2 years or when it outgrows its current pot. Choose a slightly larger pot and use fresh, well-draining soil during the repotting process.
- Pests and diseases: Keep an eye out for pests such as aphids, mealybugs, or spider mites. Regularly inspect the plant for any signs of infestation, and if necessary, treat with an appropriate organic or chemical pesticide.
Remember that each plant can have slightly different requirements, so it's always best to monitor the specific needs of your Anthurium Vittarifolium plant closely.

Place in a window with dappled sun or a spot in the middle of a room. Or directly in a window facing west or east.

When it comes to watering this particular plant, it is important to pay close attention to its needs in order to maintain its health and vitality. One of the most important factors to consider is the soil moisture level, as Anthurium Vittarifolium plants prefer consistently moist, but well-draining soil.
To achieve this, it is recommended to water the plant once a week, or as needed, depending on the environmental conditions and the size of the plant. The watering should be gentle and thorough, and done in a way that allows the water to fully saturate the root system.
It is also important to avoid overwatering this plant, as this can lead to root rot and other issues. To check if the soil is moist enough, simply stick your finger about an inch into the soil. If it feels dry, it's time to water.
Another important consideration is the type of water used. Anthurium Vittarifolium plants prefers filtered or distilled water, as minerals found in tap water can build up in the soil and harm the plant over time.
Overall, paying attention to soil moisture and using the right type of water is key to keeping an Anthurium Vittarifolium plant healthy and thriving.
To fertilize this plant, use a balanced fertilizer with equal amounts of nitrogen, phosphorus, and potassium. Mix the fertilizer according to the instructions on the label and apply once a month during the growing season. Water the plant thoroughly before and after fertilizing to ensure the nutrients are evenly distributed. Avoid fertilizing during the winter months when the plant is dormant. Additionally, do not exceed the recommended amount of fertilizer, as this can cause damage to the plant.
The ideal soil for Anthurium Vittarifolium plant should be well-draining and rich in nutrients. It should contain a good balance of organic matter, sand, and perlite to prevent waterlogging and allow adequate air circulation to the roots. The pH of the soil should be slightly acidic, between 5.5 and 6.5. It is important to avoid using heavy or compacted soils as they can lead to root rot and other diseases. Additionally, the soil should be kept consistently moist, but not wet, to mimic the plant's natural habitat in tropical rainforests. A high-quality potting mix formulated for aroid plants may be suitable for Anthurium Vittarifolium.
To propagate this plant, start by selecting a healthy leaf from the parent plant. Cut the leaf stem at the base, making sure to include some of the stem where it joins the main plant.
Next, prepare a pot filled with well-draining, moisture-retentive soil. Make a hole in the soil and insert the stem into the hole. Firmly pack the soil around the stem to secure it in place.
Water the newly planted stem thoroughly, but be careful not to overwater and keep the soil consistently moist. Place the pot in a warm, bright location, but avoid direct sunlight.
Over time, the stem will develop roots and eventually a new plant will emerge from the base of the stem. It’s important to be patient during this process as it can take several weeks or even months for the new plant to grow.
Once the new plant has grown a few leaves and appears to be established, it can be transplanted into its own pot using the same type of soil and care requirements as the parent plant.
Common pests of the anthurium vittarifolium include Mealybugs, spider mites, thrips. Make a habit of checking your anthurium vittarifolium frequently for pests so that any infestations can be caught and managed early.


