Plant Overview
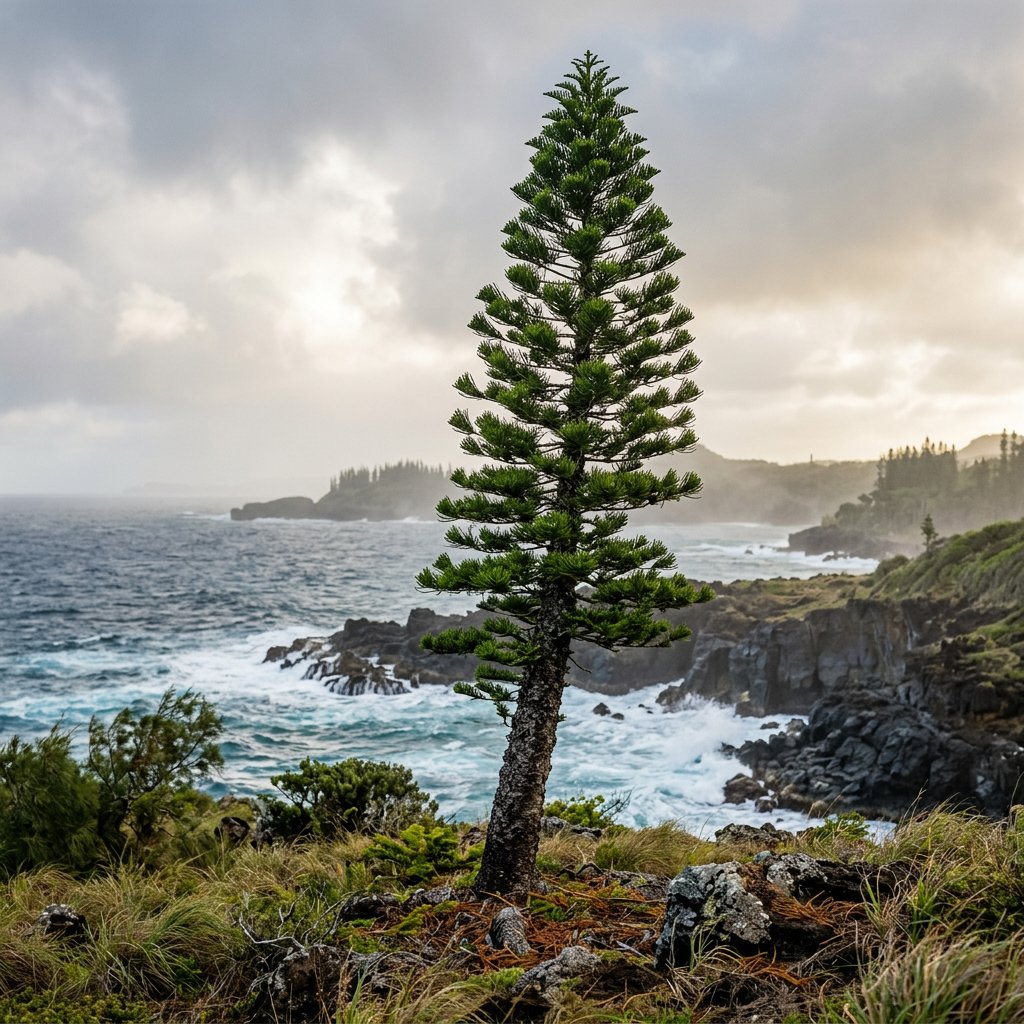
Often mistaken for its cousin, the Norfolk Island Pine, the Cook Pine is a living architectural masterpiece. Named after Captain James Cook during his voyages in the South Pacific, this New Caledonian native is famous for its impossibly narrow, towering silhouette. It looks less like a traditional tree and more like a fuzzy green pillar stretching toward the clouds.
🔍 How to Identify
- 🌲 Columnar Shape: Unlike most conifers that spread wide at the base, this tree maintains a remarkably narrow, cylindrical profile, often looking like a giant pipe cleaner.
- 🌿 Scaly Foliage: The branches are covered in short, bright green, scale-like leaves that overlap tightly. They are soft to the touch when young but become stiff and woody as the tree matures.
- 📐 The Equatorial Lean: Its most famous ID feature is a distinct tilt. In an odd botanical mystery, these trees almost always lean toward the equator, with the angle becoming more dramatic the further they are planted from the tropics.
🏡 In Your Garden
- 🌊 Salt Spray Hero: This is a premier choice for coastal landscapes. It is incredibly resistant to salt air and high winds, making it a "must-have" for seaside estates where other trees might wither.
- 🪴 Slow-Growing Indoor Star: Because it grows slowly, the Cook Pine is often sold as a "living Christmas tree" or a majestic floor plant. It can live happily in a large pot for years before it finally demands to be planted in the ground.
- 🏜️ Drainage Specialist: The quickest way to harm this tree is through overwatering. It requires very well-draining, sandy soil and prefers to dry out significantly between waterings to mimic its rocky island origins.
⚠️ Safety & Toxicity
- 🟢 Safe Status: The Cook Pine is generally considered non-toxic to humans, cats, and dogs, making it a safer indoor alternative to some tropical palms.
- 🌵 Mechanical Irritation: While not poisonous, the mature "needles" are quite stiff and prickly. Handling the branches without gloves can cause minor scratches or skin irritation for those with sensitive skin.
✨ Fun Fact
Scientists conducted a global study on the Cook Pine and discovered that it is the only tree known to consistently lean toward the equator regardless of which hemisphere it is planted in—and no one knows exactly why it happens!

Detailed Care Instructions
| Lighting | Full Sun |
| Hardiness Zones | Min 9B |
To grow an Araucaria columnaris plant, also known as the Norfolk Island pine, follow these steps:
- Choose a suitable location: Araucaria columnaris prefers bright, indirect sunlight. Choose a location that provides partial shade or filtered light, especially during the hottest part of the day.
- Prepare the soil: The plant thrives in well-draining soil that is rich in organic matter. If your soil is heavy or clay-based, consider adding compost or peat moss to improve drainage.
- Plant the seedling: If you don't have a seedling, you can purchase one from a nursery or propagate it from seeds. Dig a hole slightly larger than the root ball and place the seedling in, ensuring that the soil level remains the same as it was in the pot. Firmly press the soil around the base of the plant.
- Watering: Araucaria columnaris prefers evenly moist soil, but it should not be waterlogged. Water the plant deeply but infrequently, allowing the top inch or so of soil to dry out before watering again. During the winter months, reduce watering frequency.
- Fertilization: Fertilize the plant regularly during the growing season (spring-summer) with a balanced, slow-release fertilizer. Follow the package instructions for dosage and application frequency.
- Pruning: Prune the plant in early spring to maintain its desired shape. Remove any dead, damaged, or diseased branches. Additionally, you can pinch back new growth to promote bushier growth.
- Temperature and humidity: Araucaria columnaris thrives in average room temperatures (65-75°F or 18-24°C). It prefers moderate humidity levels, so misting the foliage with water can help increase humidity in dry indoor environments.
- Pest control: Monitor your plant regularly for common pests like spider mites, scale insects, or mealybugs. Treat infestations promptly with insecticidal soap or neem oil.
- Repotting: As the Araucaria columnaris grows, it may outgrow its current pot. Repot it into a larger container with fresh potting soil every couple of years or when the roots begin to fill the pot.
- Winter care: Araucaria columnaris is not frost-tolerant. If you live in a cold climate, consider moving the plant indoors or providing protection during the winter months.
By following these steps and providing the plant with proper care, you can successfully grow Araucaria columnaris and enjoy its beautiful and unique appearance.

Place in a bright room that is sun drenched almost all day. Or directly in a south-facing window.

To properly water this plant, it is important to first check the moisture level of the soil. Use a moisture meter or insert your finger into the soil up to the second knuckle to determine if the soil is dry. If the soil is dry, water the plant until excess moisture starts to flow out of the drainage holes. Avoid over-watering and allowing the plant to sit in standing water, as this can lead to root rot. Allow the top inch of soil to dry out before watering again, and adjust the frequency of watering based on the environment and season. It is important to note that this plant prefers well-draining soil and may require less watering during the winter months.
To fertilize this plant, use a balanced fertilizer with equal parts nitrogen, phosphorus, and potassium. Apply the fertilizer during the growing season, which is typically spring and summer. Follow the instructions on the fertilizer packaging for the correct amount to use. Be careful not to over-fertilize, as this can harm the plant. Water the plant thoroughly after fertilizing to help distribute the nutrients throughout the soil.
The recommended soil for Araucaria Columnaris plant is a well-draining, acidic mix. Ideal soil mix should consist of 50% peat moss or high-quality potting soil, 25% perlite or vermiculite, and 25% sharp sand or fine bark. It’s important to have a container with drainage holes to prevent waterlogging, which can cause root rot and ultimately lead to the death of the plant. A layer of gravel or rocks at the bottom of the pot can also aid in drainage. The use of fertilizer is not necessary, as this plant does not respond well to high levels of nutrients. It prefers a humid environment and indirect sunlight.
To propagate this particular plant, you need to start by selecting a healthy mature specimen with healthy and strong foliage, which is free from any insect or disease. Next, take a cutting from the plant, making sure to choose a stem that is about 10-15 cm long and has several nodes. Remove any foliage from the lower half of the cutting and dip the cut end into rooting hormone.
Place the cutting in well-draining soil that has been moistened and cover it with a plastic bag or a clear plastic container to create a humid environment. Keep the soil moist but not waterlogged and place the container in a warm and bright location, but out of direct sunlight.
After a few weeks, you should see new growth emerging from the cutting, which indicates that it has successfully rooted. Once the roots have established, you can transfer the new plant to a larger pot with fresh soil or plant it in your desired location in the garden.
Remember to take care of your new plant by providing it with water and nutrients as needed and protecting it from pests and diseases.
Common pests of the new caledonia pine include Mealybugs. Make a habit of checking your new caledonia pine frequently for pests so that any infestations can be caught and managed early.


