Plant Overview
The Monkey Jack (or Artocarpus rigidus) is a rugged, tropical relative of the famous Jackfruit and Breadfruit. Hailing from the dense rainforests of Southeast Asia, this tree is often called "Tempenek" by locals who appreciate its wild, tangy fruit. It is a majestic canopy tree that brings an ancient, jungle-like aesthetic to any large landscape, standing as a sturdy survivor of the equatorial heat.
🔍 How to Identify
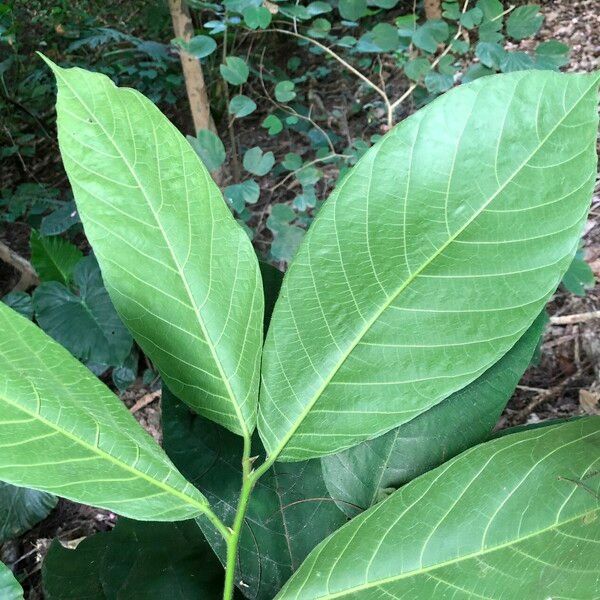
- 🍃 Rigid Foliage: True to its name, the leaves are notably stiff and leathery. They are elliptic in shape, with a glossy dark-green top and a slightly rough, sandpapery texture underneath.
- 🌕 Bristly Fruit: The fruit is roughly the size of a grapefruit and looks like a miniature, orange Jackfruit. It is covered in stiff, blunt protuberances that give it a "spiky" appearance.
- 🌳 Tall Stature: In the wild, it can reach towering heights, featuring a straight trunk with grey-brown bark that bleeds a thick, milky white sap if damaged.
🏡 In Your Garden
- 🌞 Sun & Space: This is a tree that demands the spotlight. It requires full sun to produce fruit and needs significant vertical and horizontal space, making it better suited for large estates or botanical collections than small backyards.
- 💧 Hydration Nuance: While it is surprisingly drought-tolerant once its deep taproot is established, it produces the best fruit when kept in humid, well-draining soil that mimics the consistent moisture of a tropical rainforest.
⚠️ Safety & Toxicity
- ✅ Safe for Consumption: The bright orange pulp inside the fruit is edible and prized for its sweet-sour flavor profile.
- 🧤 Sticky Latex: The entire tree contains a thick, milky latex. While not toxic, it is incredibly sticky (almost like glue) and can cause mild skin irritation for people with latex allergies. It is best to wear gloves when pruning or harvesting.
✨ Fun Fact
The Monkey Jack is a favorite snack for primates in the wild. Monkeys serve as the tree's primary "gardeners" by eating the fruit and dispersing the large, hard seeds throughout the forest, ensuring the next generation of trees can grow!

Detailed Care Instructions
To grow an Artocarpus Rigidus plant, also known as the ironwood tree or plei, you can follow these steps:
- Choose the right location: Artocarpus Rigidus prefers full sun to partial shade. Select a spot in your garden with well-drained soil and enough space for the tree to grow.
- Prepare the soil: Ensure the soil is rich in organic matter and well-drained. You can amend the soil with compost or well-rotted manure to improve its fertility and drainage.
- Planting: Dig a hole twice as wide and deep as the root ball of the plant. Place the plant in the hole, ensuring the top of the root ball is at ground level. Backfill the hole with soil, gently firming it around the roots.
- Watering: After planting, water the tree thoroughly to settle the soil and provide moisture to the roots. Keep the soil consistently moist during the establishment period.
- Mulching: Apply a layer of organic mulch around the base of the tree, about 2-3 inches deep. Mulch helps retain moisture, suppress weeds, and regulate soil temperature.
- Pruning: Prune the tree to remove any dead or damaged branches, or to shape it as desired. However, Artocarpus Rigidus generally requires minimal pruning.
- Fertilizing: Apply a balanced slow-release fertilizer once a year during the growing season, following the manufacturer's instructions. Avoid over-fertilizing, as it can cause excessive leafy growth instead of focusing on establishing a strong root system.
- Pest and disease control: Monitor for common pests like scale insects, aphids, or mealybugs. Treat them with organic or chemical insecticides as necessary. A healthy plant is less susceptible to diseases, so focus on providing optimal growing conditions.
- Winter protection: Artocarpus Rigidus is generally hardy, but if you live in a cold climate, protect the tree during winter by wrapping it with burlap or providing a windscreen to shield it from harsh winds.
- Patience: Artocarpus Rigidus can be slow-growing, so be patient and provide consistent care. It can take several years for the tree to reach its full height and potential.
Remember to research the specific needs of Artocarpus Rigidus and adjust the care accordingly to ensure its health and growth.
When it comes to watering the Artocarpus Rigidus plant, it is essential to provide adequate moisture without overwatering. Here are some detailed guidelines to help you water this particular plant species effectively:
- Understanding the plant's water requirements: Artocarpus Rigidus typically prefers moderately moist soil. While it appreciates a good amount of water, it is also crucial to allow the soil to partially dry out between waterings to prevent waterlogged conditions.
- Watering frequency: The frequency of watering depends on various factors such as climate, season, and soil type. As a general rule, water the plant thoroughly once the top inch (2.5 cm) of soil feels dry to the touch. This ensures that the water penetrates deep into the root zone.
- Measuring water quantity: To determine the amount of water needed, consider the plant's size and the pot's size. Aim to provide enough water to wet the entire root ball without leaving the plant sitting in a saucer of water or causing excessive runoff.
- Watering technique: When watering, direct the water at the base of the plant, near the root zone. This helps deliver water directly to the roots and reduces splashing on the foliage, which can contribute to the development of diseases.
- Soil drainage: Adequate soil drainage is crucial to prevent waterlogging, which can adversely affect the plant's health. If the plant is not in a well-draining soil mix, consider adding organic matter and perlite or sand to improve drainage.
- Mulching: Applying a layer of mulch around the plant can help retain soil moisture, reduce evaporation, and regulate soil temperature. However, ensure that the mulch is not piled against the plant's stem to avoid moisture-related problems.
- Observing plant response: Pay attention to how the plant responds to watering. Wilted or droopy foliage can indicate a need for more water, while yellowing leaves or signs of root rot may indicate overwatering. Adjust the watering schedule accordingly based on these observations.
By considering these guidelines, you can maintain a healthy watering routine for your Artocarpus Rigidus plant, ensuring it receives the appropriate moisture for optimal growth and well-being.
When fertilizing Artocarpus Rigidus, it is important to consider its specific nutritional needs. Here is a general guide for fertilizing this plant:
- Choose a balanced fertilizer: Look for a fertilizer with an NPK ratio of 10-10-10 or similar. This means it contains equal proportions of nitrogen (N), phosphorus (P), and potassium (K), which are essential macronutrients for plant growth.
- Apply during the growing season: Start fertilizing in early spring or when new growth appears. Continue fertilizing every 4-6 weeks throughout the active growing season, typically until late summer or early fall.
- Dilute the fertilizer: Mix the recommended amount of fertilizer with water according to the package instructions. It is essential not to over-concentrate the fertilizer, as this may damage the plant's roots.
- Apply evenly: Pour the diluted fertilizer solution around the base of the plant, making sure to moisten the soil surrounding the roots. Avoid applying directly onto the foliage to prevent burning.
- Water thoroughly: After fertilizing, water the plant thoroughly to help distribute the nutrients and prevent any potential salt build-up.
- Monitor leaf color and growth: Regularly observe the plant's foliage for signs of nutrient deficiency or excess. Adjust the fertilizer application rate accordingly if you notice pale or yellowing leaves or stunted growth. Always follow the plant's specific requirements for best results.
Remember to always consult specific guidelines for Artocarpus Rigidus, as fertilizer preferences can slightly vary depending on the species or specific growth conditions.
Artocarpus Rigidus is a tropical plant that belongs to the Moraceae family. To ensure optimal growth and development, it is important to select the right type of soil. This plant prefers a specific soil composition that mimics its native habitat.
The ideal soil for Artocarpus Rigidus should have excellent drainage capabilities. It should not be overly compacted or heavy, as this can lead to waterlogging and root rot. Loose, friable soil that allows water to pass through easily is desirable.
Furthermore, Artocarpus Rigidus thrives in slightly acidic to neutral soil pH levels. A pH range of 6.0 to 7.0 is ideal for its growth. This ensures that the plant can efficiently absorb essential nutrients from the soil.
In terms of soil texture, Artocarpus Rigidus tolerates various types, including loamy, sandy, or clay soils. However, the soil should have good moisture retention capacity, allowing the plant's roots to access sufficient water without retaining excessive amounts that could potentially cause root rot.
To enhance soil fertility, it is recommended to incorporate organic matter such as compost or well-rotted manure. This helps improve soil structure, nutrient content, and moisture retention. Regular applications of organic fertilizers can also promote healthy growth and flowering.
It is important to note that Artocarpus Rigidus prefers a soil that is rich in nutrients, as it is a heavy feeder. Providing a balanced fertilizer with a higher nitrogen content during the growing season can aid in its overall development.
To summarize, Artocarpus Rigidus prefers well-draining, slightly acidic to neutral soil with good moisture retention capacity. Incorporating organic matter into the soil and providing regular fertilization can help ensure its robust growth.
Artocarpus Rigidus is a plant that can be propagated through various methods such as seed propagation, stem cuttings, and air-layering. Here are the steps involved in propagating Artocarpus Rigidus:
- Seed Propagation:
- Collect ripe fruits of Artocarpus Rigidus.
- Remove the outer skin and pulp to extract the seeds.
- Wash the seeds thoroughly to remove any remaining pulp.
- Place the seeds in a container of warm water and allow them to soak for 24 hours.
- Prepare a well-draining potting mixture by combining equal parts of peat moss and perlite.
- Fill small pots or seed trays with the potting mixture.
- Plant the seeds in the potting mixture, burying them about 1 inch deep.
- Place the pots or trays in a warm and bright location, preferably under grow lights or in a greenhouse.
- Keep the potting mixture consistently moist but not waterlogged.
- Germination may take several weeks or even months, so be patient.
- Once the seedlings have developed several sets of leaves, they can be transplanted into larger pots or directly into the garden.
- Collect ripe fruits of Artocarpus Rigidus.
- Stem Cuttings:
- Take stem cuttings from a healthy and mature Artocarpus Rigidus plant during the active growing season.
- Choose a stem that is neither too young nor too old and has at least three sets of leaves.
- Using a clean and sharp pair of pruning shears, cut a 6-8 inch long section of the stem just below a leaf node.
- Remove any leaves from the lower half of the cutting.
- Dip the cut end of the stem into a rooting hormone powder or gel to promote root development.
- Insert the cutting into a pot filled with a well-draining potting mixture.
- Firmly press the potting mixture around the base of the cutting to secure it in place.
- Place the pot in a warm and humid location, preferably under a plastic bag or in a propagating case.
- Mist the cutting and potting mixture regularly to maintain humidity.
- After a few weeks to a couple of months, roots should begin to form.
- Once the cutting has rooted, it can be transplanted into a larger pot or directly into the garden.
- Take stem cuttings from a healthy and mature Artocarpus Rigidus plant during the active growing season.
- Air-layering:
- Select a healthy and mature stem of Artocarpus Rigidus.
- Make a 1-inch long upward slanting cut through the bark and into the wood of the stem.
- Apply rooting hormone to the exposed wood to stimulate root development.
- Surround the cut area with moist sphagnum moss and wrap it with plastic wrap.
- Secure the plastic wrap with tape to create a sealed and humid environment.
- Check the moss periodically to ensure it remains moist, misting if necessary.
- After several weeks to a few months, roots should start to form within the moss.
- Once sufficient roots have developed, carefully cut below the air-layered section, ensuring that each root remains intact.
- Pot the air-layered section in a suitable growing medium and provide it with proper care until it establishes itself.
These propagation methods can help you successfully grow new Artocarpus Rigidus plants, allowing you to expand your collection or share them with fellow plant enthusiasts.
- Select a healthy and mature stem of Artocarpus Rigidus.


