Plant Overview
Often called the Desert Milkweed or Mohave Milkweed, Asclepias erosa is a rugged survivor of the American Southwest. While other plants wither under the scorching desert sun, this milkweed thrives, standing tall as a critical lifeline for migrating Monarch butterflies. With its architectural, pale foliage and structural presence, it looks like a piece of living sculpture designed specifically for the heat.
🔍 How to Identify
- 🍃 The Leaves: Look for large, oval, and exceptionally thick leaves. They are a distinctive pale green or yellowish-gray, often featuring a velvety or waxy texture that helps the plant reflect intense UV rays.
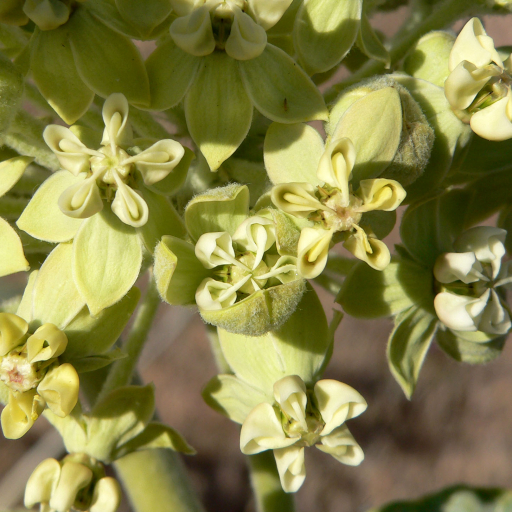
- 🌸 The Blooms: Unlike the bright orange of some relatives, these flowers are sophisticated clusters (umbels) of star-shaped blooms in shades of creamy white, soft buttery yellow, or pale lime green.
- 💧 The Sap: If a leaf or stem is damaged, the plant immediately "bleeds" a thick, sticky white latex. This "milk" is a defensive mechanism against many hungry insects.
🏡 In Your Garden
- 🏜️ Heat-Seeker: This plant is a specialist for xeriscaping. It thrives in rocky, sandy, or poor-quality soil where other plants might fail. It requires maximum sun exposure and prefers to dry out completely between waterings.
- 🚷 The Taproot Rule: Asclepias erosa develops a deep, sturdy taproot to find water far underground. Because of this, it is notoriously difficult to transplant once established. Choose its "forever home" in your garden carefully, as moving it can be fatal to the plant.
⚠️ Safety & Toxicity
- 🚫 Status: Toxic to humans and pets.
- 🧴 Details: The plant contains cardiac glycosides. If ingested, it can cause nausea, spasms, or more serious heart issues in pets, livestock, and humans. The milky sap can also cause skin rashes or severe eye irritation; always wear gloves when pruning and wash your hands immediately afterward.
✨ Fun Fact
🦋 Desert Life-Saver: While many garden milkweeds struggle in the arid heat, Asclepias erosa is one of the primary host plants for Monarch butterflies in the Mojave and Sonoran deserts. It serves as both a "nursery" for their caterpillars and a high-energy nectar station for the traveling adults.

Detailed Care Instructions
To grow Asclepias Erosa, also known as the Desert Milkweed, you can follow these steps:
- Obtain seeds: Purchase seeds of Asclepias Erosa from a reputable seed supplier or collect them from mature plants if available.
- Germination: Start the germination process indoors about 6 to 8 weeks before the last frost date in your area. Place the seeds in a container with moistened seed-starting soil and cover lightly with a thin layer of soil.
- Provide proper conditions: Asclepias Erosa requires full sunlight, so place the containers in a sunny location. Keep the soil consistently moist but not soaked. Use a spray bottle or misting sprayer to water gently, ensuring the seeds or seedlings are not disturbed.
- Transplanting: After the last frost date, when the seedlings are about 2-3 inches tall with a few leaves, transplant them into individual pots or directly into the ground. If transplanting outdoors, make sure the soil has warmed up and all danger of frost has passed. Space the plants about 1-2 feet apart.
- Soil requirements: Asclepias Erosa prefers well-draining, sandy or loamy soil with good fertility. If your soil is heavy or clay-like, amend it with organic matter like compost or sand to improve drainage.
- Watering: Water the plants deeply but infrequently. Once established, Asclepias Erosa is drought-tolerant, but during the initial stages, regular watering is important until the roots develop.
- Mulching: Apply a layer of organic mulch, like straw or wood chips, around the plants to help retain moisture, control weeds, and regulate soil temperature.
- Pruning: Prune any dead or damaged parts of the plant to maintain its health and appearance.
- Pests and diseases: Asclepias Erosa is generally resistant to pests and diseases, but keep an eye out for common issues such as aphids or milkweed bugs. If any infestations occur, manually remove the pests or use organic methods for control.
- Attracting butterflies: Asclepias Erosa is a host plant for monarch butterflies. By providing this plant in your garden, you can support their lifecycle and encourage the presence of these beautiful insects.

Place in a bright room that is sun drenched almost all day. Or directly in a south-facing window.

Asclepias Erosa is a type of plant that requires specific watering techniques to maintain its health and growth. To water this plant, you should follow these steps:
1. Identify the soil type: Asclepias Erosa prefers well-draining soil, so it's essential to understand the soil type before watering. If the soil is sandy or loamy, it may dry out faster than clay soil, which retains moisture for longer.
2. Check the moisture level: Before watering, it's best to check the soil's moisture level. You can do this by inserting your finger into the soil about an inch deep. If it feels dry, it's time to water. If it's moist, wait a few days.
3. Water deeply: When watering Asclepias Erosa, it's essential to water deeply to encourage deep root growth. Use a watering can or hose to water the soil around the roots until the water seeps into the ground.
4. Avoid getting leaves wet: Asclepias Erosa is susceptible to fungal diseases, so it's essential to avoid getting the leaves wet when watering. Instead, aim the water at the base of the plant, near the roots.
5. Water in the morning: It's best to water Asclepias Erosa in the morning when the temperatures are cooler. This allows the water to soak into the ground before the heat of the day causes evaporation.
By following these watering techniques, you can help Asclepias Erosa thrive and flourish.
To fertilize this plant, use a balanced fertilizer with an N-P-K ratio of 10-10-10 or 20-20-20. Apply the fertilizer in early spring when new growth begins. Follow the manufacturer's instructions for application rates and methods. Be careful not to apply too much fertilizer, as it can burn the plant's roots. Water the plant thoroughly after fertilizing to help the nutrients reach the roots. Repeat fertilization every 4-6 weeks during the growing season, but stop fertilizing in late summer to allow the plant to prepare for dormancy.
Asclepias Erosa plants prefer a well-draining soil that is nutrient-rich and has a pH range of 6.0 to 7.5. It is recommended to use a mix of sand, perlite, and garden soil to create the ideal soil conditions for this plant. Additionally, it is important to avoid using heavy clay soils that can retain too much moisture and cause root rot. Mulching with organic material such as dried leaves, straw, or wood chips can also help retain moisture and nutrients while suppressing weed growth.
To propagate this plant, you'll need to take stem cuttings from healthy, mature plants. Choose a stem that is at least 4 inches long and has several nodes or leaf joints. Using a sharp, sterile pair of scissors or pruning shears, cut the stem at a 45-degree angle just below a node.
Remove the lower leaves from the stem, leaving only two or three at the top. Dip the cut end of the stem in rooting hormone powder to encourage root growth. Plant the stem cutting in a container filled with moist potting soil, making sure the node where the leaves were removed is buried in the soil.
Place the container in a warm, bright location but out of direct sunlight. Mist the soil regularly to keep it moist but not soaking wet. After a few weeks, the cutting should start to develop roots. You can gently tug on the stem to check for resistance, which indicates the formation of a root system.
Once the plant has several established roots, you can transplant it into a larger container or into the ground. It's best to wait until the plant is at least a few inches tall and has a few leaves before transplanting. Water the plant regularly and provide it with plenty of sunlight to help it grow strong and healthy.


