Plant Overview
Often called the "Siberian Aster" or the "Tatarian Daisy," Aster tataricus is a towering giant of the autumn garden. In many Asian cultures, it is a symbol of remembrance and "the last goodbye" because it remains vibrant and blooming long after other flowers have succumbed to the frost. It is one of the oldest cultivated species in the Aster family, prized for its ability to bring a final, dramatic splash of lavender to a fading landscape.
🔍 How to Identify
- 🌸 Towering Height: Unlike its shorter, mounded cousins, this plant is a vertical marvel, frequently soaring to heights of 6 to 8 feet on remarkably sturdy, upright stems.
- 🍃 Paddle Leaves: The basal (bottom) leaves are massive—sometimes 2 feet long—with a rough, sandpaper-like texture and a distinct paddle shape that tapers toward the stem.
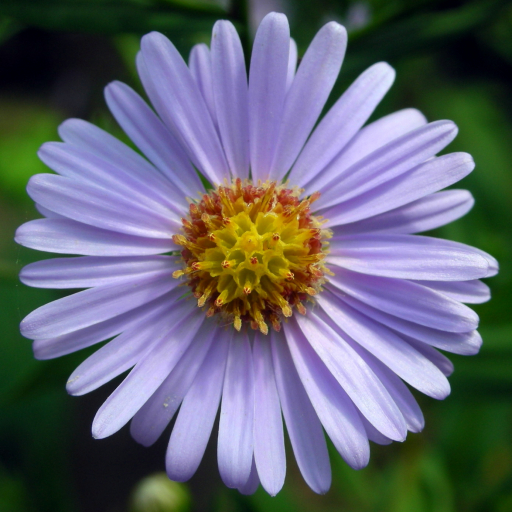
- 🌼 Late-Season Stars: The flowers appear in flat-topped clusters; each small bloom features a bright "sunny-side-up" yellow center surrounded by delicate lavender or pale violet ray petals.
🏡 In Your Garden
- 🦋 The Pollinator "Last Call": Because it blooms from late September through November, it acts as a critical fuel station for migrating Monarch butterflies and late-season bees when other nectar sources have dried up.
- 💪 Structural Strength: Despite its extreme height, the stems are incredibly woody and resilient. Unlike many tall perennials, it rarely requires staking or support, even in windy garden spots or after a heavy autumn rain.
⚠️ Safety & Toxicity
- ✅ Generally Safe: Aster tataricus is not considered toxic to humans and has actually been used for centuries in Traditional Chinese Medicine (known as Zi Wan) to treat respiratory ailments.
- 🐾 Pet Friendly: This plant is generally safe for cats, dogs, and horses. However, it is always wise to prevent pets from grazing on garden plants, as large amounts of any fibrous foliage can cause mild digestive upset.
✨ Fun Fact
In Japan, this flower is known as Shion. According to ancient folklore and the "Language of Flowers" (Hanakotoba), giving someone a Tatarian Aster means "I will never forget you" or "You are always in my thoughts."

Detailed Care Instructions
To grow Aster Tataricus plant, follow these steps:
- Choose a suitable location: Ensure that the plant receives full sun to partial shade. The soil should be well-draining, fertile, and rich in organic matter.
- Planting: Plant the Aster Tataricus seeds or seedlings in spring or early summer after the last frost. Dig a hole slightly larger than the root ball and place the plant in it. Space multiple plants about 18-24 inches apart to allow for their spreading habit.
- Watering: Water the plant deeply after planting, then maintain regular watering. Keep the soil evenly moist but avoid overwatering, as excessive moisture can lead to root rot. Water at the base of the plant, avoiding wetting the foliage.
- Mulching: Apply a layer of organic mulch around the plant to retain soil moisture, suppress weeds, and provide insulation during extreme temperatures. Mulch also improves soil fertility over time.
- Fertilizing: Apply a balanced, slow-release fertilizer in spring when new growth appears. Follow the package instructions for proper dosage. Additional fertilizer may not be necessary if the soil is already fertile.
- Support: Aster Tataricus plants can grow tall and may require support to prevent bending or toppling over. Use plant stakes or garden netting to provide support for the stems.
- Pruning: Trim back the plant in late fall or early spring to remove any dead or damaged foliage. This will help promote healthy growth and prevent diseases.
- Pest and disease control: Monitor the plant regularly for any signs of pests or diseases. Treat accordingly with organic or chemical controls, depending on your preference.
- Division: Every few years, divide the plant in early spring to maintain its vigor and prevent overcrowding. Dig up the plant and separate the clumps, then replant them in well-prepared soil.
- Winter care: In colder regions, apply a layer of mulch around the base of the plant in late fall to protect it from harsh winter conditions. This will help insulate the roots and increase the chances of survival.
By following these steps, you can successfully grow Aster Tataricus plant and enjoy its beautiful blooms in late summer to early fall.

Place in a bright room that is sun drenched almost all day. Or directly in a south-facing window.

To water this plant, it is important to use a watering can or hose with a gentle flow to avoid damaging the fragile flowers. It is recommended to water deeply once a week, rather than giving frequent shallow watering. The soil should be allowed to dry slightly before watering again. Be sure to water at the base of the plant, avoiding the leaves and flowers to prevent mildew and fungal diseases. It is important to provide adequate drainage to prevent the plant from sitting in standing water. Watering should be adjusted depending on weather conditions, with more frequent watering needed during hot and dry spells.
To fertilize this plant, scatter a balanced slow-release granular fertilizer around the base of the plant, avoiding direct contact with the stem. Water thoroughly after application to help the fertilizer penetrate the soil. Repeat every 4-6 weeks during the growing season, reducing frequency during the winter months. Avoid over-fertilization, as this can lead to excessive leaf growth at the expense of flowers.
Aster Tataricus prefers well-drained, slightly acidic soils that are rich in organic matter. It does well in loamy or sandy soils with a pH between 6.0 and 7.5. The soil should be moist but not waterlogged, as this plant does not tolerate wet feet. Adding compost or aged manure to the soil before planting can improve fertility and soil structure. It is always a good idea to test the soil before planting to determine its nutrient and pH levels. If necessary, adjust the soil pH using lime or sulfur. Avoid using heavy clay soils or soils with high salinity, as these can be problematic for Aster Tataricus.
To propagate this plant, you will need to start with a healthy and mature specimen. You can then take cuttings from the stem or divide the roots of the plant. If taking stem cuttings, make sure to choose a portion of the stem that is free from any damage or disease.
Using a sharp, sterile knife or shears, cut a section of stem that is about four inches long. Remove the leaves from the lower two inches of the stem and dip the cut end in a rooting hormone powder.
Place the stem cutting into a container filled with moist soil or vermiculite. Cover the container with clear plastic to create a miniature greenhouse. Keep the soil moist but not waterlogged, and place the container in a bright, indirect light.
After a few weeks, the cutting should produce roots. You can carefully transplant it into its own pot or into your garden.
If you prefer to divide the roots of the plant, carefully dig up the entire plant and gently pull apart the clumps of roots. Each clump should have some healthy leaves and roots. Plant the divided clumps immediately into soil or in separate containers.
With proper care and attention, your newly propagated plant should grow into a healthy and vibrant specimen.