Plant Overview
Known as the Eared Lady Fern, this deciduous beauty is a standout in the world of shade gardening. While many ferns are purely green, the Athyrium otophorum surprises the eye with a sophisticated color palette of pale lime-green fronds held up by striking burgundy-red stems. It is often described by enthusiasts as one of the most "refined" ferns due to its airy, graceful structure and unique color contrast.
🔍 How to Identify
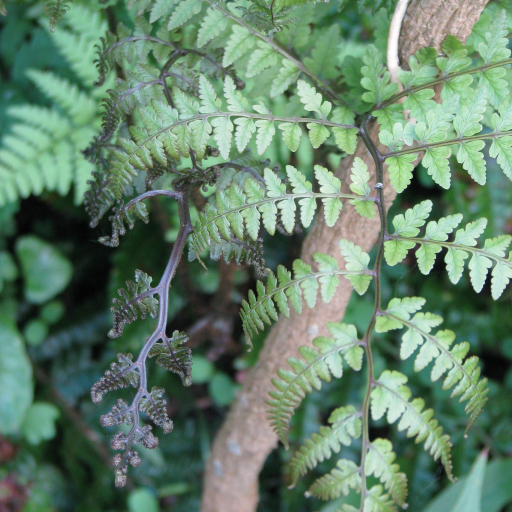
- 👂 The "Ears": Its name comes from the small, ear-like lobes (auricles) located at the base of each leaflet, which point backward toward the main stem.
- 🎨 Burgundy Stems: The central stalks (rachis) are a deep, wine-red color, which creates a dramatic visual against the pale green foliage.
- 🍃 Triangular Fronds: The leaves have a distinct triangular or "deltoid" shape, appearing much broader at the base than at the tip, with a soft, matte texture.
🏡 In Your Garden
- ☁️ Light Play: This fern acts like a natural highlighter for dark corners. It prefers bright, indirect light; too much direct sun will scorch its delicate fronds, while too much deep shade can dull the vibrant red of its stems.
- 💧 Thirsty Roots: It lacks the drought tolerance of some sturdier ferns. It prefers "consistently moist but not soggy" soil. If the soil dries out completely, the fronds will quickly turn brittle and brown.
- 🍂 Seasonal Slumber: Being deciduous, it will completely disappear in the winter. Don't worry—it isn't dead! It is simply storing energy in its rhizomes to push out fresh, colorful growth in the spring.
⚠️ Safety & Toxicity
- 🐾 Pet Friendly: This fern is generally considered non-toxic to cats and dogs, making it a safe choice for pet-filled households.
- 👶 Mild Irritant: While not poisonous, the spores on the underside of the leaves or the fuzz on young "fiddleheads" can occasionally cause mild skin irritation for people with very sensitive skin.
✨ Fun Fact
The Athyrium otophorum is a "late riser" in the garden. While other ferns might start poking through the soil in early spring, this species often waits until the ground is thoroughly warm before unfurling its fiddleheads, often surprising gardeners who thought it hadn't survived the winter!

Detailed Care Instructions
Growing Athyrium otophorum, commonly known as the Eared Lady Fern, requires attention to certain conditions to ensure healthy development. Here’s a guide to help you grow this beautiful fern:
1. Location and Light:
- Shade and Indirect Light: Athyrium otophorum thrives best in shaded to partially shaded areas. Avoid direct sunlight, which can scorch the delicate fronds.
- Indoors Placement: If you're growing it indoors, place it near a north or east-facing window where it can receive indirect light.
2. Soil:
- Well-Draining Soil: Use a rich, organic, well-draining soil. A mix designed for ferns or a peat-based potting mix works well.
- pH Levels: Slightly acidic to neutral pH (around 6.0 to 7.0) is ideal.
3. Watering:
- Consistent Moisture: Keep the soil consistently moist but not waterlogged. Water the plant regularly, particularly during dry periods.
- Avoid Overwatering: Ensure good drainage to prevent root rot.
4. Humidity:
- High Humidity: This fern prefers high humidity environments. Mist the plant regularly or place a humidifier nearby to maintain adequate moisture in the air, especially if indoor air is dry.
5. Temperature:
- Cool to Mild Temperatures: Ideal temperatures range from 60°F to 75°F (15°C to 24°C). It can tolerate slightly cooler temperatures but should be protected from frost.
6. Fertilization:
- Mild Fertilizer: Feed with a balanced, water-soluble fertilizer diluted to half-strength every 4-6 weeks during the growing season (spring and summer).
7. Pruning and Maintenance:
- Remove Dead Fronds: Regularly remove any yellow or dead fronds to keep the plant healthy and encourage new growth.
- Repotting: If the plant outgrows its pot, repot it in a slightly larger container with fresh potting mix.
8. Pests and Diseases:
- Watch for Pests: Common pests include aphids, scales, and spider mites. Treat infestations promptly with insecticidal soap or neem oil.
- Prevent Diseases: Ensure good air circulation around the plant and avoid overwatering to prevent fungal diseases.
9. Propagation:
- Division: The easiest method to propagate Athyrium otophorum is by division. Carefully divide the clumps of the plant during the spring and plant the divisions in separate pots or garden spots.
Tips for Success:
- Consistency is Key: Maintain consistent watering and humidity levels.
- Mulching: Apply a layer of mulch around the base to retain moisture if growing outdoors.
- Regular Observation: Keep an eye on the plant for any signs of stress, pests, or disease and act promptly.
By following these guidelines, you can create an environment in which your Athyrium otophorum will thrive and add lush greenery to your garden or indoor space.

Place in a window with dappled sun or a spot in the middle of a room. Or directly in a window facing west or east.

Watering Athyrium otophorum effectively involves ensuring that you meet its moisture needs without overwatering, which can lead to root rot. Here's a detailed guide on how to properly water this plant:
1. **Moisture Levels**: This plant prefers consistently moist soil. The soil should never be allowed to dry out completely but should not be waterlogged either.
2. **Soil Check**: Before watering, check the moisture level of the soil. You can do this by sticking your finger about an inch into the soil. If it feels dry at this depth, it's time to water.
3. **Watering Method**: Water the plant thoroughly, ensuring that the water reaches the root zone. Pour water evenly around the base of the plant until water starts to drain out from the bottom of the pot (if potted) or until the soil feels evenly moist (if planted in the ground).
4. **Frequency**: The frequency of watering will depend on various factors including the climate, the soil type, and the season. Generally, during the growing season, you might need to water more frequently, while in the dormant season (typically winter), the watering can be reduced.
5. **Humidity**: This plant thrives in higher humidity environments. If you live in a dry climate, consider increasing humidity around the plant by misting it regularly or placing a humidity tray (a tray with water and pebbles) near the plant to ensure sufficient moisture in the air.
6. **Container Considerations**: If the plant is in a pot, ensure that it has drainage holes to prevent water from accumulating at the bottom. This prevents waterlogging and promotes healthy root growth.
7. **Water Quality**: Use room-temperature water to avoid shocking the plant. If possible, use filtered or rainwater to avoid any chlorine or fluoride that may be present in tap water, which could be harmful to the plant over time.
By carefully monitoring and maintaining the appropriate moisture levels, you can help ensure the healthy growth of your Athyrium otophorum.
Here are the fertilizing instructions for Athyrium Otophorum:
- Timing: Fertilize the plant during its active growing season, which typically falls in the spring and summer months. Reduce or stop fertilizing during the fall and winter when the plant's growth slows down.
- Type of Fertilizer: Use a balanced, water-soluble fertilizer with an equal ratio of nitrogen, phosphorus, and potassium (e.g., 10-10-10 or 20-20-20). Alternatively, you can use a fertilizer specifically formulated for ferns if available.
- Dilution: Dilute the fertilizer to half the recommended strength as indicated on the package. Over-fertilizing can harm the plant, so it’s better to err on the side of caution.
- Application Frequency: Apply the diluted fertilizer once a month during the growing season. Ensure that the soil is already moist before applying the fertilizer to prevent root burn.
- Application Method: You can either pour the diluted fertilizer solution directly onto the soil around the plant or foliar feed by spraying it onto the foliage. If foliar feeding, make sure to spray the undersides of the fronds as well.
- Organic Alternatives: If you prefer organic options, you can use a diluted fish emulsion or seaweed extract instead. These should also be applied once a month during the growing season.
- Monitoring: Keep an eye on the plant for any signs of over-fertilization, such as yellowing leaves or burnt leaf tips, and adjust your fertilizing routine accordingly.
By following these guidelines, you’ll help ensure that your Athyrium Otophorum remains healthy and vibrant.
The Athyrium Otophorum plant thrives best in well-drained, humus-rich soil with a slightly acidic to neutral pH level, typically ranging from 5.5 to 7.0. Ideal soil for this plant would be one that retains moisture well without becoming waterlogged, emulating the moist, shaded woodland environments it naturally prefers.
When preparing the soil, it's beneficial to incorporate organic matter such as compost, leaf mold, or well-rotted manure to improve its nutrient content and structure. This not only aids in water retention but also ensures good aeration around the roots. Additionally, amending the soil with peat moss can help to acidify it slightly, if necessary.
Maintaining consistent moisture levels is crucial for this plant, so mulching around the base with organic materials like shredded bark or compost can help conserve soil moisture and suppress weeds. When watering, ensure the soil remains evenly moist but not saturated, as overly wet conditions can lead to root rot and other issues.
Overall, a rich, well-aerated, and consistently moist soil that mimics its natural habitat will provide the best growing conditions for the Athyrium Otophorum plant.
Propagating Athyrium otophorum can be done through both division and spore propagation. Here’s a detailed guide on how to do it using each method:
Division Method
- Best Time: Early spring or late fall is the ideal time for division, as the plant is either coming out of dormancy or going into it.
- Prepare the Tools: Gather a clean, sharp spade or garden knife, and a pair of gloves.
- Dig Up the Plant: Carefully dig around the plant to lift it from the ground, ensuring you keep the root system as intact as possible.
- Divide the Rhizomes: Gently shake off excess soil and examine the root system. Using your knife or spade, divide the rhizomes into sections, making sure each section has several fronds and a healthy portion of roots.
- Replant: Immediately replant the divided sections in your desired location or container. Plant them at the same depth they were originally growing.
- Watering: Water the newly transplanted divisions thoroughly to reduce transplant shock.
- Care: Keep the soil consistently moist and place the divisions in a shaded or partially shaded location to simulate their natural habitat.
Spore Propagation Method
- Collecting Spores: In late summer or early fall, look for mature fronds bearing sori (clusters of spore-producing structures) on the underside. Cut the frond and place it in a paper bag to allow the spores to mature and fall out.
- Preparing the Soil: Use a mix of half peat and half sand or a specialized fern spore compost. Sterilize it by baking it in the oven at 180°F (82°C) for 30 minutes to prevent fungal growth.
- Sowing Spores: Prepare a shallow tray or container with the sterilized soil. Moisten the soil, scatter the spores evenly on the surface, and cover the tray with a clear plastic lid or a sheet of glass to create a humid environment.
- Optimal Conditions: Place the container in a location with indirect light and keep the temperature between 65°F and 75°F (18°C - 24°C). Do not allow the soil surface to dry out; maintain high humidity by misting with water.
- Germination: Spores will first develop into a prothallus, a small heart-shaped gametophyte, within a few weeks to several months. Once these structures are visible, ensure they remain moist to facilitate fertilization and the growth of sporophytes (young ferns).
- Transplanting Young Plants: When the sporophytes are a few inches tall and have developed several fronds, carefully transplant them into individual pots with a rich, well-draining soil mix.
- Acclimatization: Gradually acclimate the young plants to lower humidity and more natural conditions by removing the cover for increasing amounts of time each day.
Both methods require patience, as the growth rate can be slow, especially when propagating by spores. Proper care during the initial stages, such as maintaining adequate moisture and providing the right lighting conditions, is critical to the successful propagation of Athyrium otophorum.
Common pests of the eared lady fern include Mealybugs, spider mites, aphids. Make a habit of checking your eared lady fern frequently for pests so that any infestations can be caught and managed early.


