Plant Overview
Often called "Black Horehound" or "Stinking Horehound," this hardy perennial is a rugged and aromatic member of the mint family. Native to the Mediterranean but now found across Europe and North America, it is often seen reclaiming waste ground, roadsides, and hedgerows. While it lacks the sweet scent of its minty cousins, it has been a staple in European folklore for centuries, used to treat everything from "melancholy" to dog bites.
🔍 How to Identify
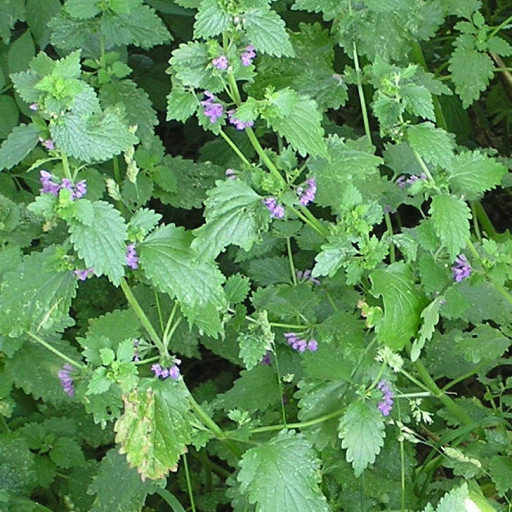
- 🌿 Crinkled Leaves: The dull green leaves are heart-shaped or ovate with deeply toothed edges and a soft, velvety texture due to a fine coating of hairs.
- 🔳 Square Stems: True to the Lamiaceae family, the plant features a distinctly four-sided, upright stem that can reach heights of up to 3 feet.
- 🌸 Hooded Flowers: In mid-to-late summer, small, tubular pink or purple flowers emerge in dense, tiered clusters (whorls) where the leaves meet the stem.
🏡 In Your Garden
- 🐝 Pollinator Magnet: While humans might find its musky, pungent scent off-putting, bees and butterflies are highly attracted to its nectar-rich blossoms.
- 🌱 Tough Transitions: It is a vigorous grower that thrives in nitrogen-rich, disturbed soil. Because it develops a deep, woody root system, it can be difficult to transplant once it has claimed a spot in your garden.
⚠️ Safety & Toxicity
- 🟢 General Safety: Ballota nigra is considered non-toxic to humans and is not known to be poisonous to common household pets like cats or dogs.
- 👃 Sensory Warning: The plant is famous for its strong, unpleasant odor, often described as "musty" or "stale." This scent is the plant's natural defense, successfully discouraging most grazing animals from eating it.
✨ Fun Fact
In ancient Greek medicine, Black Horehound was a primary ingredient in a poultice used to treat rabies. It was traditionally mixed with salt and applied directly to "the bites of mad dogs" to prevent infection and calm the nerves of the patient.

Detailed Care Instructions
To grow Ballota Nigra, also known as Black Huşeini, you can follow these steps:
- Obtaining seeds or cuttings: You can either purchase seeds or obtain cuttings from an existing Ballota Nigra plant.
- Planting seeds or cuttings: If using seeds, plant them in well-draining soil. Sprinkle the seeds lightly on the soil surface and cover them with a thin layer of soil. Keep the soil moist but not waterlogged. If using cuttings, dip the cut ends in rooting hormone and plant them directly into moist soil.
- Location: Select a suitable location for the plant. Ballota Nigra prefers full sun to partial shade. Ensure the spot receives at least 6 hours of direct sunlight per day.
- Soil: The plant prefers well-draining soil that is nutrient-rich. You can amend the soil with organic matter such as compost to improve drainage and fertility.
- Watering: Water the plant regularly, particularly during the growing season. Keep the soil evenly moist but avoid overwatering, as it may cause root rot.
- Fertilization: Apply a balanced, slow-release fertilizer in spring to provide necessary nutrients. Follow the manufacturer's instructions for application rates.
- Pruning: Prune the plant lightly in early spring to remove any dead or damaged branches. This helps promote new growth and maintains the plant's shape.
- Pests and diseases: Ballota Nigra is generally resistant to most pests and diseases. However, keep an eye out for common garden pests such as aphids or mites. Treat any infestations promptly using organic or chemical methods.
- Propagation: If you want to expand your Ballota Nigra collection, you can propagate it through division. Divide the plant in early spring by carefully separating the roots and replanting them in separate pots or spaces.
- Winter care: Ballota Nigra is hardy in USDA zones 5-9 and can withstand frost and cold temperatures. However, in colder regions, mulch around the base of the plant in late fall to provide extra protection during winter.
With proper care and attention, your Ballota Nigra should grow well and provide you with its attractive foliage and flowers.

Place in a bright room that is sun drenched almost all day. Or directly in a south-facing window.

Ballota Nigra is a plant that requires moderate watering. Before watering, ensure that the soil is completely dry. You can check the soil moisture by sticking your finger 2-3 inches deep into the soil. If it feels dry, it's time to water the plant. Use a watering can or a hose to water the soil directly, avoiding watering the leaves. Ensure that the water reaches the roots of the plant. Do not overwater the plant, as this can lead to root rot. Water the plant once a week during the growing season and reduce the frequency during winter.
To fertilize this plant, use a balanced fertilizer with equal amounts of nitrogen, phosphorus, and potassium. Apply the fertilizer in the early spring before new growth appears, and then again in mid-summer. Use a slow-release fertilizer to prevent excessive growth and avoid fertilizing in the fall. Water the plant thoroughly before and after fertilizing.
The ideal soil for the Ballota Nigra plant is a well-draining, loamy soil with a slightly acidic to neutral pH level. It should also be rich in organic matter and nutrients, such as compost or aged manure. Additionally, the soil should be able to retain moisture without becoming waterlogged, as the plant prefers moderate watering. Avoid using heavy, clay-like soils, as they can impede drainage and lead to root rot.
To propagate the plant known as Ballota Nigra, one should start by taking stem cuttings from a healthy parent plant. The cutting should be around 4-6 inches in length and taken from the top of the plant. Remove any leaves from the bottom two inches of the stem and dip the cut end in rooting hormone powder.
Next, fill a small container with well-draining soil and moisten it slightly. Use a pencil or other tool to create a small hole in the soil and place the cutting into the hole. Press the soil gently around the stem to secure it in place. Cover the container with a plastic bag or place it in a propagator to create a humid environment.
Place the container in a bright, indirect light location and ensure the soil is kept moist but not waterlogged. After 4-6 weeks, roots should start to form and the cutting should have established itself. At this point, it can be gradually introduced to more light and eventually transplanted into a larger pot or garden bed.