Plant Overview
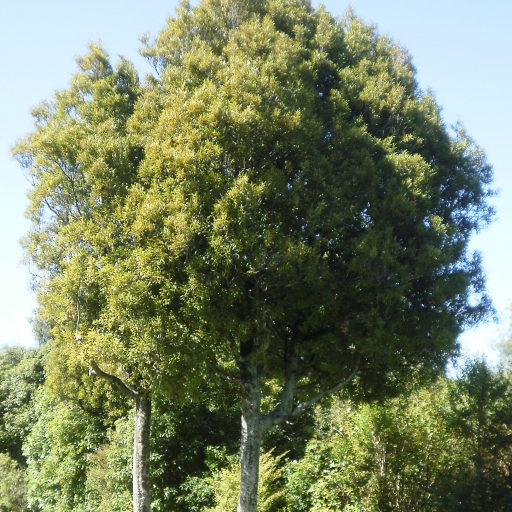
Often called simply the Tawa, this elegant evergreen is a cornerstone of New Zealand’s lowland forests. With its slender, willow-like foliage and towering stature, it creates a shimmering silver-green canopy that defines the bush. It is deeply connected to local history, once providing both a staple food source and high-quality timber for indigenous Māori communities.
🔍 How to Identify
- 🍃 The Leaves: Narrow, yellowish-green, and lance-shaped, they have a distinct "weeping" habit and a pale, waxy underside that glimmers in the wind.
- 🌑 The Fruit: It produces large, smooth, dark purple-black drupes that look remarkably like small olives or plums.
- 🌳 The Bark: In younger trees, the bark is smooth and dark, while older specimens often become a canvas for colorful crustose lichens.
🏡 In Your Garden
- ☁️ Shade Tolerance: Tawa seedlings are exceptionally shade-tolerant, making them one of the few native giants that can be successfully started under the canopy of existing trees or in darker garden corners.
- 🌱 Root Sensitivity: This species has a delicate root system that "resents" being moved. It is best to plant it directly from a pot into its permanent location to avoid transplant shock.
⚠️ Safety & Toxicity
- 🐾 Pet Friendly: The Tawa is generally considered non-toxic to cats and dogs, making it a safe choice for a naturalized backyard.
- 🫐 Seed Caution: While the purple flesh of the fruit is technically edible, the large inner kernels are very bitter and require extensive traditional processing to be safe for human consumption.
✨ Fun Fact
The Tawa relies almost entirely on the Kererū (New Zealand Pigeon) for its survival. Because the fruit is so large, the Kererū is the only bird left with a beak wide enough to swallow the fruit whole and disperse the seeds across the forest floor!

Detailed Care Instructions
To grow Beilschmiedia tawa, also known as the tawa tree, you can follow these steps:
- Obtain seeds: Find a reliable source for Beilschmiedia tawa seeds. You can search for nurseries or seed banks specializing in native New Zealand plants.
- Prepare a pot or container: Fill a pot or container with a well-draining potting mix. Make sure the container has drainage holes to prevent waterlogging.
- Sow the seeds: Place the seeds on the soil surface and lightly cover them with a thin layer of soil. Keep the seeds spaced apart to provide room for growth.
- Provide warmth and moisture: Beilschmiedia tawa seeds require warmth and moisture to germinate. Keep the pot in a warm location, ideally between 20-25°C (68-77°F). Mist the soil regularly to keep it moist, but not soggy.
- Patience and care: Germination may take anywhere from a few weeks to several months, so be patient. Keep the soil consistently moist, and avoid letting it dry out completely.
- Transplanting: Once the seedlings are large enough to handle, usually when they have 2-3 true leaves, they can be transplanted into individual pots or directly into the ground. Choose a location with well-draining soil, partial shade, and protection from strong winds.
- Watering and maintenance: Water the seedlings regularly but avoid overwatering. Beilschmiedia tawa prefers a moist, but not waterlogged, soil. Ensure the young plants are protected from slugs and snails.
- Gradual acclimatization: If you plan to transplant the seedlings into the ground, gradually acclimate them to outdoor conditions over a week or two. Start by placing them in a sheltered spot outdoors for a few hours each day, gradually increasing the exposure time.
- Planting in the ground: Dig a hole slightly larger than the root ball of the seedling. Place the plant in the hole and backfill with soil, gently firming it around the roots. Water thoroughly after planting.
- Continued care: Water the young plants regularly, especially during dry periods. Mulching around the base of the plants can help retain moisture and suppress weeds. Prune the plants lightly to maintain shape and remove any dead or damaged branches.
Remember, Beilschmiedia tawa is a slow-growing tree, so it may take several years for it to reach maturity and produce its distinctive glossy leaves.

Place in a bright room that is sun drenched almost all day. Or directly in a south-facing window.

Beilschmiedia Tawa plant requires regular watering to thrive well. It is essential to keep the soil consistently moist but not waterlogged. Avoid letting the soil dry out completely.
One way to water this plant is to check the top inch of soil. If it feels dry to the touch, then it is time to water. Be sure to water deeply enough to saturate the roots.
A simple method to water the plant is to use a watering can or a hose with a gentle spray nozzle to water around the base of the plant. It is advisable to avoid getting water on the leaves as it can cause them to rot or lead to fungal diseases.
One important thing to keep in mind while watering the plant is to allow excess water to drain out, to avoid waterlogging and root rot. Always empty the saucer under the pot after watering if you're growing it indoors.
During the winter season, when the plant goes into a dormant phase, it will require less frequent watering. You can water it once every two weeks or even more if the soil feels moist to the touch.
Overall, it is important to monitor the soil moisture level, and adjust the watering frequency depending on the temperature, humidity, and light levels in your growing conditions.
To fertilize this plant, use a balanced, slow-release fertilizer in the spring and summer months. Apply the fertilizer around the drip line of the plant, avoiding contact with the stem. Water the plant well after fertilizing. Avoid fertilizing in the fall and winter.
If you are looking to grow the Beilschmiedia Tawa plant, it is important to use soil that is well-draining and nutrient-rich. A combination of peat moss, vermiculite, and perlite is often recommended to achieve the ideal soil consistency. This will ensure that the roots have access to enough oxygen and moisture while preventing the soil from becoming too compacted. In terms of pH levels, the Beilschmiedia Tawa plant prefers soil that is slightly acidic to neutral, with a pH range of 5.5 to 7.5. Adding organic matter to the soil can help to adjust the pH and provide additional nutrients for the plant. It is also important to avoid overwatering the plant, as this can lead to root rot and other issues. Overall, the key to successfully growing the Beilschmiedia Tawa plant is to provide it with a balanced, well-draining soil that is rich in nutrients and moisture.
To propagate this plant, start by taking a cutting from a healthy adult plant. The cutting should be at least 4-6 inches long and should have several leaves attached. Remove the lower leaves from the cutting, leaving only a few at the top. Dip the cut end of the cutting into rooting hormone powder, then plant it in a pot filled with well-draining soil mix. Water the soil thoroughly and cover the pot with a plastic bag to create a humid environment. Place the pot in a bright, indirect light and keep the soil moist but not waterlogged. In a few weeks, roots should start to grow from the cutting. Once the roots have established, remove the plastic bag and gradually expose the plant to more sunlight.


