Plant Overview
Often called the "Field Brome" or "Field Chess," this graceful grass is a world traveler originally from Europe and Asia. While it is frequently seen swaying in wild meadows or along sunny roadsides, it has a bit of a "rebel" reputation among farmers because it loves to sneak into wheat and cereal fields. When the wind catches a field of mature Brome, it creates a beautiful, shimmering wave of purple and green.
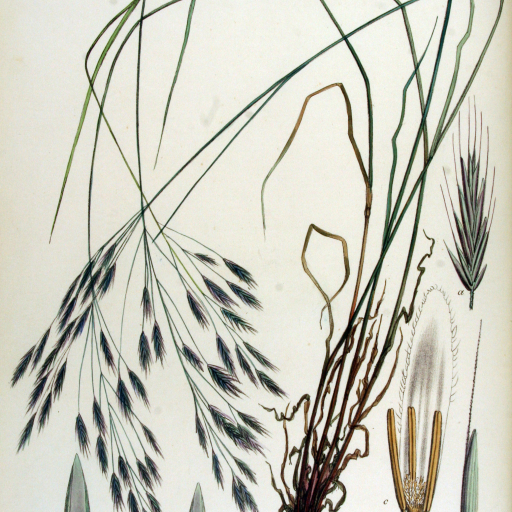
🔍 How to Identify
- 🌾 The Seed Heads: Look for large, loose clusters (panicles) that droop elegantly to one side as they get heavier with seeds.
- 💜 The Color: One of its most striking features is the distinct purplish or reddish-brown tint that develops on the spikelets as they ripen.
- 🍃 The Texture: If you run your fingers along the lower stem, you’ll notice the leaf sheaths are covered in soft, fine hairs, giving the plant a "velvety" feel.
🏡 In Your Garden
- 🌱 Soil Specialist: This plant is a "pioneer," meaning it is often the first to grow in disturbed or poor soil. Its dense, fibrous root system is fantastic at holding the earth together, making it a natural choice for erosion control.
- 🚜 Growth Cycle: Unlike permanent lawn grass, Field Brome is an annual or biennial. It puts all its energy into one or two seasons of massive seed production before bowing out, ensuring the next generation is ready to sprout when the soil is turned.
⚠️ Safety & Toxicity
- ✅ Non-Toxic Status: Bromus arvensis is generally considered non-toxic to humans, cats, dogs, and livestock.
- 🐕 Mechanical Irritation: The "awns" (the tiny, hair-like bristles on the seeds) can act like tiny hooks. These can occasionally get stuck in a pet's fur, ears, or between their paws, which may cause minor skin irritation or discomfort.
✨ Fun Fact
- 🕰️ The Waiting Game: Field Brome seeds are masters of patience. They can lay dormant in the soil for several years, "sleeping" through droughts or deep freezes until the conditions are exactly right for them to germinate!

Detailed Care Instructions
To successfully grow a Bromus Arvensis plant, also known as field brome or corn brome, follow these steps:
- Choose an appropriate location: Select an area with full sun to partial shade. Field brome tolerates a wide range of soil conditions but prefers well-drained soil.
- Prepare the soil: Till the soil to a depth of 6-8 inches to remove any weeds or rocks. Incorporate organic matter such as compost or well-rotted manure to improve soil fertility.
- Sow the seeds: Field brome is usually grown from seeds. Scatter the seeds evenly over the prepared soil, aiming for a seeding rate of around 20-40 pounds per acre or adjust accordingly for a smaller area. Lightly rake the seeds into the soil, ensuring good seed-to-soil contact.
- Water regularly: Keep the soil consistently moist during the germination period, which usually takes about 10-14 days. Apply water gently, so the seeds do not get dislodged or washed away.
- Maintain the plants: Once the Bromus Arvensis plants are established, they are fairly low-maintenance. Water the plants regularly, especially during dry periods. Mulching around the plants can help retain moisture and suppress weed growth.
- Control weeds: Keep the area around the plants free from weeds, as they can compete for nutrients and water. Hand-pull weeds or use a shallow hoe to carefully remove them without disturbing the Bromus Arvensis plants.
- Harvest if desired: Field brome is often grown for its forage value or to prevent soil erosion. If you are growing it for forage, harvest when the plants are in the boot stage (just before they start flowering) for the best nutritional content. Cut the grass at a height of about 4-6 inches above the ground.
- Overwintering: Field brome is a perennial plant and may come back each year. If this is undesirable, it may be necessary to control growth by mowing or applying appropriate herbicides.
Remember to consult with local agricultural extension services or horticulture professionals for specific advice tailored to your region and growing conditions.

Place in a bright room that is sun drenched almost all day. Or directly in a south-facing window.

To properly water Bromus Arvensis, it is important to consider the specific watering needs of this plant species. Here are some guidelines to follow:
1. Understanding water requirements: Bromus Arvensis plants prefer moderately moist soil. They thrive in areas with regular rainfall or consistent irrigation.
2. Soil moisture assessment: Before watering, check the moisture level of the soil. Insert your finger about an inch deep into the soil near the base of the plant. If it feels dry at this depth, it is an indication that watering is required.
3. Watering frequency: The frequency of watering depends on various factors such as climate, weather conditions, and soil type. Generally, watering Bromus Arvensis once a week is sufficient, but adjust this frequency according to the specific needs of your plants.
4. Watering method: Water evenly around the base of the plant to ensure thorough penetration into the root zone. Avoid overhead watering methods as this could encourage the growth of fungal diseases.
5. Watering amount: Aim to provide the plant with enough water to moisten the top few inches of soil. Ensure that excess water drains away to prevent waterlogging, which can damage the roots.
6. Morning watering: It is preferable to water Bromus Arvensis in the morning. This allows foliage to dry during the day, reducing the risk of diseases caused by prolonged moisture on the leaves.
7. Mulching: Apply a layer of organic mulch around the base of the plant to help retain soil moisture, regulate soil temperature, and suppress weed growth. This can reduce the frequency of watering required.
8. Observing plant response: Regularly monitor the condition of your Bromus Arvensis plants. Signs of over-watering include wilting, yellowing leaves, or the development of root rot. Adjust your watering schedule accordingly to maintain a healthy balance.
Remember, while these instructions are specific to watering Bromus Arvensis, it is always beneficial to research and understand the specific needs of any plant you are caring for to optimize its overall well-being.
To properly fertilize the Bromus Arvensis plant, follow these instructions:
- Begin fertilizing in the early spring when new growth appears.
- Choose a slow-release granular fertilizer with balanced N-P-K (nitrogen-phosphorus-potassium) proportions, preferably 10-10-10 or similar.
- Carefully read and follow the instructions on the fertilizer package for the recommended application rates.
- Sprinkle the granules evenly around the base of the plant, ensuring they don't touch the stems or foliage.
- Gently work the granules into the topsoil using a handheld garden rake or by lightly tilling the soil around the plant.
- Water the plant thoroughly after fertilizing to help the nutrients penetrate the soil.
- Repeat the fertilization process once or twice more during the growing season, following the package instructions and spacing applications about 6-8 weeks apart.
- Avoid excessive fertilization, as it may lead to unwanted growth or nutrient imbalances.
- Regularly monitor the plant's health and adjust the fertilization schedule or amounts if necessary.
- Note that over-fertilization can harm the plant, so it's important to be cautious and not exceed the recommended dosage.
For optimal growth, the Bromus arvensis plant requires a specific type of soil composition. This plant thrives in soil that is well-drained and moderately fertile. It prefers soils that are medium-textured, such as loamy or sandy soils. These types of soils promote proper water drainage, preventing waterlogging and root rot.
Additionally, Bromus arvensis plants prefer slightly acidic to neutral pH levels in their soil. A pH range between 5.5 and 7.0 is ideal for this plant species. It is important to maintain the pH within this range to ensure that essential nutrients are readily available for uptake by the plant's roots.
In terms of soil fertility, Bromus arvensis plants benefit from the presence of organic matter in the soil. Organic matter enhances soil structure and nutrient availability, facilitating overall plant growth and development. It can be helpful to incorporate well-rotted compost or aged manure into the soil prior to planting to improve organic matter content.
Finally, it is worth noting that Bromus arvensis plants exhibit some tolerance to drought conditions. However, to ensure healthy growth and optimal performance, it is recommended to provide adequate irrigation when soil moisture levels become depleted. This will help prevent stress and maintain the overall health of the plant.
In summary, providing well-drained, moderately fertile soil with a slightly acidic to neutral pH range is essential for successful cultivation of Bromus arvensis plants. Incorporating organic matter into the soil and providing adequate irrigation will further support their growth and development.
Propagation of Bromus arvensis plants can be done through several methods, including seed collection and germination, division of clumps, and stem or root cuttings.
- Seed Collection and Germination: Harvest seeds from mature plants in late summer or early fall when the seed heads are dry and starting to turn brown. Cut the seed heads and collect them in a paper bag. Once collected, spread the seed heads on a clean surface and gently rub them to separate the seeds. Remove any debris or non-seed material. Store the seeds in a cool, dry place until ready to sow.
To germinate the seeds, you can use a standard potting mix or a mix of peat and perlite with good drainage. Sow the seeds on the soil surface and lightly cover them with a thin layer of the same mix. Moisten the soil and keep it consistently moist but not waterlogged. Place the pot in a warm location with indirect light. Germination typically takes two to three weeks.
- Division of Clumps: Bromus arvensis plants form clumps with interconnected roots. To propagate through division, wait until the plant is actively growing in early spring or fall. Dig up the clump and carefully separate the individual plants by teasing the roots apart. Make sure each division has an adequate portion of roots and shoots. Replant the divisions immediately in suitable soil and water gently. Keep the newly planted divisions well-watered until they establish.
- Stem or Root Cuttings: Take stem or root cuttings during the active growth period of the plants, typically in spring or summer. Select healthy, disease-free stems or roots and cut them into sections that are around 4-6 inches long. Remove any leaves from the bottom half of the cutting. Dip the cut ends in a rooting hormone, if desired, and plant the cuttings in a well-draining medium such as perlite or vermiculite. Mist the cuttings regularly to maintain humidity and place them in a warm location with indirect light. Rooting typically occurs within a few weeks.
Regardless of the propagation method you choose, it is crucial to provide suitable growing conditions for new plants. Provide adequate sunlight, water, and nutrients as per the species' requirements. Monitor for pests or diseases and take necessary action to ensure the plants remain healthy and thrive.


