Plant Overview
Known as the Creeping Bellflower or the rather ominous "Hellroot," this plant is the ultimate "beautiful troublemaker" of the garden world. While its elegant spires of nodding purple bells look like they belong in a fairytale cottage garden, this European native is a master of survival. It was once cultivated for its edible roots, but today it is famous (or infamous) for its ability to colonize a backyard faster than almost any other perennial.
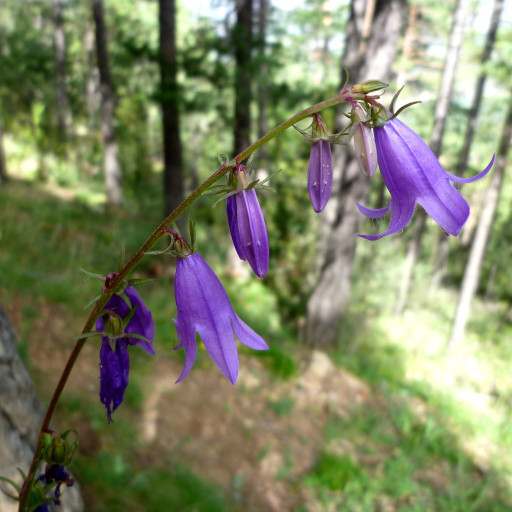
🔍 How to Identify
- 🔔 The Flowers: Deep violet or lavender-blue bells that hang downward. Uniquely, the flowers usually line up along only one side of the tall, unbranched stem.
- 🍃 Leaf Shape-Shifter: The leaves change as they go up the plant. The ones at the very base are heart-shaped with long stalks, while the leaves on the flowering stem are narrow, pointed, and "hairy" to the touch.
- 🌱 The Roots: If you dig it up, you’ll find thick, white, fleshy taproots that look like small parsnips, connected by a massive web of slender white runners (rhizomes).
🏡 In Your Garden
- 🚧 The Great Escape: This plant is considered highly invasive in many regions. It spreads through two methods: producing thousands of tiny seeds and extending underground "tentacles." If you leave even a centimeter of root in the soil, a new plant will emerge.
- 💪 Indestructible Nature: It is famously difficult to eradicate. It thrives in sun or deep shade and can push through heavy clay or cracks in pavement. Gardeners often joke that the only way to get rid of it is to move houses!
- 🦋 Pollinator Magnet: Despite its aggressive habits, it is a favorite for long-tongued bees and hummingbirds, who love to crawl deep inside the bell-shaped blooms.
⚠️ Safety & Toxicity
- ✅ Status: Non-toxic and generally safe.
- 🍽️ Edibility: Historically, both the leaves and the parsnip-like roots were eaten in salads. It is safe for households with curious pets or children, though its presence in the lawn is usually more of a headache for the gardener than a danger to the family.
✨ Fun Fact
The species name rapunculoides means "resembling a little turnip." This plant is a close relative of the "Rapunzel" plant from the Brothers Grimm fairytale; in the story, Rapunzel's mother craved the tasty roots of a bellflower so much that her husband stole them from a witch’s garden!

Detailed Care Instructions
Th plant was brought to North America from its native Europe. It was initially a popular plant due to its attractive flowers and their ability to attract pollinators like bees and butterflies but it turned out to be an invasive species.
Is creeping bellflower toxic?
The plant is not toxic.
Why does creeping bellflower grow back after I dug it up?
The plant will regrow even from the smallest bit of root left in the ground. If you choose to remove it manually and without the aid of herbicides, you need to be persistent and remove any regrowth that pops up.
| Color | Lavender, Purple |
| Soil Ph | Neutral To Slightly Acidic Or Slightly Alkaline |
| Lighting | Full Sun |
| Soil Type | Rich, Well-Drained, And Kept Evenly Moist |
| Bloom Time | Early Summer, On Average |
| Plant Type | Biennial |
| Mature Size | 2 To 4 Feet |
| Native Area | Europe And Western Siberia |
| Sun Exposure | Full Sun To Partial Shade |
| Hardiness Zones | 3-9 |
To grow Campanula Rapunculoides, also known as Creeping Bellflower, you can follow these steps:
- Choose a suitable location: Campanula Rapunculoides prefers full sun to partial shade. Select a spot that receives at least 6-8 hours of direct sunlight per day.
- Prepare the soil: This plant prefers well-drained soil. Amend the soil with organic matter like compost or well-rotted manure to improve its fertility and drainage.
- Sow seeds: You can either sow seeds directly into the garden or start them indoors 6-8 weeks before the last expected frost date. Sow the seeds about ¼ inch deep and cover lightly with soil. Keep the soil moist until germination occurs.
- Transplant seedlings (if started indoors): Once the seedlings have developed a couple of true leaves, they can be transplanted outdoors. Choose a spacing of about 12-18 inches between plants.
- Watering: Keep the soil consistently moist, but not waterlogged. Water deeply when the top inch of soil feels dry.
- Mulching: Apply a layer of organic mulch around the plants to help retain moisture and suppress weed growth. Avoid placing mulch directly against the stems to prevent rot.
- Fertilizing: Campanula Rapunculoides generally doesn't require much fertilization. However, you can apply a balanced slow-release fertilizer in early spring to provide nutrients for healthy growth.
- Pruning: Remove any dried or dead stems periodically to promote new growth and maintain the plant's appearance.
- Divide the plant: Over time, Campanula Rapunculoides can spread and become dense. To control its growth, divide the plant every 2-3 years in early spring or fall to rejuvenate it and create new plants.
- Pest and disease control: This plant is generally resistant to most pests and diseases. However, keep an eye out for slugs and snails, which may occasionally attack the plant. Use organic methods like hand-picking or natural slug repellents to control them if necessary.
Always remember to check with your local plant authorities or nursery to ensure that Campanula Rapunculoides is not considered invasive in your area, as it can be aggressive in some regions.

Place in a window with dappled sun or a spot in the middle of a room. Or directly in a window facing west or east.

Campanula Rapunculoides can be watered by carefully pouring water at the base of the plant, avoiding getting the leaves wet. The plant should be watered deeply and thoroughly, allowing the water to soak down to the root zone. It is important not to overwater the plant, as this can cause root rot. The frequency of watering will depend on various factors such as the temperature, humidity, and soil moisture. It is generally recommended to water the plant when the top inch of soil feels dry. The best time to water the plant is in the morning or evening when the sun is not at its strongest. Additionally, adding mulch around the plant can help to retain moisture and reduce the need for frequent watering.
To fertilize the Campanula Rapunculoides plant, you can follow these instructions:
- Start by choosing a balanced, water-soluble fertilizer that is suitable for flowering plants.
- Dilute the fertilizer according to the package instructions in a watering can or sprayer.
- During the active growing season, which is typically from spring to fall, apply the fertilizer once every two to four weeks.
- Avoid fertilizing during winter dormancy or when the plant is not actively growing.
- Ensure the soil is moist before applying the fertilizer.
- Gently pour the diluted fertilizer solution around the base of the plant, taking care not to splash it on the leaves.
- Apply the fertilizer evenly, covering the entire root zone of the plant.
- Avoid over-fertilizing as it can damage the plant and lead to excessive foliage growth instead of flowers.
- After fertilizing, water the plant thoroughly to allow the nutrients to penetrate the soil.
- Monitor the plant's response to the fertilizer and adjust the frequency or strength of fertilization if necessary.
Remember to always read and follow the instructions provided with the specific fertilizer you choose, as application rates and frequencies may vary.
The ideal soil for this plant should be well-draining and rich in nutrients. It should have a slightly acidic to neutral pH level between 6.0 and 7.5. This plant prefers a fertile soil that is moist but not waterlogged. A loamy soil would work well as it is a mix of sand, silt, and clay. Organic matter such as compost, leaf mold, or aged manure can also be added to the soil to improve its fertility and structure. Avoid using heavy clay soils as the plant's roots may not be able to penetrate them. Additionally, make sure the soil is free of weeds and debris before planting.
To propagate this plant, first prepare a well-draining soil mix with good organic matter. Take healthy cuttings from the plant, making sure each cutting has several nodes or leaves. Remove the lower leaves from the cutting and dip the cut end into a rooting hormone powder. Plant the cutting into the soil mix and water lightly. Cover the pot with a clear plastic bag or include plastic wrap above and around the pot to create a mini greenhouse environment. Keep the cutting in bright, indirect sunlight and maintain moisture in the soil. After several weeks, the cutting should begin to develop roots and can be gradually adapted to regular growing conditions once the roots are well-established.
Common pests of the creeping bellflower include Spider mites, larvae. Make a habit of checking your creeping bellflower frequently for pests so that any infestations can be caught and managed early.


