Plant Overview
Capsicum annuum is the versatile superstar of the garden, encompassing everything from the mild Bell pepper to the fiery Jalapeño and Cayenne. Originally hailing from the Americas, these plants have traveled the globe to become a staple in almost every culinary tradition. Whether you are growing them for a spicy kick or their ornamental beauty, they are as vibrant in the garden as they are on the plate.
🔍 How to Identify
- 🌿 Glossy Foliage: Look for smooth, lance-shaped leaves with a distinct glossy finish that helps the plant shed excess rainwater in humid environments.
- 🌼 Starry Blooms: The plant produces small, delicate, star-shaped flowers that are typically white or greenish-white, usually growing individually at the leaf axils.
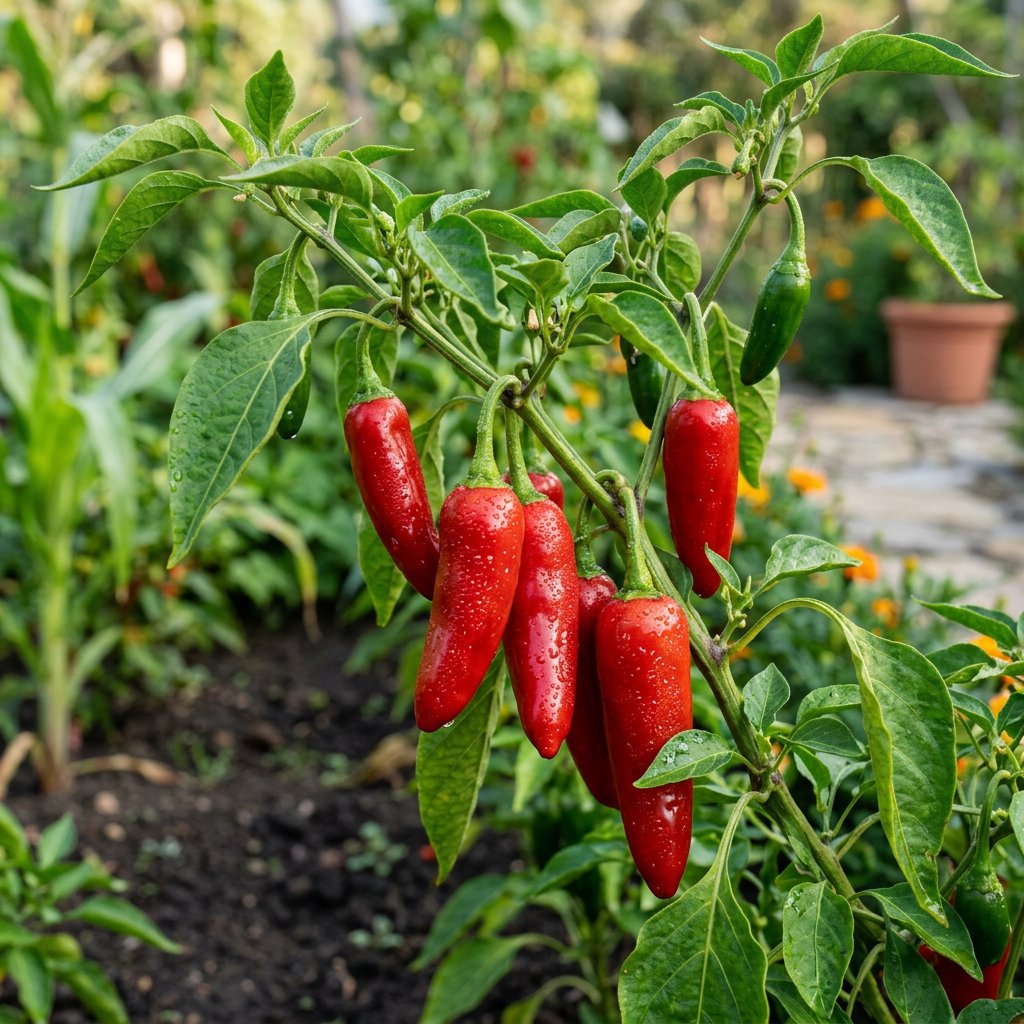
- 🌶️ Vibrant Berries: The fruit (botanically a berry) is hollow and changes color as it matures—typically starting green and turning red, orange, or yellow once fully ripe.
🏡 In Your Garden
- ☀️ Sun Worshippers: These plants are fueled by light; they require at least six hours of direct sun to produce fruit. If they feel "left in the dark," they may drop their blossoms in protest.
- 💧 Sensitive Roots: Capsicum annuum hates having "wet feet." They require well-draining soil because their fine root systems are highly prone to rot if water sits around them for too long.
- 🌡️ Temperature Tantrums: They are quite sensitive to the cold. If nighttime temperatures drop below 60°F (15°C) or climb above 90°F (32°C), the plant might stop producing fruit until the weather stabilizes.
⚠️ Safety & Toxicity
- 🌶️ Capsaicin Burn: Many varieties contain capsaicin, the compound responsible for "heat." This can cause intense burning if it touches your eyes or sensitive skin—always wash your hands after harvesting or pruning spicy types.
- 🐾 Nightshade Family: Like tomatoes and potatoes, the leaves and stems contain solanine, which is toxic to dogs, cats, and horses.
- 👄 Pet Irritant: While not "deadly" in small amounts, if a pet eats a spicy pepper, it can cause severe gastrointestinal distress and oral irritation.
✨ Fun Fact
🚢 A Global Mistake: When Christopher Columbus encountered these plants in the Caribbean, he mistakenly thought they were related to the expensive Black Pepper (Piper nigrum) used in Europe. He began calling them "peppers," a name that stuck for centuries despite the two plants being completely unrelated!

Detailed Care Instructions
To grow a Capsicum Annum plant, also known as chili or bell pepper, follow these steps:
- Choose a suitable location: Capsicum plants require at least 6-8 hours of direct sunlight per day. Select a spot in your garden or balcony that receives ample sunlight.
- Prepare the soil: Capsicum plants prefer well-draining soil enriched with organic matter. Mix compost or aged manure into the soil to improve its fertility and nutrient content.
- Start seeds indoors or purchase seedlings: If you're starting from seeds, begin indoors about 8-10 weeks before the last expected frost in your area. Sow the seeds in seed trays or small pots filled with potting mix. Keep the soil moist and maintain a warm temperature (around 70°F/21°C) to encourage germination. Once seedlings have grown a few inches tall, transplant them to larger pots.
- Transplant the seedlings: If you've purchased seedlings from a garden center, ensure they are hardened off and ready for outdoor conditions. After the last frost has passed, transplant the seedlings into the prepared garden soil or larger containers. Space them about 18-24 inches apart to provide enough room for growth.
- Watering: Keep the soil consistently moist but not waterlogged. Water the plants deeply when the top inch of the soil feels dry. Avoid overhead watering to prevent disease, instead water at the base of the plant.
- Fertilizing: Apply a balanced organic fertilizer every 4-6 weeks during the growing season. Follow the manufacturer's instructions for dosage and application method. Capsicum plants are heavy feeders, so regular fertilization is important.
- Support and protect the plants: As the Capsicum plants grow, they may need support to prevent the branches from breaking under the weight of the fruits. Use stakes, cages, or trellises to provide support to the plants. Additionally, protect the plants from strong winds and cold temperatures by covering them or moving them indoors if necessary.
- Harvesting: Capsicum plants usually start producing fruits within 60-90 days. Harvest the peppers when they have reached the desired size and color. Cut the peppers off the plant using a sharp knife or pruners to avoid damaging the plant.
Remember to always check your specific plant variety's requirements and adjust your care accordingly.

Place in a bright room that is sun drenched almost all day. Or directly in a south-facing window.
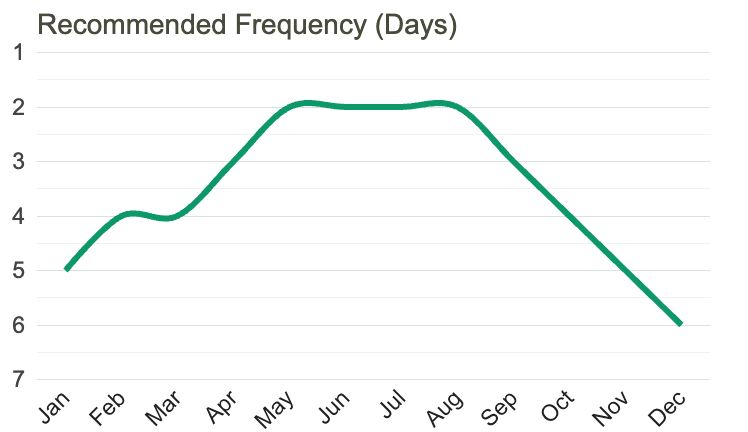
To effectively water Capsicum Annum plant, it is important to water the plant deeply and slowly. This can be achieved by watering the soil at the base of the plant and allowing the water to soak in rather than watering from above. It is important to avoid getting water on the leaves as this can lead to the development of fungal diseases.
When determining how often to water the plants, it is important to consider the environment in which they are growing. Hot and dry conditions will require more frequent watering, while cooler and more humid conditions may require less. To determine when to water, check the soil moisture level by feeling the soil with your finger. If the top inch of soil feels dry, it is time to water.
It is also important to ensure that the plant is not sitting in water as this can lead to root rot. Make sure that the soil is well-draining and that any excess water is able to drain away from the plant.
In general, Capsicum Annum plants require regular watering throughout the growing season to ensure healthy growth and fruit production.
To fertilize this plant, apply a balanced fertilizer with equal amounts of nitrogen, phosphorus, and potassium. Avoid over-fertilizing as it can lead to reduced fruit production. Apply the fertilizer every four to six weeks during the growing season and water thoroughly after application. Additionally, consider supplementing the fertilizer with occasional doses of organic matter such as compost.
For best results, the soil used for growing this specific plant should have a loose, well-draining structure. It should contain a balanced mix of nutrients, including organic matter such as compost, to support healthy growth. The soil should also have a neutral pH level, ideally between 6.0 and 7.0, to ensure proper nutrient uptake by the plant's roots. It is important to avoid soils that are too heavy or compacted, as this can hinder root development and lead to waterlogging, which can cause root rot. Additionally, using a high-quality potting mix can help provide the necessary nutrients and structure for healthy growth if growing the plant in a container.
To propagate this plant, start by choosing a healthy and mature specimen from which to take cuttings. Using sterilized scissors or a sharp knife, carefully cut a stem from the parent plant just above a leaf node, making sure to remove any flowers or fruit. Trim any leaves from the bottom third of the stem and dip the cut end in rooting hormone.
Once the cutting has been prepared, place it in a container filled with moistened potting soil. Cover the container with a clear plastic bag and place it in a bright, warm area, away from direct sunlight. Mist the soil with water as needed to keep it moist, being careful not to overwater.
After two to three weeks, the cutting should begin to show signs of root growth. At this point, remove the plastic bag and gradually expose the plant to more light. Once the plant has grown to a suitable size, it can be transplanted to a larger container or out into the garden.
Common pests of the chili pepper include Spider mites, fungus gnats, aphids, thrips, whiteflies. Make a habit of checking your chili pepper frequently for pests so that any infestations can be caught and managed early.


