Plant Overview
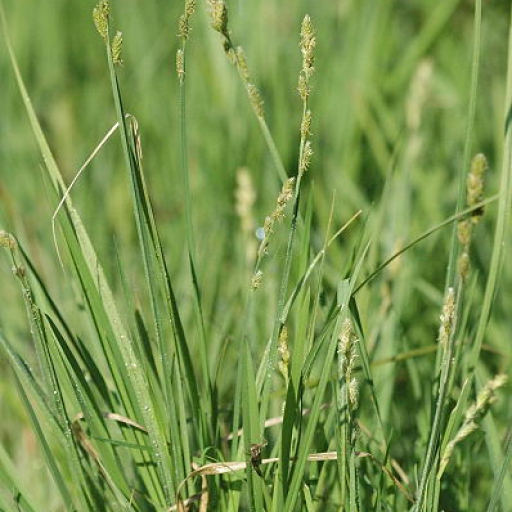
Often called the "Silvery Sedge" for its ethereal, pale-green hue, Carex canescens is a humble but elegant architect of northern wetlands. From the misty fens of Scandinavia to the high bogs of North America, it acts as a soft, tufted carpet that thrives where other plants might drown. It is the perfect choice for gardeners looking to embrace "bog aesthetics" or stabilize a soggy shoreline.
🔍 How to Identify
- 🌿 Silvery Foliage: The leaves have a distinct glaucous (waxy, blue-grey) coating that gives the plant its name canescens, which means "becoming grey" in Latin.
- ✨ Star-like Spikes: The flower heads consist of small, greenish-white clusters that sit close to the stem, resembling tiny, frosted stars when viewed up close.
- 🌱 Clumped Habit: It grows in neat, dense tufts (cespitose) rather than spreading via aggressive underground runners, making it much easier to manage than common lawn grasses.
🏡 In Your Garden
- 💧 The "Soggy Spot" Solution: This sedge is your best friend if you have a low-lying area where water pools after rain. It loves having "wet feet" and is a superstar in rain gardens or along the muddy edges of garden ponds.
- 🌾 Texture & Contrast: Because of its fine, needle-thin leaves and cool color palette, it provides a beautiful visual break when planted alongside broad-leaved shade plants like Hostas or Ferns. It prefers acidic, peaty soil to truly thrive.
⚠️ Safety & Toxicity
- ✅ Safe Status: Carex canescens is generally considered non-toxic to humans, cats, and dogs. It is a very safe "filler" plant for family gardens.
- ✂️ Physical Irritation: While not poisonous, the leaves of most sedges have microscopic serrations. If you run your hand quickly along the blade, you might experience a minor "grass cut," so wearing gloves during autumn cleanup is a smart move.
✨ Fun Fact
- 🌍 The Global Traveler: This plant is "circumboreal," meaning it naturally occurs all the way around the northern hemisphere. It is one of the most widely distributed sedges on Earth, successfully colonizing wetlands in North America, Europe, and Asia without any human help!

Detailed Care Instructions
To grow Carex canescens, also known as gray sedge or hoary sedge, you can follow these steps:
- Choose the right location: Carex canescens prefers a sunny or partially shaded spot. It can tolerate various soil types, including moist to wet soil, so make sure the chosen location drains well.
- Prepare the soil: If the soil is heavy or has poor drainage, add organic matter such as compost to improve its texture and drainage. Carex canescens thrives in wetland or boggy conditions, so if you have a very dry area or live in a arid climate, you may need to create a moisture-retaining environment like a rain garden or use a raised bed.
- Planting: Plant Carex canescens in early spring or fall. Dig a hole slightly larger than the root ball and place the plant into the hole. Backfill the hole with soil, firming it gently around the plant. Leave a slight depression around the base of the plant to help retain water.
- Watering: Initially, water the plant thoroughly and then keep the soil consistently moist. Avoid over-watering and creating waterlogged conditions.
- Mulching: Apply a layer of organic mulch around the base of the plant to help retain soil moisture and suppress weeds. This is particularly important during the establishment period.
- Fertilizing: Carex canescens generally doesn't require fertilizer, as it is adapted to nutrient-poor environments. However, if you find that the plant is struggling or lacking in growth, you can apply a slow-release, low-nitrogen fertilizer sparingly in early spring.
- Maintenance: Keep an eye on the plant for any signs of pests or diseases. Remove any dead or damaged foliage as needed. Every few years, consider dividing the plant in early spring to rejuvenate it and encourage new growth.
Overall, Carex canescens is a relatively low-maintenance plant once established. With proper care and attention to water requirements, it should thrive and grow well in suitable conditions.

Place in a bright room that is sun drenched almost all day. Or directly in a south-facing window.

The plant should be watered regularly, keeping the soil moist but not waterlogged. It is best to avoid watering the foliage to prevent any fungal diseases from developing. When watering, water directly at the base of the plant and avoid getting water on the leaves. Avoid letting the soil dry out completely, as this can cause stress to the plant and lead to yellowing or browning of the foliage. In areas with hot and dry climates, more frequent watering may be necessary. In colder seasons, reduce watering but do not let the soil dry out completely. Use a well-draining potting mix to ensure proper drainage and avoid waterlogging the roots.
- Choose a balanced fertilizer with equal amounts of nitrogen, phosphorus, and potassium.
- Dilute the fertilizer according to the instructions on the package.
- Apply the diluted fertilizer to the soil surrounding the plant.
- Avoid getting any fertilizer on the foliage of the plant, as this can cause burning.
- Water the plant thoroughly after fertilizing to help the nutrients soak into the soil.
- Repeat fertilization every 4-6 weeks during the growing season, typically from spring to fall.
For optimal growth, it is recommended to use a well-draining soil that is rich in organic matter when planting this particular plant. The soil pH should be slightly acidic to neutral, ranging from 5.5 to 7.0. Additionally, this plant prefers moist to wet soil conditions, so it is important to select a soil that retains moisture well. To improve soil fertility and moisture retention, it may be beneficial to incorporate compost or peat moss into the planting area.
To propagate this plant, first select a healthy mature plant and carefully dig up the root system. Use a sharp, sterile knife to divide the roots and separate them into small clumps, making sure each clump has some shoots and roots.
Prepare a well-draining potting mix and fill small pots with it, making a hole in the center of each pot for the root clump to be placed in. Place the root clump into the hole and gently firm the soil around it. Water thoroughly and place the pots in a bright and sheltered location.
Keep the soil consistently moist and mist the plants with water occasionally to maintain a humid environment. Once new growth appears, about 4-6 weeks after planting, the plants can be gradually acclimatized to drier air and lower humidity.
Continue to care for the plants by watering as needed and fertilizing with a balanced, water-soluble fertilizer every two to four weeks. The new plants can be transplanted into larger pots or directly into the garden when they have developed strong root systems.