Plant Overview
Known as the "Lesser Tussock-sedge," this slender beauty is a quiet master of the northern wetlands. Often found weaving through peat bogs and fens, it creates soft, fountain-like mounds that provide essential structure to marshy ecosystems. While it lacks showy petals, its architectural form and subtle golden-brown spikes make it a favorite for those creating naturalistic water gardens or bog landscapes.
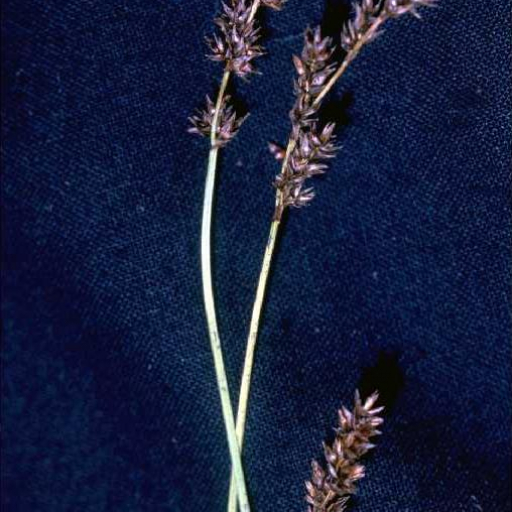
🔍 How to Identify
- 🌿 Growth Habit: It grows in dense, upright clumps known as "tussocks," giving it a textured, mop-top appearance that stands out in soggy terrain.
- 🌾 The Stems: The stems are remarkably slender and triangular; if you run your fingers along the upper part, you’ll notice a slightly rough, "sandpapery" texture.
- 🟤 Flower Spikes: It features a narrow, compact cluster of brownish-tan spikelets at the very top, which appear slightly branched and "bottlebrush" in style compared to other sedges.
🏡 In Your Garden
- 💧 Wetland Specialist: This is not a plant for a dry backyard. It thrives in "wet feet" conditions, making it an ideal candidate for pond edges, rain gardens, or areas where the soil stays consistently saturated.
- 🌱 Root Stability: Because it naturally grows in soft, peaty muck, its root system is excellent at stabilizing soil. It is a "set it and forget it" plant—once it finds a damp spot it likes, it prefers to be left undisturbed to form its signature mounds.
⚠️ Safety & Toxicity
- ✅ Status: Non-toxic and generally safe for curious pets and children.
- ✂️ Physical Safety: While it isn't poisonous, the edges of the leaves can be quite sharp. It is wise to wear gardening gloves when pruning or dividing the clumps to avoid "grass cuts" on your fingers.
✨ Fun Fact
- 🌍 The Carbon Keeper: Because Carex diandra is a primary resident of peat bogs, it plays a vital role in carbon sequestration. By growing and decaying in water-logged, oxygen-poor environments, it helps lock carbon into the earth for centuries!

Detailed Care Instructions
To grow Carex diandra plants, follow these steps:
- Climate: Determine if your climate is suitable for growing Carex diandra. This plant typically thrives in moist, shaded areas, so make sure you can provide these conditions in your garden.
- Soil: Carex diandra prefers moist, well-draining soil. Add organic matter, such as compost or peat moss, to improve soil quality and moisture retention.
- Planting: Dig a hole in the desired location, slightly larger than the size of the plant's root ball. Place the plant in the hole and backfill with soil, making sure the crown of the plant is level with the soil surface.
- Watering: Water the plant thoroughly after planting and keep the soil consistently moist. Avoid overwatering, as soggy soil can lead to root rot. Monitor the soil moisture and water as needed.
- Light: Carex diandra prefers partial to full shade. If planting in an area with full sun, provide some shade during the hottest part of the day.
- Mulching: Apply a layer of organic mulch around the base of the plant to help retain moisture and suppress weed growth.
- Fertilization: Carex diandra generally does not require regular fertilization. However, if you notice poor growth or nutrient deficiencies, you can apply a balanced, slow-release fertilizer according to the package instructions.
- Pruning: Trim any dead or damaged foliage to keep the plant healthy and tidy. Avoid cutting into the crown of the plant, as this can lead to damage or disease.
- Division: Over time, Carex diandra may become crowded. To propagate new plants, dig up the clump in early spring or fall, divide it into smaller sections, and replant them in suitable locations. Water the divided plants well after replanting.
- Pests and diseases: Carex diandra is generally resistant to pests and diseases. However, it can occasionally be affected by slugs or snails. If necessary, control these pests with appropriate methods, such as handpicking or using organic slug pellets.
By following these guidelines, you can successfully grow Carex diandra plants in your garden.

Place in a bright room that is sun drenched almost all day. Or directly in a south-facing window.

To adequately water the Carex Diandra plant, it is essential to understand its specific water requirements. This plant prefers consistently moist soil but not waterlogged conditions. Here are some guidelines to follow:
1. Soil moisture: Before watering, check the moisture level of the soil by sticking your finger about an inch deep into the soil. If it feels dry, it's time to water.
2. Timing: Water the Carex Diandra plant early in the morning or late in the evening to minimize water evaporation and ensure the soil retains moisture.
3. Frequency: Depending on the environmental conditions and the condition of the soil, water this plant approximately once or twice a week. Adjust the frequency if necessary, considering factors like humidity, temperature, and rainfall.
4. Watering method: Pour water directly onto the soil, close to the base of the plant, allowing it to penetrate deep into the root zone. Avoid wetting the plant's foliage excessively as it can lead to fungal diseases.
5. Water amount: Apply water until you see it running out of the drainage holes at the bottom of the plant pot. This ensures that the entire root system receives sufficient moisture.
6. Mulching: Adding a layer of organic mulch around the base of the plant can help retain soil moisture. This can be in the form of bark chips, straw, or dried leaves.
7. Monitor soil drainage: Ensure that the container or planting area has well-draining soil. The Carex Diandra plant should not sit in waterlogged soil, as this can lead to root rot and other issues.
8. Environmental considerations: Adjust your watering routine during periods of heavy rain or drought. If there is sufficient rainfall, you might need to reduce or skip watering. Conversely, during dry spells, you may need to water more frequently.
By following these instructions, you can provide the appropriate amount of water for the Carex Diandra plant, ensuring its health and vitality.
- Choose a well-draining pot or garden bed for your Carex Diandra plant.
- Fill the pot or bed with a high-quality, nutrient-rich soil mix.
- Water the soil thoroughly before applying fertilizer.
- Select a balanced, slow-release fertilizer specifically formulated for ornamental grasses.
- Follow the package instructions for the correct dosage based on the size of your plant.
- Sprinkle the fertilizer evenly around the base of the Carex Diandra plant, avoiding direct contact with the stems or leaves.
- Gently scratch the fertilizer into the soil surface to ensure it is incorporated.
- Water the plant thoroughly after fertilizing to help dissolve and distribute the nutrients.
- Repeat the fertilization process every 4-6 weeks during the growing season.
- Monitor the plant's overall health and adjust the fertilizer application if necessary, following any additional instructions provided by the manufacturer.
When it comes to selecting the appropriate soil for Carex Diandra plant, it is essential to consider certain criteria without specifically mentioning its common names.
- Texture: The soil should have a suitable texture that adequately drains excess water while retaining enough moisture for healthy plant growth. It should strike a balance between being well-draining and having the ability to hold onto moisture for consistent hydration.
- Composition: The soil should have a balanced composition of organic matter, minerals, and nutrients. It should provide necessary macro and micronutrients essential for the plant's overall growth and development.
- pH level: Carex Diandra generally prefers a slightly acidic to neutral pH range. It is recommended to choose a soil with a pH level between 5.5 and 7.0, which allows for optimal nutrient absorption and root health.
- Structure: The soil should have a good structure that encourages root penetration and aeration. This helps the plant establish a strong root system and supports nutrient uptake.
- Drainage: Carex Diandra plants thrive in moderately moist soil, but they are not tolerant of excessive water accumulation. The soil should be well-draining to prevent waterlogging, which can lead to root rot and other related problems.
- Nutrient Retention: The soil should have the ability to retain nutrients and slowly release them over time. This allows for sustained nourishment of the Carex Diandra plant and reduces the need for frequent fertilization.
- Organic Matter: A soil mix with an adequate amount of organic matter (such as compost or well-rotted manure) helps improve the overall structure, water-holding capacity, and nutrient availability for the plant. It also enhances microbial activity in the soil, supporting a healthy ecosystem.
When selecting soil for Carex Diandra plant, these aspects are crucial for its growth and overall well-being, promoting optimal conditions for strong roots, healthy foliage, and vibrant growth.
Carex diandra is a perennial plant that can be propagated through various methods, including division, rhizome cuttings, and seed germination. Here is a detailed guide on propagating Carex diandra:
- Division: This is the most common and easiest method to propagate Carex diandra. Follow these steps:
- Lift the plant from the garden bed using a garden fork or spade.
- Gently tease the clump apart into smaller sections, ensuring each division has healthy roots and shoots.
- Trim back any damaged or dead foliage or roots.
- Replant the divisions immediately, making sure to space them adequately apart in a suitable garden location with well-drained soil and partial shade.
- Lift the plant from the garden bed using a garden fork or spade.
- Rhizome cuttings: Carex diandra spreads readily through underground rhizomes, making it suitable for propagation through this method. Here's how to do it:
- Carefully dig up a mature clump of Carex diandra from the garden bed.
- Look for healthy rhizomes that are thick and have firm roots.
- Use a clean, sharp knife to cut away a section of the rhizome together with its attached roots and shoots.
- Plant the rhizome cutting in a pot or directly into the garden, ensuring the rhizome is buried just below the soil surface.
- Keep the soil consistently moist, providing partial shade until new growth appears.
- Carefully dig up a mature clump of Carex diandra from the garden bed.
- Seed germination: While it may take longer and require more patience, propagating Carex diandra from seeds can yield multiple plants. Follow these steps:
- Collect mature seeds from a ripe seed head of Carex diandra.
- Fill a tray or pot with a well-draining seed-starting or potting mix.
- Sprinkle the seeds evenly across the soil surface and lightly press them into the substrate without burying them.
- Place the tray or pot in a location where it receives indirect light and maintains a temperature of around 65-75°F (18-24°C).
- Keep the soil consistently moist but not waterlogged by misting regularly or placing a clear plastic cover over the tray to retain moisture.
- Seeds will usually germinate within 2-4 weeks. Once the seedlings have grown a few inches tall, they can be transplanted into individual pots or directly into the garden.
Remember to provide proper care and attention to the propagated plants, ensuring they receive adequate water, partial shade, and well-draining soil to encourage healthy growth.
- Collect mature seeds from a ripe seed head of Carex diandra.


