Plant Overview
Known as the Greater Tussock-sedge, this architectural marsh-dweller is famous for its ability to build its own "islands." Found across Europe in fens and wet woodlands, it creates dramatic, shaggy mounds that look like green-haired spirits rising from the swamp. In the wild, these ancient hummocks act as vital high-ground sanctuaries for smaller plants and insects.
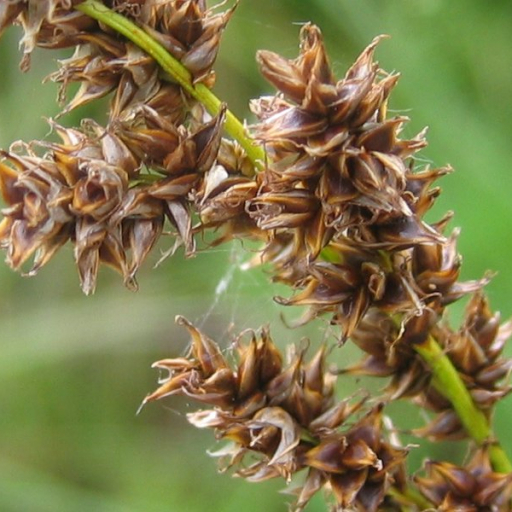
🔍 How to Identify
- 🌿 The Tussock: It grows in dense, heavy clumps (tussocks) that can reach over 3 feet (1 meter) in height. Over many years, the dead roots and leaves accumulate to form a solid, woody "pedestal" or stool.
- 🌾 The Flowers: Unlike many sedges that have simple spikes, this species produces large, branched, brownish-gold flower heads called "panicles" that bloom from May to June.
- 🗡️ The Foliage: The leaves are long, dark green, and remarkably stiff. If you run your finger along the edge, you’ll feel tiny, saw-like teeth that can be surprisingly sharp.
🏡 In Your Garden
- 💧 The Moisture Rule: This plant is an obligate wetland species. It thrives in bog gardens, pond margins, or any area where the soil never dries out. It is a fantastic "problem solver" for permanently soggy spots.
- 🏗️ Patience for Pedestals: Don't expect a tall hummock overnight. It takes years for the characteristic "trunk" to form. In a garden setting, it provides incredible winter structure and golden-brown textures even when dormant.
- ✂️ Low Maintenance: It generally dislikes being moved once established due to its deep, fibrous root system. Leave the dead foliage over winter to protect the crown and provide shelter for overwintering ladybugs and beetles.
⚠️ Safety & Toxicity
- ✅ Status: Generally considered non-toxic to humans, cats, and dogs.
- 🧤 Physical Hazard: While it won't poison you, the leaf edges are literally "razor-grass." Always wear sturdy gardening gloves when pruning or handling the plant to avoid painful micro-cuts.
✨ Fun Fact
In some ancient European wetlands, individual Carex paniculata tussocks are estimated to be over 100 years old. They are so sturdy that Victorian-era naturalists used to use them as stepping stones to cross deep, muddy bogs without sinking!

Detailed Care Instructions
To grow Carex paniculata, also known as greater tussock sedge, you can follow these steps:
- Choose a suitable location: Carex paniculata prefers moist soil, so select a site that receives partial shade to full sun and has well-draining soil. It can tolerate both acidic and alkaline soil.
- Prepare the soil: Loosen the soil using a garden fork or tiller and remove any weeds or rocks. Incorporate organic matter like compost or well-rotted manure to improve the soil's fertility and moisture retention.
- Sow the seeds: If you have Carex paniculata seeds, sow them directly into the prepared soil during early spring or early autumn. Lightly press the seeds into the soil and cover them with a thin layer of compost or soil.
- Water regularly: Keep the soil consistently moist but not waterlogged. Water the plants when the top inch of soil feels dry. During hot and dry periods, you may need to water more frequently.
- Mulch: Apply a layer of organic mulch, such as wood chips or straw, around the plant. Mulching helps retain moisture, suppresses weed growth, and provides insulation to the roots.
- Prune as needed: Carex paniculata generally does not require pruning unless there are dead or damaged leaves. Cut back any brown or yellowing leaves at the base to maintain a tidy appearance.
- Fertilize sparingly: Apply a slow-release balanced fertilizer in early spring to promote healthy growth. Follow the instructions on the fertilizer package and avoid over-fertilizing, as excessive nutrients can harm the plant.
- Divide the plant: Over time, Carex paniculata can form dense clumps. To control its size and rejuvenate the plant, you can divide it every few years during early spring or autumn. Dig up the clump and carefully separate it into smaller sections, each with its own healthy roots and stems. Replant the divisions in prepared soil and water well.
With proper care and suitable growing conditions, your Carex paniculata plants should thrive and grow into attractive tufted clumps.

Place in a bright room that is sun drenched almost all day. Or directly in a south-facing window.

To successfully hydrate this plant, it is best to water it regularly, ensuring that the soil remains moist but not too wet. You should avoid allowing the soil to dry out completely as this can damage the roots. It is recommended to water the plant deeply once a week during the growing season. If the plant is in a pot, it is essential to ensure that there is drainage in the container to avoid waterlogging. It is best to water the plant early in the morning or late in the evening to prevent evaporation and allow the soil to absorb the water effectively. You should also avoid watering the leaves as this can encourage disease and fungal growth. Lastly, you should always monitor the soil moisture level and adjust your watering frequency accordingly.
To properly fertilize this plant, it is recommended to use a balanced fertilizer with equal parts of nitrogen, phosphorus and potassium. Apply the fertilizer to the soil around the base of the plant in early spring before new growth appears. Use a compost or organic fertilizer, as synthetic fertilizers may harm the plant. Water the plant after fertilizing to help the nutrients soak in. Avoid over-fertilizing as this can lead to weak growth and disease.
Carex Paniculata plants prefer to grow in well-draining soils that are rich in organic matter. The soil should not be too compact or too loose. It is best to use a soil that has a pH level of 5.5 to 7.5. The soil should be fertile and have good water retention capabilities without becoming waterlogged. A soil mixture that contains peat moss, perlite, and vermiculite or sand is ideal as it provides the right balance of nutrients and moisture. It is also recommended to add organic fertilizers to the soil when planting the Carex Paniculata plant.
To propagate this plant, start by selecting a healthy parent plant with established roots. Using a sharp and sterilized knife or scissors, cut off a section of the plant stem that includes two to three nodes (where the leaves originate). Remove any lower leaves from the stem, leaving only the top two or three. Prepare a pot with fresh, well-draining potting soil and make a hole in the center. Dip the cut end of the stem into rooting hormone and gently insert it into the hole. Firm the soil around the stem and water thoroughly.
Place the potted stem in a bright, indirect location with warm temperatures. Keep the soil moist but not waterlogged, and mist the leaves regularly to increase humidity. Within a few weeks, new growth should appear, indicating successful propagation. Once the new plant is established, it can be transplanted into a larger pot or planted directly into the ground.


