Plant Overview
Often called the Iberian Starmistle, this plant is the armored knight of the thistle world. Originally hailing from the Mediterranean and central Asia, it has traveled far and wide, often earning a reputation as a stubborn invader in North American pastures. While its delicate purple blooms are undeniably beautiful, they are guarded by a crown of formidable straw-colored spines that give the plant its "star" moniker.
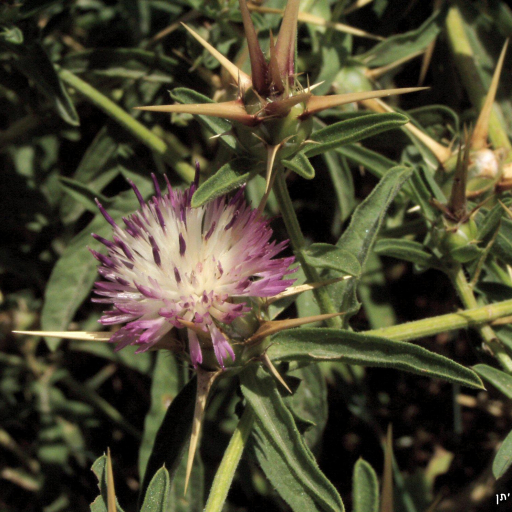
🔍 How to Identify
- 🌸 The Flower Head: Small, teardrop-shaped buds open into vibrant pinkish-purple flower clusters. They look similar to common thistles but are much more "hostile" in appearance.
- ⚔️ The Bracts: This is the giveaway. At the base of each flower, you’ll find long, stout, straw-colored spines (up to 1 inch long) that radiate outward like a lethal star.
- 🌿 The Foliage: The plant starts its life as a flat, ground-hugging rosette with deeply lobed, hairy leaves. As it matures, it sends up a multi-branched, skeleton-like stem that can reach three feet in height.
🏡 In Your Garden & Landscape
- 🚜 A Tough Competitor: In a garden or pasture setting, this plant is a "resource hog." It develops a massive, deep taproot that allows it to survive extreme droughts while sucking moisture away from neighboring plants.
- 🛤️ Disturbed Ground Lover: You are most likely to spot it along roadsides, hiking trails, or overgrazed fields. It thrives where the soil has been churned up, using its thousands of wind-dispersed seeds to colonize new territory quickly.
⚠️ Safety & Toxicity
- 🌵 Physical Hazard: The spines are exceptionally sharp and stiff. They can easily pierce thin gardening gloves or light summer clothing, causing painful punctures and skin irritation.
- 🐴 Equine Warning: While not typically fatal to humans, Iberian Starmistle (and its cousin, Yellow Starmistle) is toxic to horses. If ingested in large quantities, it can cause a neurological condition known as "chewing disease," which prevents the horse from being able to swallow.
- 🐾 Pet Safety: While not common for dogs or cats to eat it due to the prickles, the seeds can get stuck in fur or paws, leading to discomfort or secondary infections.
✨ Fun Fact
A single, well-established Iberian Starmistle plant is a seed factory, capable of producing over 10,000 seeds in a single season. These seeds are equipped with a tiny tuft of bristles called a "pappus," allowing them to hitch a ride on the wind or the fur of passing animals to start a new colony miles away.

Detailed Care Instructions
To grow Centaurea Iberica plants, also known as Spanish star-thistle, you can follow these steps:
- Climate and Soil: First, check if your climate conditions are suitable for growing this plant. Centaurea Iberica typically prefers Mediterranean-like climates with dry summers and mild winters. It thrives in well-draining soil, so ensure your soil is sandy or loamy with good drainage.
- Selecting Seeds or Seedlings: Choose whether you want to grow the plant from seeds or seedlings. If using seeds, soak them in water for 24 hours before planting to help with germination.
- Planting Time: Ideally, the best time to plant Centaurea Iberica seeds is in late winter or early spring, as they need cool temperatures for germination. In warmer regions, planting can be done in the fall.
- Planting Method: If planting seeds, scatter them on the prepared soil surface, then cover lightly with a thin layer of soil. If using seedlings, dig holes slightly larger than the root ball and position the plants accordingly.
- Watering: Water the planted area gently, making sure not to overwater. Centaurea Iberica is drought-tolerant but requires regular watering until established.
- Sun Exposure: Centaurea Iberica thrives in full sun, so ensure the plants receive at least 6-8 hours of direct sunlight each day.
- Maintenance: Remove any competing weeds around the plants to ensure proper growth and prevent them from overshadowing the Centaurea Iberica. Additionally, apply a layer of organic mulch around the plants to help conserve moisture and suppress weed growth.
- Pruning: Centaurea Iberica generally does not require extensive pruning. However, if the plants become leggy or untidy, you can lightly trim them back after they finish flowering.
- Fertilization: Generally, Centaurea Iberica does not need much fertilization. However, if your soil is poor in nutrients, you can apply a balanced, slow-release fertilizer in the spring.
- Division: Every few years, you can divide established Centaurea Iberica plants to keep them vibrant and healthy. Lift the clumps, separate the root ball into smaller sections, and replant in suitable areas.
By following these steps, you should be able to successfully grow Centaurea Iberica plants in your garden or landscape.

Place in a bright room that is sun drenched almost all day. Or directly in a south-facing window.

To water this plant, it is important to consider the soil moisture level and the surrounding environment. One should ensure that the soil is not too dry or too wet before watering, as either condition can be harmful to the plant's growth. The frequency of watering varies depending on the season and weather conditions, but generally, the plant should be watered deeply every 2-3 weeks. It is recommended to water the plant in the morning or evening when the sun is not too strong to avoid evaporation. Additionally, one should avoid getting water on the leaves as this can promote fungal growth. Overall, careful monitoring of the soil moisture level and adjusting the watering schedule accordingly is key to ensuring the health and vitality of this plant.
To fertilize the Centaurea Iberica plant, apply a balanced fertilizer in the early spring before new growth begins. Repeat application every four to six weeks during the growing season. Water the plant thoroughly before and after fertilizing to prevent root burn. Avoid over-fertilization as it can lead to excessive growth and weak stems.
The soil recommended for growing the Centaurea Iberica plant should be well-draining and rich in organic matter. The pH of the soil should be between 6.0 to 7.0. It should not be too heavy or too sandy, and it should be able to hold moisture without becoming waterlogged. A mix of loam, sand, and peat moss can be ideal for this plant. Additionally, adding perlite or vermiculite to the soil can also help with drainage. Fertilizer or compost can be added to the soil to further enrich it. The plant should be grown in full sun to partial shade and watered regularly, but not excessively.
To propagate this particular plant, you can take stem cuttings during the growing season. The stems should be around 10-15cm in length and you should ensure that they have healthy leaves and no signs of disease or damage.
Prepare a container with moist, well-draining soil and make a 2-3cm hole in the center using a pencil or skewer. Dip the cut end of the stem in rooting hormone powder and gently insert it into the hole in the soil.
Water the cutting gently and cover the container with a clear plastic bag or plastic wrap, ensuring that there is enough air circulation to prevent mould or rot. Place the container in bright, indirect light and keep the soil moist, but not waterlogged.
After a few weeks, the cutting should start to root and you will see new growth. At this point, you can remove the plastic cover and begin to acclimate the plant to normal growing conditions.
Once the plant has established roots and new growth, you can transplant it into a larger container or outside in the garden.


