Plant Overview
Known as the "Queen of the Night" or "Raat Ki Rani," Cestrum nocturnum is legendary not for its appearance, but for its intoxicating fragrance. Originating from the West Indies and Central America, this plant remains modest during the day, only to release a powerful, sweet scent once the sun sets. In many cultures, it is planted near windows or doorways to allow the evening breeze to carry its perfume throughout the home.
🔍 How to Identify
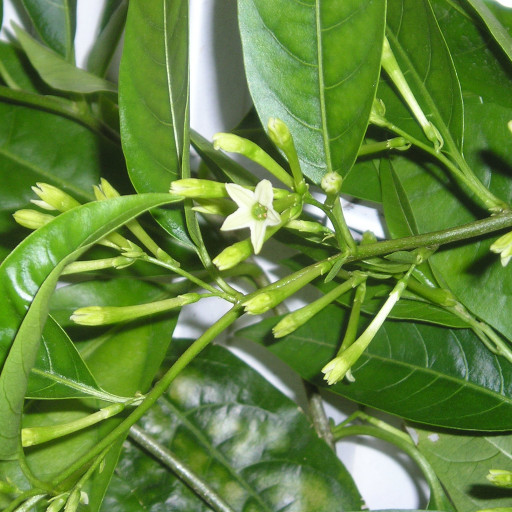
- 🌙 The Flowers: Tiny, tubular, greenish-white or cream-colored blossoms that grow in drooping clusters. They remain closed during the day and peel open like small stars at night.
- 🍃 The Foliage: Long, lance-shaped leaves that are glossy and smooth to the touch. The stems are thin and can become quite woody as the plant matures.
- ⚪ The Berries: After the blooming cycle, the plant produces small, fleshy, milky-white berries that are roughly the size of a pea.
🏡 In Your Garden
- ✂️ Growth Habit: This is a vigorous, fast-growing shrub that can quickly become "leggy." To keep it looking like a lush bush rather than a wild vine, regular pruning after a blooming cycle is essential.
- ☀️ The Scent Secret: To produce its signature fragrance, the plant needs a full day of sun to "charge." If it’s kept in too much shade, the evening scent will be noticeably weaker.
- 🌬️ Airflow Matters: Because the scent is so concentrated, it is best planted in a spot with good air circulation. Placing it directly under a bedroom window can sometimes be too overwhelming for sensitive sleepers!
⚠️ Safety & Toxicity
- 🚫 Status: Toxic to humans and pets.
- 🐾 Details: As a member of the Solanaceae (Nightshade) family, all parts of the plant—especially the white berries—contain alkaloids that are dangerous if ingested. It can cause digestive upset or more severe symptoms in cats, dogs, and small children.
- 👃 Respiratory Note: The intense fragrance and pollen released at night can occasionally trigger hay fever, headaches, or asthma-like symptoms in sensitive individuals.
✨ Fun Fact
Despite its common name "Night-blooming Jasmine," this plant is not a true jasmine at all! It is actually a close botanical relative of tomatoes, potatoes, and chili peppers. It relies almost exclusively on nocturnal moths for pollination, which is why it has evolved such a potent "come hither" scent for the dark.

Detailed Care Instructions
| Humidity | Normal |
| Invasive | Weed |
| Lighting | Part Sun |
| Toxicity | Poisonous |
| Difficulty | Easy |
| Temperature | 18°C - 24°C |
| Hardiness Zones | Min 7A |
To grow Cestrum Nocturnum, also known as Night-blooming jasmine or Raat Ki Rani, follow these steps:
- Find a suitable location: Cestrum Nocturnum requires full sunlight or partial shade to thrive. Ensure the spot receives at least 6-8 hours of sunlight each day.
- Prepare the soil: Cestrum Nocturnum prefers well-draining soil with good organic content. Mix organic compost or well-rotted manure into the soil before planting to provide essential nutrients.
- Planting method: Plant the Cestrum Nocturnum in the spring or summer. Dig a hole twice the size of the plant's root ball. Place the plant in the hole and backfill with soil, gently firming it around the roots.
- Watering: Adequate watering is crucial during the plant's initial establishment period. Water deeply to ensure the soil is evenly moist but not waterlogged. Once established, water the plant regularly, especially during dry spells.
- Mulching: Apply a layer of mulch around the plant to retain soil moisture, suppress weeds, and regulate soil temperature.
- Pruning: Prune the Cestrum Nocturnum regularly to promote bushiness and maintain a desired shape. Prune back any dead or damaged growth and remove any crossing branches.
- Fertilization: Feed the plant with a balanced, slow-release fertilizer once or twice a year during the growing season. Follow the instructions on the fertilizer package for the proper dosage.
- Pests and diseases: Monitor the plant regularly for any pest or disease issues. Common pests include aphids, mealybugs, and spider mites. Use insecticidal soaps or natural remedies to control infestations promptly.
- Propagation: Cestrum Nocturnum can be propagated through cuttings. Take softwood cuttings during the spring or summer, dip them in rooting hormone, and plant them in moist, well-draining soil. Keep them warm and humid until they develop roots.
- Overwintering: Cestrum Nocturnum is hardy in USDA zones 9-11. If you live in a colder zone, consider growing it in a container and bringing it indoors during the winter, providing bright light and reduced watering.
By following these steps, you can successfully grow and enjoy the beautiful fragrance of the Cestrum Nocturnum plant.

Place in a window with dappled sun or a spot in the middle of a room. Or directly in a window facing west or east.

Cestrum Nocturnum is a flowering plant that can be watered by following these steps:
1. Check the soil moisture before watering. Insert your finger into the soil up to the first knuckle. If it feels dry, it’s time to water.
2. Water the plant deeply at the root zone. Use a watering can or hose with a gentle flow to avoid washing away the soil. Avoid getting water on the foliage, as this can lead to leaf spot fungus.
3. Allow the soil to drain completely after watering. Do not let the plant sit in standing water, as this can lead to root rot.
4. Water the plant once or twice a week during the growing season, depending on the weather and soil conditions. Reduce watering in the winter when the plant is dormant.
5. Use a well-draining soil mix to ensure adequate drainage.
6. Mulch around the base of the plant with organic material to retain moisture in the soil and protect the roots from temperature fluctuations.
7. Monitor the plant for signs of over or under watering. Wilting or yellowing leaves can indicate that the plant is getting too much or too little water. Adjust watering accordingly.
To fertilize this plant, use a balanced fertilizer with equal amounts of nitrogen, phosphorus, and potassium. Apply the fertilizer in early spring before the growing season begins. Spread the fertilizer evenly around the base of the plant, being sure not to get any on the leaves. Water the plant thoroughly after fertilizing to help the nutrients soak into the soil. Repeat this process every 4 to 6 weeks during the growing season for optimal growth.
For optimal growth and health, it is recommended to use a soil that is well-draining and rich in organic matter. The soil should also have a slightly acidic to neutral pH level. It is advised to avoid heavy clay soils that can retain too much moisture and lead to root rot. Adding perlite or sand to the soil can increase drainage, and adding compost or aged manure can increase the soil's nutrient content. Regular fertilization may also be necessary for optimal growth and flowering.
There are several methods for propagating this plant, but the most common way is through stem cuttings. Here's how you can do it:
- Take a healthy stem cutting that is around 6-8 inches long, with no flowers or buds present.
- Remove the lower leaves, leaving just a few at the top of the cutting.
- Dip the bottom end of the cutting in rooting hormone powder to improve its chances of rooting.
- Plant the cutting in a pot filled with a well-draining potting mix. Make sure the pot is large enough to accommodate the cutting with some room to grow.
- Water the cutting thoroughly and place it in a bright, but indirect, light.
- A humid environment helps the cutting to root well. You can create one by covering the pot with a clear plastic bag or wrapping it in plastic wrap.
- Make sure to keep the potting mix moist, but not waterlogged.
- After about 4-6 weeks, the cutting should start to show signs of new growth, which means it has rooted successfully.
- When the cutting has grown enough, you can transplant it into a larger pot or directly into the ground in a suitable location.
Common pests of the night-blooming jasmine include Spider mites, aphids, larvae. Make a habit of checking your night-blooming jasmine frequently for pests so that any infestations can be caught and managed early.