Plant Overview
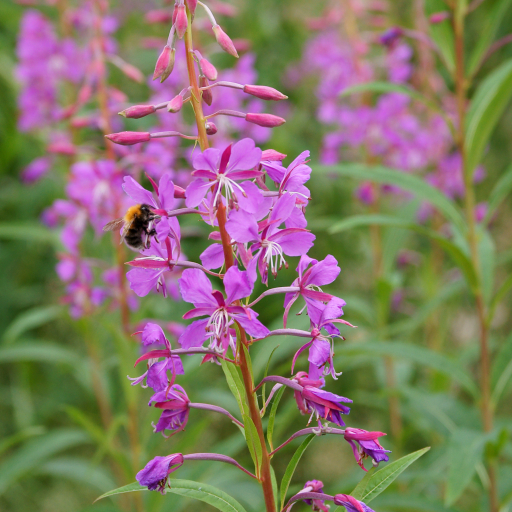
Known as the "phoenix of the forest," Chamerion angustifolium is famously called Fireweed because it is often the first plant to paint scorched earth pink after a wildfire. This resilient beauty is more than just a pioneer; it’s a stunning symbol of rebirth and endurance across the Northern Hemisphere, from the mountains of Alaska to the meadows of Europe.
🔍 How to Identify
- 🌸 Flower Spikes: Striking, tall racemes of four-petaled flowers ranging from pale pink to deep magenta. They typically bloom from the bottom of the stalk upward, signaling the progression of summer.
- 🌿 Willow-like Leaves: The plant features long, narrow, lance-shaped leaves that look remarkably like those of a willow tree, which is why it is also known as "Rosebay Willowherb."
- 🌬️ Fluffy Seeds: After flowering, the plant produces long, slender pods that split open to release hundreds of tiny seeds attached to silky white hairs, which drift through the air like summer snow.
🏡 In Your Garden
- 🐝 Pollinator Paradise: This plant is an absolute magnet for bumblebees and butterflies. It is a primary source of high-quality nectar, often used by beekeepers to produce the sought-after, clear, and spicy "Fireweed Honey."
- 🌱 The Spreading Habit: While beautiful, be cautious of its "takeover" potential. It spreads aggressively via underground rhizomes and airborne seeds. It is best suited for large, wilder meadow areas or restoration projects rather than small, tidy flower beds.
- 🏜️ Disturbance Specialist: It thrives in disturbed, nutrient-poor soil where other plants struggle. It doesn't need pampering; in fact, too much fertilizer may make the stems floppy.
⚠️ Safety & Toxicity
- ✅ Safe Status: Fireweed is non-toxic to humans, dogs, cats, and horses.
- 🍵 Edible Tradition: Historically, the young shoots were eaten like asparagus, and the leaves have been used for centuries to make "Ivan Chai," a fermented herbal tea popular in Eastern Europe and Russia.
✨ Fun Fact
During World War II, Fireweed earned the nickname "Bombweed" in London. It rapidly colonized the craters and rubble left behind by the Blitz, bringing vibrant color and a sense of hope to the grey, war-torn ruins of the city.

Detailed Care Instructions
To grow Chamerion angustifolium, also known as fireweed, follow these steps:
- Select a suitable location: Fireweed plants grow best in full sun to partial shade. Choose a well-drained area with fertile soil.
- Seed selection: Purchase fireweed seeds from a reputable supplier or collect seeds from mature plants. Ensure that the seeds are fresh and of good quality.
- Seed preparation: Fireweed seeds benefit from a process called stratification, which mimics the natural winter conditions before germination. Place the seeds in a moist paper towel or in a plastic bag with damp soil and refrigerate them for about 30 days. This stratification period breaks seed dormancy.
- Sowing seeds: After stratification, sow the fireweed seeds directly into the prepared soil, or start them indoors in seed trays. If starting indoors, use seed starting mix and keep the soil consistently moist. Transplant the seedlings outdoors after the danger of frost has passed.
- Watering: Fireweed requires regular watering, especially during hot and dry periods. Keep the soil evenly moist, but not waterlogged, as excessive moisture can lead to root rot.
- Fertilization: Fireweed usually grows well in fertile soil, but you can apply a balanced, slow-release fertilizer according to the manufacturer's instructions. Avoid over-fertilizing, as it may cause excessive leaf growth at the expense of flowering.
- Pruning and maintenance: Fireweed is a perennial plant, so you won't need to replant it every year. However, it will benefit from pruning. After blooming, trim back the flower stalks to encourage a second round of flowering.
- Controlling pests and diseases: Fireweed is typically resistant to pests and diseases, but you may occasionally encounter aphids or powdery mildew. Monitor your plants regularly and treat any issues accordingly with organic pest control or fungicides, if necessary.
- Propagation: Chamerion angustifolium can also be propagated through division. In the early spring, divide mature plants by carefully separating the roots and replanting each division in a suitable location.
- Enjoy the blooms: Fireweed will reward you with beautiful pinkish-purple flowers that attract bees, butterflies, and other pollinators. Enjoy the blooms and the wildlife they attract!
Remember to check if there are any specific regulations or guidelines for growing fireweed in your particular region, as some areas may consider it a noxious weed.

Place in a bright room that is sun drenched almost all day. Or directly in a south-facing window.

To water this plant, wait until the soil has dried out slightly before adding water to the pot. When watering, pour the water slowly and evenly around the base of the plant until it begins to trickle out of the drainage holes. Avoid getting water on the leaves or petals of the plant as it may cause damage. Additionally, reduce watering during the winter months when the plant is in a dormant stage. Always check the soil's moisture level before watering to avoid over-watering which can lead to root rot.
To fertilize this plant, begin by selecting a slow-release fertilizer that is suitable for perennial plants. Apply the fertilizer according to the manufacturer's instructions, being careful not to over-fertilize. One approach is to spread the fertilizer around the base of the plant, taking care not to get any on the leaves or stems. It's best to fertilize this plant in the spring or early summer when it is actively growing. Additionally, be sure to water the plant well after fertilizing to help the nutrients penetrate the soil.
Chamerion angustifolium plant prefers well-draining soil with a pH level of 5.5 to 7.5. The soil should be loamy with a good amount of organic matter. It grows best in soil that is slightly moist but not waterlogged. The plant is tolerant of a wide range of soil types, including clay, sandy, or rocky soils, but it thrives in soil that is rich in nutrients. The addition of compost or aged manure can provide the necessary nutrients. It is important to avoid using soil that is heavily contaminated with pollutants or toxins.
To propagate this plant, first locate a mature plant with healthy stems and leaves. Next, identify the suitable cuttings to use for propagation, taking into consideration the age, growth rate and health of the plant. Cut several healthy stems with a sharp, sterile tool, ensuring they are at least 4 inches long and have at least one set of healthy leaves. Remove the bottom leaves, leaving some space below the node.
Next, prepare a well-draining soil mix, and moisten the soil.
Dip the cuttings in rooting hormone powder and insert them into the soil mix. The soil should be firmly packed around the stem to ensure that the cutting remains upright.
Cover the pot with a plastic bag or a glass jar to create a humidity tent over the cutting. This will help to create a humid environment for the cutting to help it root.
Place the pot in a bright area but out of direct sunlight to allow the cutting to root. Ensure the soil is kept moist but not waterlogged. After approximately two to three weeks, check the cutting for signs of rooting by gently tugging on it. If it resists, it has likely rooted, and it can be removed from the humid environment.
If you are transferring the plant to a garden bed, leave it to grow for several weeks more in its pot, before transplanting it to its new location.
Common pests of the fireweed include Spider mites, larvae. Make a habit of checking your fireweed frequently for pests so that any infestations can be caught and managed early.