Plant Overview
Often referred to as the Tube Clematis or Hyacinth-flowered Clematis, this unique beauty breaks the rules of its family. Unlike its cousins that aggressively scale trellises, Clematis heracleifolia is a "bushy" variety that stays closer to the ground, offering a refreshing structural change for garden borders. In late summer, it surprises onlookers with clusters of fragrant, sky-blue flowers that look remarkably like miniature hyacinths.
🔍 How to Identify
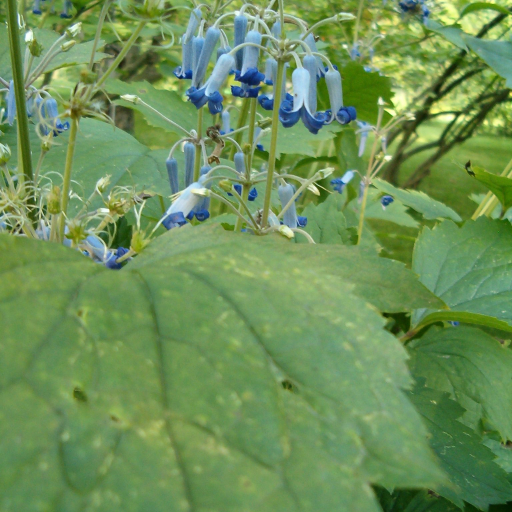
- 🌸 The Bloom: Small, tubular flowers in shades of lavender to indigo. The petals (actually sepals) recurve or curl back at the tips, giving them a distinct bell-like shape.
- 🍃 The Foliage: Large, coarse, trifoliate leaves that look more like a shrub or a perennial herb than a typical vine. The leaves resemble those of the Hogweed (Heracleum), which is how it earned its botanical name.
- 🏗️ Growth Habit: This is a non-climbing, semi-woody perennial. It grows in a mounding, sprawling clump rather than sending out long, twining tendrils to hunt for a fence.
🏡 In Your Garden
- 🌱 Root Logic: Like most Clematis, this plant prefers "cool feet and a warm head." It thrives when its roots are shaded by other plants or mulch, while its foliage enjoys the sunlight.
- ✂️ Hard Pruning: It belongs to "Pruning Group 3," meaning it blooms on the current year's growth. You should cut the entire plant back to about 6–12 inches from the ground in late winter or early spring to prevent it from becoming overly leggy.
- 🦋 Pollinator Magnet: The delicate fragrance and nectar-rich tubes are highly attractive to bees and butterflies during the "late summer slump" when other flowers might be fading.
⚠️ Safety & Toxicity
- 🚫 Status: Toxic to ingest and a mild skin irritant.
- 🐾 Details: Like all members of the Ranunculaceae family, it contains protoanemonin. If leaves are crushed and handled, the sap can cause skin blistering or redness. If eaten by pets or humans, it can lead to mouth sores, drooling, and digestive distress. Always wear gloves when pruning.
✨ Fun Fact
While most Clematis use their leaf stems (petioles) like tiny hands to grab onto things and climb, Clematis heracleifolia essentially "forgot" how to climb! It is one of the few species in the genus used primarily as a groundcover or a low-lying border shrub.

Detailed Care Instructions
To grow Clematis Heracleifolia, follow these steps:
- Choose a suitable location: Clematis Heracleifolia prefers a sunny or partially shaded spot in the garden. Make sure the area has well-draining soil.
- Prepare the soil: Before planting, prepare the soil by removing any weeds, rocks, or debris. Add organic matter, such as compost or well-rotted manure, to enrich the soil and improve its drainage.
- Planting: Dig a hole that is wide and deep enough to accommodate the plant's root ball. Place the Clematis Heracleifolia in the hole, ensuring the top of the root ball is level with or slightly above the soil surface. Backfill the hole with soil, pressing gently to remove air pockets around the roots.
- Watering: After planting, water the Clematis thoroughly and keep the soil moist but not waterlogged. Once established, the plant is moderately drought-tolerant but still benefits from regular watering during dry periods.
- Mulching: Apply a layer of organic mulch around the base of the plant to conserve moisture, suppress weed growth, and provide insulation to the roots. Keep the mulch a few inches away from the stem to prevent rot.
- Support: Clematis Heracleifolia is a climbing plant that requires support to grow. Install a trellis, fence, or other structure for the plant to climb upon. Tie the stems gently to the support as they grow.
- Pruning: In late winter or early spring, prune the plant to remove dead or damaged wood and maintain its shape. Clematis Heracleifolia blooms on new growth, so pruning helps promote vigorous growth and abundant flowering.
- Fertilizing: Feed the plant with a balanced, slow-release fertilizer in spring and apply a layer of compost around the base annually to replenish nutrients.
- Pests and diseases: Monitor the plant for pests like aphids or slugs and take appropriate action to control them. Clematis can be susceptible to fungal diseases, so provide adequate air circulation, avoid overhead watering, and remove any infected leaves or stems promptly.
- Enjoy your Clematis Heracleifolia: Once established, the plant will reward you with beautiful blooms and a pleasant fragrance. Regular care and maintenance will ensure healthy growth and optimal flowering.

Place in a bright room that is sun drenched almost all day. Or directly in a south-facing window.

To water this plant, you should thoroughly soak the soil around the base of the plant. Take care not to get water on the leaves or foliage as this can encourage disease. Water deeply at least once a week, more if the weather is particularly hot or dry. Allow the soil to dry out slightly between waterings, but not completely. Avoid letting the plant sit in standing water or in a container without drainage holes. Use a watering can or hose with a gentle flow to water the plant, and be sure to water early in the day to allow any excess moisture to evaporate before nightfall.
To fertilize the plant, mix a slow-release fertilizer into the soil surrounding the root ball at least once per year. Avoid applying fertilizer too close to the stem, as this can cause damage. Water the plant well after application, and repeat the process annually in the spring or early summer for best results.
Clematis Heracleifolia plant prefer well-draining soil that is rich in organic matter. A soil mix that contains nutrient-rich humus and loam is ideal for promoting healthy growth of the plant. It is important to avoid using heavy clay soils that retain too much water as this can lead to root rot. Additionally, the soil should be slightly acidic, with a pH level between 6.0 and 6.8. Amending the soil with compost or organic matter prior to planting can help improve soil quality and nutrient availability. When planting, ensure the root ball is placed at the same depth as it was in its previous container and water well. Mulching around the base of the plant can help retain moisture in the soil while also suppressing weed growth. Proper soil preparation and care can help ensure a healthy and vibrant Clematis Heracleifolia plant.
To propagate this plant, you will need to take stem cuttings from a mature plant during the growing season. Choose healthy, non-flowering stems that are at least 4-6 inches in length. Use sharp, clean scissors and make a clean cut just below a pair of leaves.
Remove the leaves from the lower 2/3 of the stem, leaving only a few leaves at the top. Dip the cut end into rooting hormone (optional) and plant the cutting into a small pot filled with moist, well-draining soil. Cover the pot with a plastic bag to create a humid environment, and place it in a bright but indirect light.
Keep the soil moist but not waterlogged, and mist the cutting daily to keep it from drying out. After a few weeks, you should see new growth emerging from the stem, which means that the cutting has taken root. Once the new plant has grown several inches tall and has developed several leaves, it can be transplanted into a larger pot or planted directly into the ground.


