Plant Overview
Often called the "Painted Nettle" or "Flame Nettle," Coleus scutellarioides is the ultimate chameleon of the plant world. While most plants are prized for their ephemeral blooms, Coleus is the undisputed royalty of foliage, offering a permanent kaleidoscope of neon greens, deep burgundies, and electric pinks. Native to Southeast Asia and Australia, it has transitioned from a Victorian-era status symbol to a modern garden staple.
🔍 How to Identify
- 🍃 Leaf Patterns: The leaves are the main attraction, featuring scalloped or fringed edges and intricate patterns that look hand-painted with contrasting "zones" of color.
- 🌿 Square Stems: As a member of the Mint family (Lamiaceae), it possesses distinctive four-sided, square stems that are fleshy and semi-succulent.
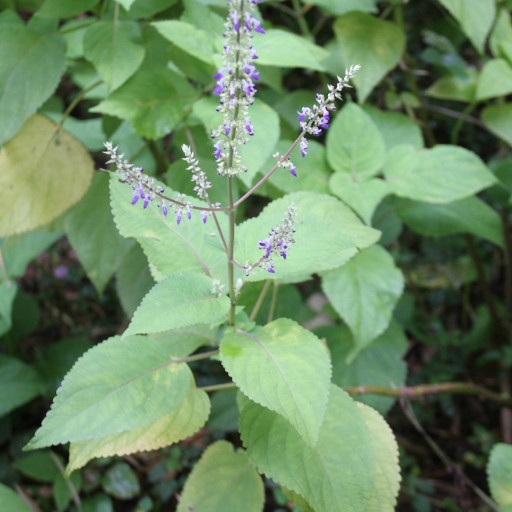
- 🌸 Blue Flower Spikes: It occasionally sends up tall, thin racemes of tiny, two-lipped blue or violet flowers, though these are often considered secondary to the leaves.
🏡 In Your Garden
- ✂️ The Pinching Secret: To keep your Coleus from becoming "leggy" or spindly, you should regularly pinch off the growing tips. This encourages the plant to put its energy into side-shoots, resulting in a much bushier, fuller shape.
- 🎨 Light vs. Color: The intensity of the leaf color is a delicate balance; while they love bright light, too much direct afternoon sun can "bleach" the pigments, while deep shade may cause the vibrant reds to fade into a dull green.
- 🌡️ Frost Phobia: Coleus is extremely sensitive to cold. It is often grown as an annual because the slightest touch of frost will cause the entire plant to collapse into a mushy state overnight.
⚠️ Safety & Toxicity
- 🐾 Toxic to Pets: Coleus contains essential oils and diterpenes that are toxic to dogs, cats, and horses. Ingestion can lead to vomiting, diarrhea, and occasionally bloody stool.
- 🧤 Skin Sensitivity: The sap can be a mild irritant to some people. If you have sensitive skin, it is best to wear gloves when pruning or taking cuttings to avoid a minor rash.
✨ Fun Fact
- 🎩 Victorian Obsession: During the mid-19th century, "Coleus Fever" gripped England. Gardening enthusiasts were so obsessed with breeding new color combinations that rare specimens were sold for staggering prices at high-society auctions.

Detailed Care Instructions
To grow Coleus Scutellarioides, also known as Coleus or Painted Nettle, follow these steps:
- Choose a suitable location: Coleus plants require partial shade to full shade, as direct sunlight can cause leaf burn. Indoors, place them near a bright window or under fluorescent lights.
- Prepare the soil: Use well-draining soil enriched with organic matter. Coleus prefers slightly acidic to neutral soil pH (around 6.0-7.0).
- Propagation: You can propagate Coleus through stem cuttings or by seed. Stem cuttings are the easiest and most common method. Cut a healthy stem just below a node (where leaves attach), remove lower leaves, and place the cutting into moist potting soil or water until roots develop. For seeds, sow them in a shallow tray and cover lightly with soil.
- Planting: When the roots have developed on the cuttings (or seedlings have grown), plant them in individual pots or in a garden bed around 12-18 inches apart. Ensure the soil is consistently moist but not waterlogged.
- Watering: Keep the soil evenly moist, but avoid overwatering. Allow the top inch of soil to dry between watering. Coleus plants appreciate high humidity, so misting the leaves or placing a tray of water nearby can be beneficial.
- Fertilization: Coleus plants are heavy feeders, so apply a balanced fertilizer every two weeks during the growing season (spring and summer). Follow the package instructions for correct dosage.
- Pruning: To encourage bushiness and prevent legginess, pinch off the tips of the stems regularly. This promotes lateral growth and compactness. You can also remove any dead or faded leaves to maintain a tidy appearance.
- Pests and diseases: Coleus plants may be susceptible to aphids, mites, and mealybugs. Regularly inspect your plants and control outbreaks by using insecticidal soap or a mixture of diluted neem oil. Avoid overwatering, as Coleus can be prone to root rot in waterlogged soil.
- Overwintering: Coleus plants are usually grown as annuals in colder regions. However, you can propagate new plants from stem cuttings before the first frost to bring indoors and overwinter as houseplants.
By following these steps, you should be able to successfully grow and enjoy Coleus Scutellarioides plants.

Place in a window with dappled sun or a spot in the middle of a room. Or directly in a window facing west or east.

To properly water this plant, check the soil moisture level regularly by sticking your finger one inch into the soil. If the soil feels dry, then water the plant deeply, until water flows out of the bottom of the pot. Allow the soil to drain completely before placing the plant back in its location. Avoid letting the soil become waterlogged or completely dry out, as this can harm the plant's roots. Consider using room temperature water, and do not allow the plant to sit in standing water, as this can encourage root rot. Lastly, adjust your watering frequency based on the plant's needs: if the plant is in a hot, dry location it may need more frequent watering than if it were in a cooler, humid spot.
To fertilize the Coleus plant, use a balanced fertilizer with equal parts of nitrogen, phosphorus, and potassium. Fertilize the plant every two weeks during its growing season. Make sure to dilute the fertilizer in water before applying it to the soil. Avoid over-fertilizing as it can lead to damage of the plant's roots. If you notice any yellowing of the leaves, reduce the amount of fertilizer you are using.
When planting the particular ornamental plant referred to in this question, it is important to choose a soil that is well-draining and nutrient-rich. Ideally, the soil should be loamy, with a balance of sand, silt, and clay. It should also be slightly acidic, with a pH range of 5.5 to 6.5. Organic matter, such as compost or manure, should be added to the soil to enhance its fertility. When transplanting, the new container should have drainage holes, and the plant should be watered thoroughly after planting. Ongoing care should involve regular watering, feeding with a balanced fertilizer, and occasionally pruning to maintain the plant's shape and maximize its colorful foliage.
To propagate this plant, take a cutting of a stem with several leaves from the mother plant. Remove the lowest leaves from the stem and dip the cut end into rooting hormone. Plant the stem in moist potting soil and cover it with a plastic bag to create a greenhouse effect. Keep the soil moist and place the plant in bright, indirect light. After a few weeks, the cutting should start to grow new leaves, which is a sign that it has successfully rooted. Once the roots are established, remove the plastic bag and either transfer the new plant to a larger pot or plant it outside in the garden.
Common pests of the coleus include Mealybugs, spider mites, fungus gnats, thrips. Make a habit of checking your coleus frequently for pests so that any infestations can be caught and managed early.


