Plant Overview
Often referred to as the Olive-leaved Bindweed, this shimmering Mediterranean native is far more elegant than its "weed" cousins. Clinging to the sun-scorched cliffs of Greece and North Africa, it is known for its luminous, silvery foliage that seems to glow under the moonlight. It is a "tough-as-nails" shrublet that brings a touch of wild, coastal grace to any rock garden or xeriscape.
🔍 How to Identify
- 🌿 Silk-Clad Leaves: The leaves are narrow, linear, and covered in fine, silky hairs that give the plant a distinct olive-green to metallic silver appearance.
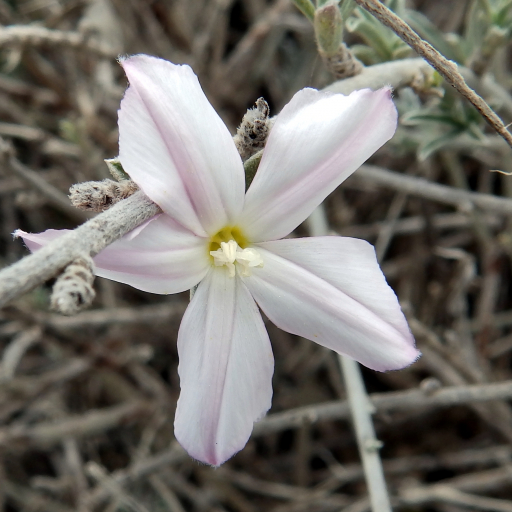
- 🌸 Trumpet Blooms: It produces delicate, funnel-shaped flowers, typically in shades of soft baby pink or pure white, often with a subtle yellow "star" in the center.
- Compact Mounds:** Unlike climbing bindweeds, this species grows in a low, woody, mounding habit, rarely exceeding 15–20 inches in height.
🏡 In Your Garden
- ☀️ The Sun Worshiper: This plant thrives in the harshest sunlight. If placed in the shade, it will lose its signature silver luster and become "leggy" as it stretches for light.
- 🏜️ Drought Specialist: It possesses a deep taproot and hairy leaves designed to trap moisture, making it incredibly drought-tolerant once established. It actually prefers "neglect" over frequent watering and will suffer in heavy, clay-rich soils.
- 🌬️ Coastal Warrior: Because of its Mediterranean origins, it is highly resistant to salt spray and wind, making it an ideal choice for seaside gardens where other plants might wither.
⚠️ Safety & Toxicity
- 🐾 Mildly Toxic: Like many members of the Convolvulaceae family, the Olive-leaved Bindweed contains alkaloids that can cause digestive upset.
- 👶 Keep Away from Grazers: While not usually life-threatening, it can cause vomiting or lethargy in cats, dogs, or curious toddlers if ingested in significant amounts. The sap may also cause mild skin irritation for those with sensitive skin.
✨ Fun Fact
The specific epithet oleifolius literally translates to "leaves like an olive tree." This is a clever evolutionary trick—the silver hairs reflect intense UV rays, preventing the plant from overheating in its native volcanic and limestone habitats!

Detailed Care Instructions
Growing Convolvulus oleifolius, also known as bindweed or bush morning glory, involves several steps. Here's a guide to help you cultivate this plant successfully:
Selecting the Right Location
- Sunlight: Convolvulus oleifolius thrives in full sun. Choose a location that gets at least 6-8 hours of direct sunlight daily.
- Soil: This plant prefers well-drained soil. Sandy or loamy soil types are ideal. The soil pH should be neutral to slightly alkaline, between 7.0 to 8.0.
Planting
- Propagation:
- Seeds: Start by soaking seeds in warm water for 12 hours before planting to soften the seed coat. This helps in quicker germination.
- Cuttings: Take cuttings from healthy plants. Dip the cut end in rooting hormone and plant in a pot filled with a mixture of sand and peat.
- Seeds: Start by soaking seeds in warm water for 12 hours before planting to soften the seed coat. This helps in quicker germination.
- Planting Time: The best time to plant either seeds or cuttings is in the spring when the danger of frost has passed.
- Spacing: Space plants about 12-18 inches apart to give them room for growth and spread.
Care
- Watering: Water the plant regularly, especially during dry periods. However, make sure not to over-water as it prefers well-drained soil. Overwatering can lead to root rot.
- Mulching: Apply mulch around the base of the plant to help retain soil moisture and reduce weed growth.
- Fertilizing: Convolvulus oleifolius does not require heavy fertilization. A slow-release balanced fertilizer applied in early spring will suffice.
- Pruning: Prune back dead or damaged stems to encourage new growth and maintain a neat appearance. Regular pruning also helps control its spread.
Pests and Diseases
- Pests: This plant is relatively pest-resistant but can occasionally be affected by aphids or spider mites. Insecticidal soap or neem oil can control these pests.
- Diseases: Powdery mildew or root rot can occur, especially with over-watering or poor air circulation. Ensure the plant has good drainage and avoid overhead watering.
Additional Tips
- Winter Care: In areas with severe winters, protect the plant with a layer of mulch or move potted plants indoors.
- Container Growth: If growing in containers, ensure the pot has good drainage holes and use a light, well-draining potting mix.
By following these steps, you can enjoy the attractive and hardy Convolvulus oleifolius plant in your garden or as part of your landscape.

Place in a bright room that is sun drenched almost all day. Or directly in a south-facing window.

To effectively water Convolvulus oleifolius, follow these steps for optimal growth and health:
### Soil & Drainage
1. **Soil Type**: Use well-draining soil. A sandy or loamy mix is ideal, as it prevents water from pooling at the roots, which can lead to root rot.
2. **Potting**: If planted in a pot, ensure it has drainage holes. Use a potting mix designed for cacti or succulents if possible, as these mixes are typically well-draining.
### Watering Frequency
1. **Initial Planting**: When newly planted, water it thoroughly to help the roots establish. Ensure the soil is moist but not waterlogged.
2. **Established Plants**: Once established, reduce watering frequency. Typically, during the growing season (spring and summer), water when the top 1-2 inches (2.5-5 cm) of soil feels dry.
3. **Dormant Period**: During the dormant period (fall and winter), significantly reduce watering. Water just enough to prevent the soil from completely drying out.
### Watering Method
1. **Direct Watering**: Water at the base of the plant, avoiding the foliage to reduce the risk of fungal diseases. Use a watering can with a narrow spout for precision.
2. **Deep Watering**: Instead of frequent shallow watering, opt for deep watering to encourage the roots to grow deeper into the soil. Water until it begins to drain out of the bottom of the pot or until the soil is saturated about 6-8 inches (15-20 cm) down if planted in the ground.
### Environmental Considerations
1. **Climate**: Adjust watering frequency based on the local climate. In hot, dry climates, more frequent watering might be necessary, whereas in cooler or more humid areas, less frequent watering will suffice.
2. **Rainfall**: If grown outdoors, account for natural rainfall. During rainy periods, you might not need to water at all.
### Monitoring
1. **Regular Checks**: Regularly check the soil moisture by inserting your finger into the soil or using a moisture meter. Ensure it is not too dry or too wet.
2. **Signs of Over/Underwatering**: Yellowing leaves can indicate overwatering, while wilting or dry, crispy leaves can signal underwatering. Adjust your watering schedule accordingly.
By following these guidelines, you can maintain a healthy Convolvulus oleifolius and promote its vibrant growth. Remember that the specific needs can vary based on individual environmental factors, so be attentive and responsive to the plant’s condition.
Convolvulus oleifolius benefits from proper fertilization to ensure robust growth and vibrant blooms. Here are the fertilizing instructions:
- Soil Testing: Before you start fertilizing, consider testing the soil to determine its nutrient content. This helps in understanding which nutrients may be lacking.
- Type of Fertilizer: Use a balanced, all-purpose fertilizer with a ratio such as 10-10-10 (Nitrogen-Phosphorus-Potassium) or one that is slightly higher in phosphorus to encourage flowering, like 10-20-10.
- Timing: Fertilize the plant in the early spring as new growth begins. You can apply another round of fertilizer mid-season to support ongoing growth and blooming.
- Application Rate: Follow the instructions on your chosen fertilizer package regarding the proper application rate. As a general guideline, granular fertilizers can be applied at a rate of about 1 to 2 pounds per 100 square feet.
- Method: For granular fertilizers, sprinkle them evenly around the base of the plant, being careful to avoid direct contact with the stem. Lightly scratch the fertilizer into the top inch of soil and then water thoroughly to help the nutrients seep into the soil.
- Organic Options: Alternatively, you can use compost or well-rotted manure as an organic fertilizer. This should be mixed into the soil around the plant at the beginning of the growing season.
- Frequency: If using a slow-release fertilizer, one application in the spring may be sufficient. For liquid fertilizers, you may need to apply them every 4-6 weeks throughout the growing season.
- Watering: Always water your plant after applying fertilizer to help dissolve the nutrients and prevent root burn. Consistent watering is key, but ensure the soil has good drainage to avoid waterlogging.
By following these instructions, you can help your Convolvulus oleifolius thrive and produce abundant blooms throughout the growing season.
When cultivating Convolvulus oleifolius, it's important to provide the right soil conditions to ensure optimal growth. This plant thrives in well-draining soils, as it does not tolerate waterlogged conditions. Here's a detailed guide on the soil requirements for Convolvulus oleifolius:
Soil Composition
- Well-Draining:
- The key characteristic of soil for Convolvulus oleifolius is excellent drainage. This helps prevent root rot and other issues associated with excessive moisture.
- The key characteristic of soil for Convolvulus oleifolius is excellent drainage. This helps prevent root rot and other issues associated with excessive moisture.
- Texture:
- Sandy or sandy-loam soils are ideal due to their natural drainage properties.
- If the native soil is heavy clay, consider amending it with sand or fine gravel to improve drainage.
- Sandy or sandy-loam soils are ideal due to their natural drainage properties.
- pH Level:
- Convolvulus oleifolius prefers neutral to slightly alkaline soils.
- Aim for a pH range of 6.5 to 8.0. You can adjust soil pH by adding lime (to increase alkalinity) or sulfur (to decrease alkalinity).
- Convolvulus oleifolius prefers neutral to slightly alkaline soils.
- Nutrient Content:
- While this plant is not particularly demanding in terms of soil fertility, a moderately fertile soil will support better growth and flowering.
- Before planting, you can incorporate a balanced, slow-release fertilizer to provide essential nutrients without overwhelming the plant.
Soil Preparation
- While this plant is not particularly demanding in terms of soil fertility, a moderately fertile soil will support better growth and flowering.
- Amending Soil:
- Incorporate organic matter such as compost or well-rotted manure into the soil. This improves soil structure and provides some nutrients.
- For sandy soils, adding organic matter can help retain moisture and nutrients.
- Incorporate organic matter such as compost or well-rotted manure into the soil. This improves soil structure and provides some nutrients.
- Bed Preparation:
- Prepare a raised bed if your garden has poorly draining soil to improve water runoff.
- Ensure the planting site receives plenty of sunlight, as Convolvulus oleifolius prefers full sun conditions.
Maintenance Tips
- Prepare a raised bed if your garden has poorly draining soil to improve water runoff.
- Mulching:
- Apply a layer of mulch around the base of the plant. Use materials that do not retain excessive moisture, such as coarse gravel or bark chips.
- Mulch helps to retain moisture, suppress weeds, and maintain a more stable soil temperature.
- Apply a layer of mulch around the base of the plant. Use materials that do not retain excessive moisture, such as coarse gravel or bark chips.
- Watering:
- Water the plant deeply but infrequently, allowing the soil to dry out slightly between waterings.
- During prolonged dry periods, ensure the plant receives enough water to prevent stress.
By paying attention to these soil requirements and preparation techniques, you can create a favorable environment that supports the healthy growth and blooming of Convolvulus oleifolius.
- Water the plant deeply but infrequently, allowing the soil to dry out slightly between waterings.
Propagating Convolvulus oleifolius can be done through either seeds or cuttings. Here’s a detailed guide on both methods:
Propagation by Seeds
- Seed Collection:
- Collect seeds from mature plants. This usually occurs after the flowering season when the flowers have dried up and the seed pods have formed.
- Collect seeds from mature plants. This usually occurs after the flowering season when the flowers have dried up and the seed pods have formed.
- Preparation:
- Clean the seeds to remove any debris or plant material.
- Soak the seeds in warm water for 24 hours to soften the seed coat and improve germination rates.
- Clean the seeds to remove any debris or plant material.
- Sowing:
- Fill seed trays or pots with a well-draining potting mix. A mix of 50% peat and 50% perlite or sand works well.
- Sow the seeds about 1/8 inch deep in the soil.
- Lightly water the soil to keep it moist but not waterlogged.
- Fill seed trays or pots with a well-draining potting mix. A mix of 50% peat and 50% perlite or sand works well.
- Germination:
- Place the seed trays or pots in a warm location with indirect sunlight.
- Maintain a consistent temperature between 65-75°F (18-24°C).
- Seeds typically germinate within 2-4 weeks.
- Place the seed trays or pots in a warm location with indirect sunlight.
- Transplanting:
- Once seedlings have developed a few sets of true leaves and are large enough to handle, transplant them into individual pots or directly into the ground.
- Ensure the new planting location has well-draining soil and receives full sunlight.
Propagation by Cuttings
- Once seedlings have developed a few sets of true leaves and are large enough to handle, transplant them into individual pots or directly into the ground.
- Selection of Cuttings:
- Choose healthy, mature sections of the plant that are free from disease.
- Ideally, select semi-hardwood cuttings taken during the growing season (spring or early summer).
- Choose healthy, mature sections of the plant that are free from disease.
- Preparation:
- Cut sections that are 4-6 inches long, making sure each cutting has at least 2-3 nodes (areas where leaves attach).
- Remove the leaves from the lower half of the cutting to reduce moisture loss and focus the plant's energy on root development.
- Cut sections that are 4-6 inches long, making sure each cutting has at least 2-3 nodes (areas where leaves attach).
- Rooting Hormone:
- Optional but recommended: Dip the cut end of each cutting into rooting hormone powder or gel to enhance root development.
- Optional but recommended: Dip the cut end of each cutting into rooting hormone powder or gel to enhance root development.
- Planting:
- Place the cuttings into pots filled with a well-draining mix of peat and perlite or sand.
- Insert each cutting about 1-2 inches into the soil, making sure at least one node is buried.
- Place the cuttings into pots filled with a well-draining mix of peat and perlite or sand.
- Aftercare:
- Water the soil lightly to keep it moist.
- Cover the pots with a plastic bag or place them in a propagator to maintain high humidity.
- Place the pots in a warm, indirect light location.
- Water the soil lightly to keep it moist.
- Root Development:
- After several weeks, the cuttings should develop roots. Gently tug on the cuttings to check for resistance, indicating root growth.
- Once well-rooted, gradually acclimate the new plants to outdoor conditions by removing the plastic bag or propagator lid.
- After several weeks, the cuttings should develop roots. Gently tug on the cuttings to check for resistance, indicating root growth.
- Transplanting:
- Transplant the rooted cuttings into larger pots or directly into the garden.
- Ensure the new planting site has well-draining soil and receives full sunlight for optimal growth.
By following these steps, you should be able to successfully propagate Convolvulus oleifolius and enjoy its growth and beauty in your garden.
- Transplant the rooted cuttings into larger pots or directly into the garden.


