Plant Overview
Known by the charming nickname "Zig-zag Plant," Corokia cotoneaster is a living architectural masterpiece hailing from the rugged coastlines of New Zealand. Its tangled, wiry branches look almost like a piece of modern art or a tumbleweed caught in a frozen dance. Despite its delicate, "see-through" appearance, this plant is a tough survivor, evolved to withstand the harshest winds of its island home.
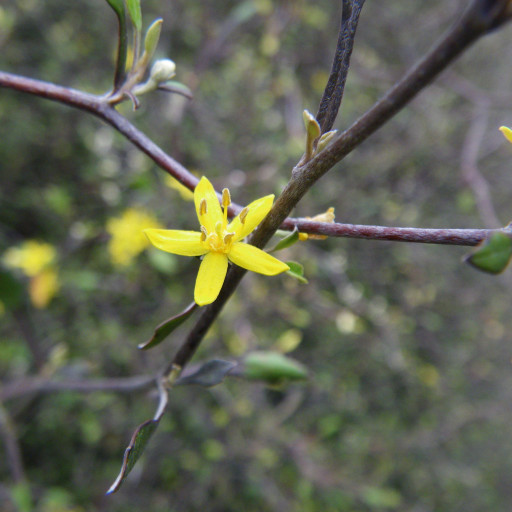
🔍 How to Identify
- 🌿 The Skeleton: Its most striking feature is its "divaricating" growth habit—the stems grow in an intricate, zig-zagging pattern that creates a dense, wire-like thicket.
- 🍃 Small Foliage: The leaves are tiny, spoon-shaped, and dark green on top, but look closely at the undersides; they are covered in soft, silvery-white fuzz.
- ⭐ Seasonal Gems: In spring, it produces tiny, star-shaped yellow flowers that smell faintly of honey, followed by vibrant red or orange berries in the autumn.
🏡 In Your Garden
- 🌬️ Wind Warrior: Because it evolved in coastal New Zealand, it is incredibly wind-tolerant and salt-hardy. It makes an excellent "living screen" or windbreak for exposed balconies and coastal gardens.
- ✂️ Living Sculpture: It is a favorite among minimalist gardeners and bonsai enthusiasts. While it looks wild, it responds beautifully to clipping and can be shaped into tight, silver-grey geometric globes or hedges.
- 🪴 Drainage is Vital: The "Zig-zag" plant hates having "wet feet." It has a sensitive root system that will rot quickly in heavy, waterlogged soil, so always use a gritty, free-draining mix.
⚠️ Safety & Toxicity
- ✅ Safe Standing: Corokia cotoneaster is generally considered non-toxic to humans and common household pets like cats and dogs.
- 🐾 Pet-Friendly Choice: It is a fantastic choice for a sensory garden or a pet-friendly landscape, though the wiry branches might be a bit scratchy if a curious pup runs through them.
✨ Fun Fact
Scientists believe the plant’s weird zig-zagging branches evolved as a defense mechanism against the Moa—a giant, flightless, now-extinct bird. The tangled "wire" structure made it difficult for the giant birds to reach the leaves!

Detailed Care Instructions
| Color | Green With Yellow Flowers |
| Soil Ph | 6.5–8 |
| Lighting | Full Sun |
| Toxicity | Non-Toxic |
| Soil Type | Rich, Well-Draining Soil |
| Bloom Time | Spring |
| Plant Type | Zig-Zag Shrub |
| Mature Size | 6-10 Feet Tall |
| Native Area | New Zealand |
| Sun Exposure | Full Sun To Partial Shade |
| Hardiness Zones | 8-10 |
To grow Corokia cotoneaster, follow these steps:
- Choose the right location: Corokia cotoneaster prefers full sun to partial shade. Select a location that receives at least 6 hours of direct sunlight per day. Ensure that the soil is well-draining.
- Prepare the soil: Corokia cotoneaster thrives in a slightly acidic to neutral soil pH range of 6.0-7.5. Amend the soil with organic matter such as compost or well-rotted manure to improve its structure and fertility.
- Planting: Dig a hole that is wide and deep enough to accommodate the plant's root ball. Remove the plant from its container and gently loosen the roots. Place the plant in the hole, backfill with soil, and firm it around the base of the plant. Ensure that the plant is at the same depth as it was in its container.
- Watering: Water thoroughly after planting to settle the soil and eliminate air pockets around the roots. Water regularly, especially during the establishment period, to keep the soil slightly moist but not waterlogged. Avoid overwatering as it can lead to root rot.
- Mulching: Apply a layer of organic mulch around the base of the plant to conserve soil moisture, suppress weed growth, and regulate soil temperature. Keep the mulch away from the plant's stem to avoid rot.
- Pruning: Corokia cotoneaster generally requires minimal pruning. However, you can prune to shape the plant or to remove any dead, damaged, or crossing branches. Pruning is best done in early spring before new growth begins.
- Fertilization: Fertilize Corokia cotoneaster annually in early spring using a balanced, slow-release fertilizer. Follow the instructions on the fertilizer packaging for dosage and application guidelines.
- Pests and diseases: Corokia cotoneaster is relatively resistant to pests and diseases. However, occasional pest attacks like aphids or scale insects may occur. Monitor the plant regularly and take appropriate action if needed, such as using organic pest control methods or insecticidal soaps.
Remember to regularly monitor the plant's health, provide adequate water, and ensure proper sunlight exposure to promote healthy growth.

Place in a window with dappled sun or a spot in the middle of a room. Or directly in a window facing west or east.

To properly water this plant, thoroughly soak the soil around the base of the plant, making sure that water reaches the root system. It is important to not let the soil become too dry, but also not to overwater and make the soil waterlogged. The plant prefers well-draining soil and can tolerate some drought. When watering, avoid getting water on the leaves or foliage of the plant, as this can promote disease or fungal growth. Instead, focus on water at the base of the plant. It is also important to adjust watering according to the weather, decreasing the frequency during cooler months and increasing during hot summer months.
For best results, fertilize this plant once every two to three months with a balanced, slow-release fertilizer. Make sure to water the plant thoroughly before fertilizing and avoid getting the fertilizer on the leaves or stems. In addition, it is important to monitor the plant's growth and adjust fertilization accordingly, as overfertilization can lead to leaf burn and other problems.
The ideal soil for this plant should be well-draining, loamy soil with a neutral pH level. It should be rich in organic matter and have good water-holding capacity to ensure the plant remains hydrated during dry spells. A soil that is too heavy or compacted can lead to poor drainage and result in root rot. The plant also prefers a slightly acidic to neutral soil pH range between 6.0 and 7.5. A soil test can help determine the pH level of the soil before planting. Additionally, the plant needs proper drainage to prevent excessive moisture retention and should not be planted in areas prone to waterlogging. Regular fertilization can also help the plant thrive by providing essential nutrients for healthy growth.
To propagate this plant, you will need to take stem cuttings in the spring or early summer. Select healthy stems that are at least 4 inches long and have several sets of leaves. Cut the stem just below a leaf node, making sure to use a sharp, clean pair of pruning shears.
Remove the leaves from the bottom half of the stem, leaving only a few at the top. Dip the cut end of the stem into rooting hormone powder, and then plant it in a container filled with a well-draining potting mix. Water the cutting well, and then cover the container with a clear plastic bag to create a humid environment.
Place the container in a warm, bright location, but out of direct sunlight. Keep the soil moist but not waterlogged, and mist the cutting daily to maintain humidity. Within a few weeks, roots should start to develop.
Once the roots are well-established (after about 6-8 weeks), transplant the cutting into a larger pot or directly into the garden. Be sure to gradually acclimate the plant to outdoor conditions if transplanting outside, as it may have been acclimatized to indoor conditions.


