Plant Overview
Known as the Small-Leaved Cotoneaster or the "Rockspray of the Himalayas," this low-growing evergreen is a favorite for those wanting a living carpet of green. Native to the high altitudes of Asia, it has evolved to hug the ground tightly, making it a master of erosion control and a stunning addition to rocky landscapes. Its tiny, glossy leaves and bright red berries make it look like a miniature forest floor in any garden.
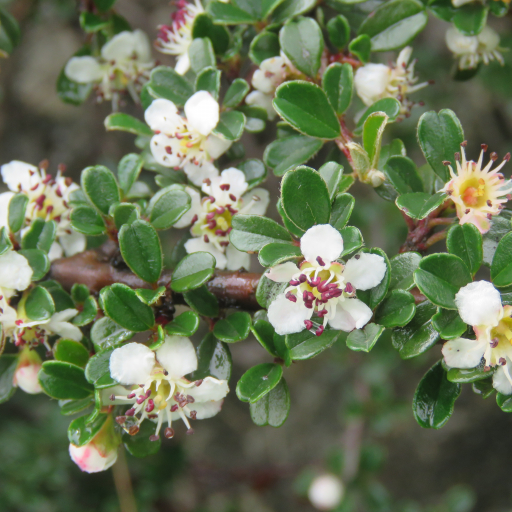
🔍 How to Identify
- 🍃 The Foliage: The leaves are exceptionally small (often less than half an inch), dark green on top, and slightly fuzzy or "felted" underneath, giving them a silvery shimmer when the wind blows.
- 🌸 The Bloom: In late spring, it produces solitary, five-petaled white flowers with pink-tipped anthers. Unlike other Cotoneasters that bloom in clusters, these often appear as "single stars" against the green.
- 🍒 The Berries: By autumn, the plant is covered in round, bright scarlet-red pomes that persist well into winter, providing a stark contrast against the deep green leaves.
🏡 In Your Garden
- 🧗 The Rock Hugger: Because of its prostrate growth habit, this plant is perfect for "spilling" over stone walls or filling in gaps in rock gardens where other plants might struggle with thin soil.
- ✂️ Bonsai Potential: Due to its naturally small leaves and woody, gnarled branching pattern, it is one of the most popular species for beginner bonsai enthusiasts looking to create a "shrub-style" miniature tree.
- 🌱 Low Maintenance: Once established, it is remarkably drought-tolerant. It prefers well-drained soil and actually thrives in "poor" soil conditions, as too much nitrogen can make it grow leggy rather than compact.
⚠️ Safety & Toxicity
- 🐾 Mildly Toxic: The berries contain cyanogenic glycosides. While birds love them, they can cause stomach upset, vomiting, or lethargy in dogs, cats, and horses if consumed in large quantities.
- 👶 Keep Away from Toddlers: The bright red berries are very attractive to children. While not usually fatal, eating them can cause significant digestive distress and should be avoided.
✨ Fun Fact
The species name microphyllus literally translates from Greek as "tiny leaf." Because these leaves are so small, the plant has a very high "surface-to-edge" ratio, which helps it survive the biting, cold winds of its native Himalayan mountain home without losing too much moisture.

Detailed Care Instructions
To grow Cotoneaster Microphyllus, follow these steps:
- Select a suitable planting location: Cotoneaster Microphyllus prefers full sun to partial shade. Choose a well-drained area with moderately fertile soil.
- Prepare the soil: Loosen the soil in the planting area and mix in organic matter such as compost or well-rotted manure to improve fertility and drainage.
- Planting: Dig a hole slightly larger and deeper than the root ball of the plant. Place the plant into the hole at the same level it was previously growing. Backfill the hole with soil, gently firming it around the roots.
- Watering: Water the plant thoroughly after planting and continue to water regularly, especially during dry periods, for the first year until the plant is established.
- Mulching: Apply a layer of mulch around the base of the plant to help conserve moisture, suppress weed growth, and insulate the roots.
- Pruning: Cotoneaster Microphyllus requires regular pruning to maintain its shape and encourage bushy growth. Prune in early spring to remove dead or damaged branches and shape the plant as desired.
- Fertilizing: Apply a balanced slow-release fertilizer in spring to promote healthy growth. Follow the manufacturer's instructions for application rates.
- Pest and disease management: Cotoneaster Microphyllus is generally resistant to pests and diseases. However, occasional problems include aphids, scale insects, and fire blight. Monitor the plant regularly and take appropriate action if needed.
- Propagation: You can propagate Cotoneaster Microphyllus through seeds or by taking semi-hardwood cuttings in summer or early autumn.
Remember to check your specific variety of Cotoneaster Microphyllus for any specific care instructions or requirements.

Place in a window with dappled sun or a spot in the middle of a room. Or directly in a window facing west or east.

Cotoneaster Microphyllus is a plant that needs regular watering in order to thrive. The soil around the plant should be kept moist but not waterlogged. It is important to water the plant deeply every week or two, rather than giving it a shallow watering more frequently. To ensure that the water reaches the roots of the plant, it is recommended to water it slowly and deeply, allowing the water to soak into the soil. It is also important to avoid getting water on the leaves of the plant, as this can lead to fungal diseases. In hot and dry weather conditions, it may be necessary to water the plant more frequently. A good way to check if the plant needs water is to stick your finger into the soil around the plant. If the soil is dry to a depth of one inch, it is time to water the plant.
The best time to fertilize the plant is in the spring or early summer. You can use a balanced fertilizer that is high in nitrogen, phosphorus, and potassium. Use a granular fertilizer, and follow the manufacturer's instructions on the packaging for the right amount and frequency of application. Avoid over-fertilizing, as this can lead to excessive growth and weak stems. Water the plant thoroughly after fertilizing to ensure that the nutrients reach the roots.
The ideal soil for this plant would be a well-draining soil that is rich in organic matter. It should have a slightly acidic to neutral pH level, preferably around 6.0-7.0. The soil should be moist but not waterlogged, as this can lead to root rot. The plant prefers a fertile soil that is able to retain some moisture, but at the same time allows air to reach the roots. The type of soil can also depend on the location and climate in which the plant is being grown. It is important to avoid using heavy or compacted soil, as this can hinder root growth and increase the risk of disease. A good mix can include compost, perlite or pumice and a quality potting mix.
The first step in propagating this particular plant is to obtain fresh cuttings from a mature and healthy parent plant. Make sure to select cuttings that are at least 6 inches long and have at least two sets of leaves.
Next, remove the leaves from the bottom half of the cutting. This will expose the nodes that will be used for root development.
Dip the cut end of the cutting in rooting hormone powder and tap off any excess.
Prepare a pot with a well-draining soil mixture and create holes for the cuttings. Insert the cutting into the soil, making sure at least one node is below the surface.
Water the cutting thoroughly and place it in a bright, but indirect, location.
It is important to keep the soil moist and consistently warm during this process. Cover the pot with a clear plastic bag to create a mini greenhouse and promote humidity.
Check the cutting regularly to ensure it is not drying out or rotting. Once roots have formed, the new plant can be transplanted to a larger pot or into the ground.
Common pests of the small-leaf cotoneaster include Scale insect, mealybugs, spider mites, aphids. Make a habit of checking your small-leaf cotoneaster frequently for pests so that any infestations can be caught and managed early.


