Plant Overview
Known as the Many-flowered Cotoneaster, this shrub is a master of seasonal transformation. Native to the cool mountain slopes of China and Central Asia, it is prized for its elegant, fountain-like arching branches. In late spring, it lives up to its name by becoming a literal cloud of white blossoms, followed by a spectacular show of crimson berries that persist long into the winter.
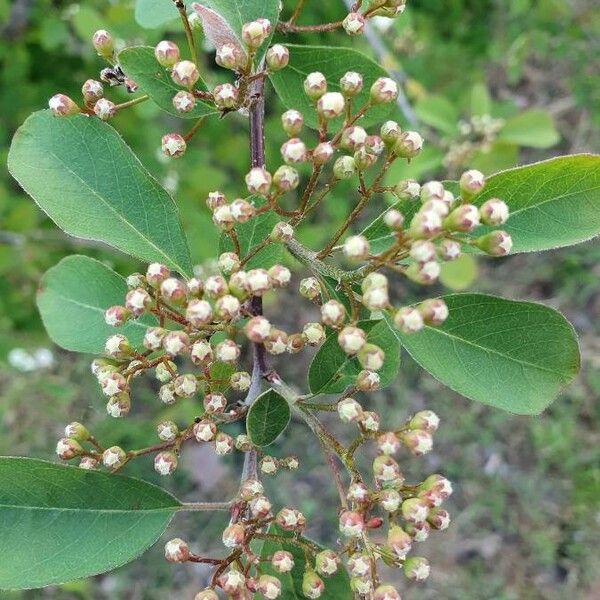
🔍 How to Identify
- 🌸 Floral Display: It produces dense clusters of 5 to 20 small, white, five-petaled flowers. During peak bloom, the blossoms are so profuse they can almost entirely hide the green foliage.
- 🍃 Foliage Texture: The leaves are broadly ovate with a smooth, dull green upper surface and a distinctive grayish-hairy underside that gives the plant a soft, silvery shimmer in the wind.
- 🍒 Autumn Berries: As the weather cools, the plant produces abundant "pomes" (berry-like fruits) that are small, round, and a vivid, glossy red.
🏡 In Your Garden
- 🏗️ Architectural Growth: This shrub naturally wants to spread and arch. To maintain its beauty, avoid "haircut" style pruning; instead, selectively remove older branches at the base to allow the younger, more vigorous stems to cascade gracefully.
- 🌍 Resilient Roots: Once established, this species is remarkably drought-tolerant and handles wind better than many other garden shrubs. It’s an excellent choice for erosion control on slopes or as a "living fence" that requires very little intervention.
⚠️ Safety & Toxicity
- 🚫 Toxic if Ingested: Like many members of the Rose family, the berries contain cyanogenic glycosides. While they are a favorite for wildlife, they are toxic to humans, dogs, and cats.
- 🤢 Symptoms: Ingestion can lead to dilated pupils, respiratory distress, and severe stomach upset. It is best kept out of reach of curious toddlers and pets who like to forage in the yard.
✨ Fun Fact
While the berries are toxic to us, they act as a vital "winter pantry" for birds! Some bird species actually wait until the berries have frozen and thawed several times, which softens the fruit and makes the nutrients easier to access during the harshest months of the year.

Detailed Care Instructions
To grow Cotoneaster multiflorus, follow these steps:
- Planting: Select a well-draining location with full sun to partial shade. The soil should be fertile and slightly acidic. Dig a hole slightly larger than the root ball of the plant and place it in the hole. Make sure the top of the root ball is level with or slightly above the soil surface.
- Watering: Water the plant thoroughly after planting and keep the soil consistently moist during the first growing season. Once established, Cotoneaster multiflorus is drought-tolerant and can withstand periods of dry soil. However, regular watering during extended dry periods will help the plant thrive.
- Mulching: Apply a layer of organic mulch around the base of the plant to conserve moisture, suppress weeds, and regulate soil temperature. Keep the mulch a few inches away from the trunk to prevent rotting.
- Pruning: Cotoneaster multiflorus can benefit from regular pruning to maintain its shape and promote healthy growth. Prune in early spring before new growth starts, removing any dead or damaged branches. You can also lightly prune to control its size or shape it as desired.
- Fertilizing: Cotoneaster multiflorus generally doesn't require much fertilization, but you can apply a slow-release balanced fertilizer in early spring to provide essential nutrients throughout the growing season. Be cautious not to over-fertilize, as excessive nitrogen can lead to excessive foliage growth at the expense of flowers and fruits.
- Pests and Diseases: Cotoneaster multiflorus is generally resistant to pests and diseases. However, keep an eye out for common garden pests like aphids, scale insects, and spider mites. Treat infestations as soon as possible using organic insecticides or by encouraging natural predators like ladybugs.
- Propagation: Cotoneaster multiflorus can be propagated through seeds, stem cuttings, or layering. Seeds can be directly sown in the desired location in early spring, while stem cuttings can be taken in late spring or early summer and rooted in moist soil or water. Layering involves bending low-growing stems to the ground, partially burying them, and waiting for them to develop roots before severing them from the parent plant.
By following these steps and providing adequate care, you can successfully grow Cotoneaster multiflorus in your garden.

Place in a bright room that is sun drenched almost all day. Or directly in a south-facing window.

To properly water this plant, make sure to first check the soil moisture by inserting your finger into the soil about 1-2 inches deep. If the soil feels dry, it is time to water. Use a watering can or hose with a gentle spray nozzle to water the soil, not the leaves or flowers, until the soil is moist but not waterlogged. Avoid overwatering, as this can lead to root rot and other issues. Allow the soil to dry out slightly between waterings. The frequency of watering depends on various factors such as the climate, soil, and pot size. It is important to provide regular, deep watering during the growing season. In the winter, reduce watering frequency to prevent waterlogging.
To effectively fertilize this plant, you should use a slow-release fertilizer with a balanced N-P-K ratio. Apply the fertilizer in early spring before new growth begins. Spread it evenly around the base of the plant, making sure to keep it away from the stems and leaves. Water the plant after fertilization to help dissolve the fertilizer and carry it down to the roots. Avoid fertilizing during the winter or late fall, as the plant's growth will slow down during these seasons.
The ideal soil to use with this plant should be well-draining and porous, with good aeration. The pH level should be slightly acidic to neutral, between 6.0 to 7.5. The soil should be rich in organic matter, with a good mix of sand, silt, and clay. It should be moist, but not waterlogged, as the plant does not tolerate waterlogged conditions. A good mix can include compost, top soil, and peat moss. The plant prefers soils that are loamy or sandy loam, with a relatively low nutrient content. It is also important to avoid soils that may be contaminated with heavy metals, as this can negatively affect the health of the plant.
To propagate this plant, you will need to take cuttings from the parent plant. Choose a stem with firm, healthy growth and cut it just below a node. Remove any leaves from the bottom half of the stem.
Dip the cut end in rooting hormone powder and plant the cutting in a pot of moist potting soil. Cover the pot with a plastic bag to create a mini greenhouse and place it in a brightly lit spot. Make sure the soil stays moist but not waterlogged.
Over the next few weeks, the cutting should begin to develop roots. Once the roots are established, you can transplant the new plant into a larger pot or directly into the ground.


