Plant Overview
The Tropical Flatsedge, scientifically known as Cyperus surinamensis, is a resilient and structurally striking member of the sedge family. Often found dancing in the breeze along tropical canal banks and marshes, it is beloved by naturalists for its geometric, umbrella-like seed heads. While some gardeners view it as a persistent "weed" due to its ability to thrive in poor soil, others appreciate its architectural silhouette in water gardens.
🔍 How to Identify
- 📐 The Stem: Like most sedges, it follows the rule "sedges have edges." If you roll the stem between your fingers, you’ll feel a distinct, sharp triangular shape.
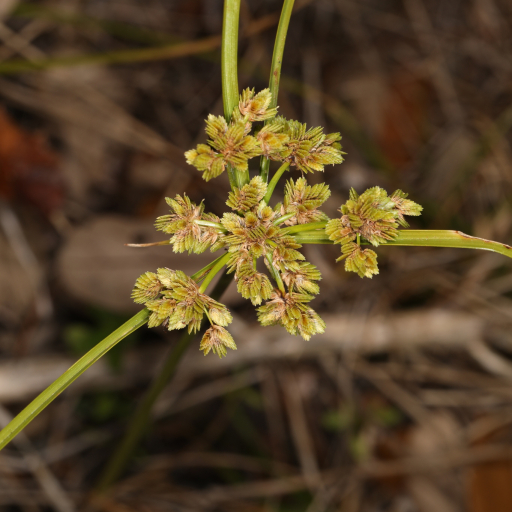
- 🌾 The Seed Heads: The plant features crowded, umbrella-like clusters of flat, yellowish-green to golden-brown spikelets that radiate from the top of the stalk.
- 🍃 The Foliage: Long, narrow, grass-like leaves sprout mostly from the base, though several leaf-like "bracts" sit directly underneath the flowering clusters, framing them like a green star.
🏡 In Your Garden
- 💧 The "Water-Lover" Logic: This plant is an obligate wetland species, meaning it is the perfect candidate for those "problem areas" in your yard where water naturally pools or where the soil stays soggy for days.
- 🌱 Controlling the Spread: Because it produces thousands of tiny seeds, it can quickly take over a manicured flower bed. If you want the look without the takeover, consider planting it in submerged pots within a pond or water feature to contain its roots.
⚠️ Safety & Toxicity
- ✅ Safe Status: Cyperus surinamensis is generally considered non-toxic to humans, cats, and dogs.
- ✂️ Physical Irritation: While not chemically toxic, the edges of the leaves and the triangular stems can be quite coarse and sharp. Handling them without gloves might lead to minor "grass cuts" or skin irritation for those with sensitive skin.
✨ Fun Fact
The Cyperus genus is famous for its history; it includes the legendary Cyperus papyrus, which the ancient Egyptians used to create the world's first form of paper! While the Tropical Flatsedge isn't used for scrolls, its roots play a vital role in preventing soil erosion in wetlands.

Detailed Care Instructions
To grow a Cyperus Surinamensis plant, also known as the dwarf papyrus, you can follow these steps:
- Choose a suitable container: Select a pot with good drainage holes that is at least 6-8 inches deep. The plant requires a lot of water, so a container with good drainage is essential.
- Soil: Use a peat-based or loamy soil mix that retains moisture but drains well. Avoid using heavy clay or sandy soil.
- Planting: Plant the Cyperus Surinamensis rhizomes just below the soil surface, leaving the top of the rhizomes exposed. Plant multiple rhizomes in the pot, allowing enough space for them to grow.
- Watering: Keep the soil consistently moist, but avoid waterlogging. Keep the bottom of the pot in a tray filled with water to maintain humidity, but make sure the water level does not reach the top of the pot.
- Light: Place the plant in a location that receives bright, indirect sunlight. Cyperus Surinamensis prefers full sun but can tolerate partial shade.
- Temperature and humidity: The plant thrives in warm temperatures between 60-90°F (15-32°C). Provide a humid environment by placing the pot on a shallow tray filled with water and mist the foliage regularly.
- Fertilizing: Feed the plant with a balanced liquid fertilizer every two weeks during the growing season (spring and summer). Reduce fertilization during winter.
- Pruning: Trim any dead or yellowing foliage regularly to maintain a neat appearance. You can cut the stems back to encourage new growth.
- Propagation: Propagate the plant by dividing the rhizomes during the spring. Gently separate the rhizomes and plant them in separate pots.
- Pests and diseases: Watch out for pests like spider mites and aphids. Treat infestations promptly using insecticidal soap or other suitable pest control methods.
With proper care and maintenance, your Cyperus Surinamensis plant should grow well and add a touch of tropical beauty to your home or garden.

Place in a bright room that is sun drenched almost all day. Or directly in a south-facing window.

Cyperus Surinamensis is a plant that is commonly grown as an indoor plant. When watering this plant, it is important to make sure that the soil is evenly moist at all times. One way to determine when it is time to water is by checking the top inch of the soil with your finger. If the soil feels dry, it is time to water.
When watering, use room temperature water and pour it slowly into the soil until it starts to drain out of the bottom of the pot. Be careful not to get water on the foliage, as this can cause damage.
During the winter months, the plant may require less water than during the summer months. It is important to adjust your watering schedule accordingly.
Overall, it is important to keep a consistent watering schedule for the health and growth of your Cyperus Surinamensis plant.
To fertilize the Cyperus Surinamensis plant, use a balanced water-soluble fertilizer once every two weeks during its growing season. Dilute the fertilizer in water according to the instructions on the label, then pour it onto the soil around the plant until it is evenly moist. Avoid getting the fertilizer solution on the foliage or the roots. Water the plant thoroughly after fertilizing to help distribute the nutrients throughout the soil. Reduce fertilization frequency during the plant's dormant period.
When selecting soil for this plant, it is important to choose a medium that is well-draining and rich in essential nutrients. A mixture of loam, sand, and peat moss is often recommended as it provides adequate drainage and aeration while also retaining moisture. Additionally, adding perlite or vermiculite can help to increase porosity, which is important for root health. It is important to avoid heavy, clay-like soils as they can become waterlogged and negatively impact plant growth. When planting, ensure that the soil is moist but not waterlogged, and allow the top inch of soil to dry out between waterings.
To propagate this plant, begin by selecting a mature healthy plant with several stems. Using a sharp, clean pair of scissors or pruning shears, carefully snip off one stem that is about 4-8 inches long. Cut the stem at a slight angle to help prevent disease or rot from taking hold.
Next, remove any leaves or flowers from the bottom half of the stem, leaving only a few at the top. This allows the stem to focus on growing new roots rather than maintaining foliage.
Prepare a container with well-draining soil, either a mix of potting soil and sand or a specialized seed-starting mix. Make a hole in the soil with a pencil or finger and insert the stem, pressing the soil firmly around it.
Water the cutting and keep it in a warm, well-lit area, out of direct sunlight. Mist the soil occasionally to keep it moist but not saturated. In roughly 3-6 weeks, the stem should begin to grow roots and new sprouts.
Once the cutting has established roots, continue to water it consistently, but be careful not to overwater. After 6-8 weeks, the new plant should be established enough to transplant to a larger container or into a garden bed.


