Plant Overview
Commonly known as the Hairy Canary Clover, this Mediterranean gem is a favorite for those seeking a touch of silvery "moonlight" in their garden. It gets its name from the soft, velvety fuzz that covers its leaves, giving the entire plant a shimmering, frosted appearance. In late spring, it transforms into a cloud of delicate, pea-like blossoms that hum with the activity of grateful pollinators.
🔍 How to Identify
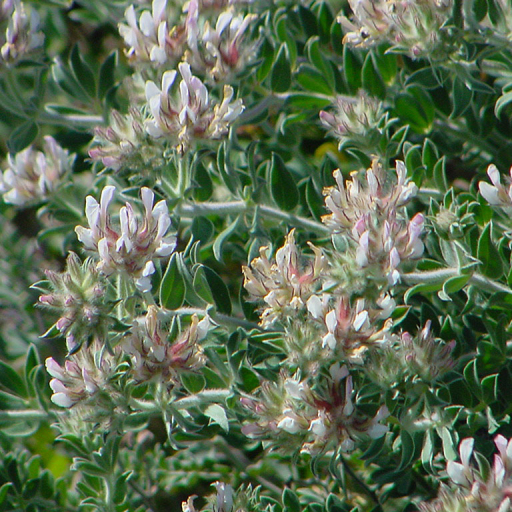
- 🌿 Silver Foliage: The leaves are trifoliate (arranged in threes) and densely covered in fine, white hairs that feel like soft felt to the touch.
- 🌸 Pea-Like Blooms: Small, terminal clusters of white flowers often tinged with a delicate blush of pink or purple veins.
- 🫘 Chocolate Pods: After flowering, the plant produces striking globose seed pods that turn a deep reddish-brown or "chocolate" color, providing visual interest well into winter.
🏡 In Your Garden
- ☀️ Sun & Drainage: Being a Mediterranean native, it is a champion of the "dry garden." It thrives in poor, rocky soil and absolutely hates having "wet feet," which can cause the silver foliage to rot.
- ✂️ Pruning Nuance: This plant has a tendency to become "leggy" or woody over time. To keep it looking like a compact, silvery cushion, it’s best to give it a light haircut after the flowers fade to encourage fresh, fuzzy growth.
- 🌱 Nitrogen Fixer: Like many members of the legume family, it works behind the scenes to improve your soil quality by "fixing" nitrogen, making it a functional neighbor for hungrier plants.
⚠️ Safety & Toxicity
- ✅ General Safety: Dorycnium hirsutum is generally considered non-toxic to humans and common household pets.
- 🧤 Skin Sensitivity: While not poisonous, the dense "hirsute" (hairy) texture of the leaves can occasionally be mildly irritating to people with very sensitive skin if handled extensively without gloves.
✨ Fun Fact
The "Hairy" part of its name is actually a survival strategy! Those tiny white hairs reflect intense sunlight and trap a layer of moisture against the leaf surface, allowing the plant to survive scorching heat that would wither other garden residents.

Detailed Care Instructions
To grow Dorycnium hirsutum (Hairy Canary Clover), follow these steps:
- Climate and soil requirements: Dorycnium hirsutum plants thrive in Mediterranean climates with dry, hot summers and mild, wet winters. They prefer well-draining soil that is neutral or slightly alkaline.
- Planting time: The best time to plant Dorycnium hirsutum is in the spring after the last frost, or in early fall.
- Choose a suitable location: Find an area with full sun or partial shade. Ensure there is enough space for the plant to grow, as it can spread up to 3 feet (1 meter) in width.
- Prepare the soil: Loosen the soil and remove any weeds or rocks. Mix in organic matter, such as compost or well-rotted manure, to improve fertility and drainage.
- Sow the seeds: Plant the seeds directly into the prepared soil at a depth of about 1/4 inch (0.6 cm). Space the seeds 6-12 inches (15-30 cm) apart. Dorycnium hirsutum can also be propagated from cuttings.
- Watering: Provide regular, but moderate, watering until the plants are established. Once they are established, they are somewhat drought-tolerant and only need occasional watering during dry periods.
- Maintenance: Keep the area around the plants free from weeds to prevent competition. Mulching can help with weed control and moisture retention.
- Pruning: Hairy Canary Clover does not require much pruning. However, you can trim back the plant after flowering to maintain its shape and encourage bushier growth.
- Fertilization: Dorycnium hirsutum does not require heavy fertilization. If necessary, you can apply a balanced, slow-release fertilizer in early spring.
- Pest and disease control: This plant is generally not prone to major pest or disease issues. However, keep an eye out for common garden pests such as aphids or spider mites and take appropriate measures if necessary.
By following these guidelines, you should be able to successfully grow Dorycnium hirsutum and enjoy its lovely foliage and pinkish-white flowers.

Place in a bright room that is sun drenched almost all day. Or directly in a south-facing window.

To water this plant, it is important to follow proper guidelines to ensure its optimal growth and development. It is recommended to water Dorycnium Hirsutum about once or twice a week, depending on the specific condition of the soil and the climate in which it grows.
It is important to make sure that the soil is well-draining and not too waterlogged, as this can cause root rot and other issues. One can check for moisture in the soil by inserting a finger about an inch deep and feeling for moisture. If the soil feels dry, it's time to water.
When watering, it is best to use a gentle stream of water and to avoid getting water on the leaves. Watering directly on the leaves can promote the growth of fungi and other diseases. To prevent water build-up around the base of the plant's stem, one should ensure that there is adequate drainage in the pot or planting bed.
During dry spells, it may be necessary to water more frequently to prevent dehydration. However, it is essential not to overwater, as this can lead to suffocation of the plant's roots and ultimately cause the plant to die. It is often better to water deeply and less frequently than to water shallowly and often.
To fertilize the Dorycnium Hirsutum plant, you should:
- Choose a balanced, slow-release fertilizer specifically formulated for flowering shrubs or perennials.
- Follow the manufacturer's instructions for the application rate. Typically, apply 1-2 tablespoons of fertilizer per square foot of planting area.
- Apply the fertilizer evenly around the base of the plant, keeping it at least a few inches away from the stems or trunk.
- Gently work the fertilizer into the top layer of soil using a garden fork or rake.
- Water the plant thoroughly after fertilizing to ensure the nutrients are absorbed by the roots.
- Repeat the fertilization process every 4-6 weeks during the growing season, usually from spring to early fall, to provide a steady supply of nutrients.
- Avoid over-fertilizing, as it can lead to excessive foliage growth at the expense of flowers.
- Regularly monitor the plant's overall health and adjust the fertilization schedule based on its needs.
For optimal growth of this plant, it is recommended to use a well-draining soil that is rich in organic matter. The soil pH should be slightly acidic to neutral (around 5.5-7.0) and the texture should be friable and loose to promote healthy root growth. It is also important to ensure that the soil is not waterlogged as this can lead to root rot. Adding a layer of mulch around the base of the plant can help to retain moisture in the soil and suppress weed growth. Regular fertilization with a balanced, slow-release fertilizer can also help to promote healthy growth and flowering. It is important to avoid over-fertilizing as this can lead to excessive vegetative growth at the expense of flowering.
Dorycnium hirsutum, a perennial flowering plant, can be easily propagated through several methods, ensuring successful reproduction and growth. Here's a step-by-step guide on propagating Dorycnium hirsutum:
- Collecting Seeds:
- Wait for the plant to produce seed pods. These pods will usually form after the flowers have wilted.
- Once the seed pods turn brown and dry, carefully collect them.
- Remove any debris or non-seed material from the collected pods.
- Gently crush the dry pods to release the seeds.
- Wait for the plant to produce seed pods. These pods will usually form after the flowers have wilted.
- Preparing the Soil:
- Choose a well-draining soil mix for planting the Dorycnium hirsutum seeds or cuttings.
- Ensure the soil is fertile, loose, and friable, allowing the roots to penetrate easily.
- Dig the planting hole or prepare seed trays, ensuring they are clean.
- Choose a well-draining soil mix for planting the Dorycnium hirsutum seeds or cuttings.
- Sowing the Seeds:
- If you're starting from seeds, sow them directly into the soil or in seed trays, spaced apart as per the plant's requirements.
- Cover the seeds lightly with soil, ensuring they are not buried too deep.
- Water gently to keep the soil moist but not waterlogged.
- If you're starting from seeds, sow them directly into the soil or in seed trays, spaced apart as per the plant's requirements.
- Caring for the Seeds/Seedlings:
- Place the newly sown seeds or seed trays in a warm and sunny location. Adequate sunlight is essential for growth.
- Regularly monitor the soil moisture and water as needed, ensuring it doesn't dry out completely.
- Protect the seeds or seedlings from extreme temperatures, both hot and cold, as they can hinder growth.
- Place the newly sown seeds or seed trays in a warm and sunny location. Adequate sunlight is essential for growth.
- Transplanting:
- Once the seedlings have grown several inches tall or have developed a strong root system, they can be transplanted into their permanent growing location.
- Choose a sunny spot with well-draining soil for optimum growth.
- Dig a hole slightly larger than the root ball of the seedling.
- Gently remove the seedling from the container or the ground where it was initially growing, ensuring the entire root system remains intact.
- Place the seedling in the prepared hole, backfill with soil, and firm it gently.
- Water the transplanted seedling thoroughly and monitor it regularly to ensure it establishes well.
- Once the seedlings have grown several inches tall or have developed a strong root system, they can be transplanted into their permanent growing location.
- Propagation by Cuttings:
- Select a healthy, non-flowering stem from the parent plant.
- Cut approximately 6 to 8 inches of the stem, making a clean slice just below a leaf node.
- Remove the lower leaves from the cutting, leaving only a few at the top.
- Dip the cut end of the stem in a rooting hormone if desired, to encourage root development.
- Plant the cutting in a pot filled with a moistened, well-draining soil mixture.
- Place the pot in a warm, bright location, away from direct sunlight.
- Mist the cutting regularly to maintain moisture levels and promote root development.
- After a few weeks, the cutting should root and can be transplanted into a larger container or the ground following the same steps as mentioned above for transplanting seedlings.
By following these steps, you can successfully propagate Dorycnium hirsutum and enjoy the beauty of this plant in your garden.
- Select a healthy, non-flowering stem from the parent plant.


