Plant Overview
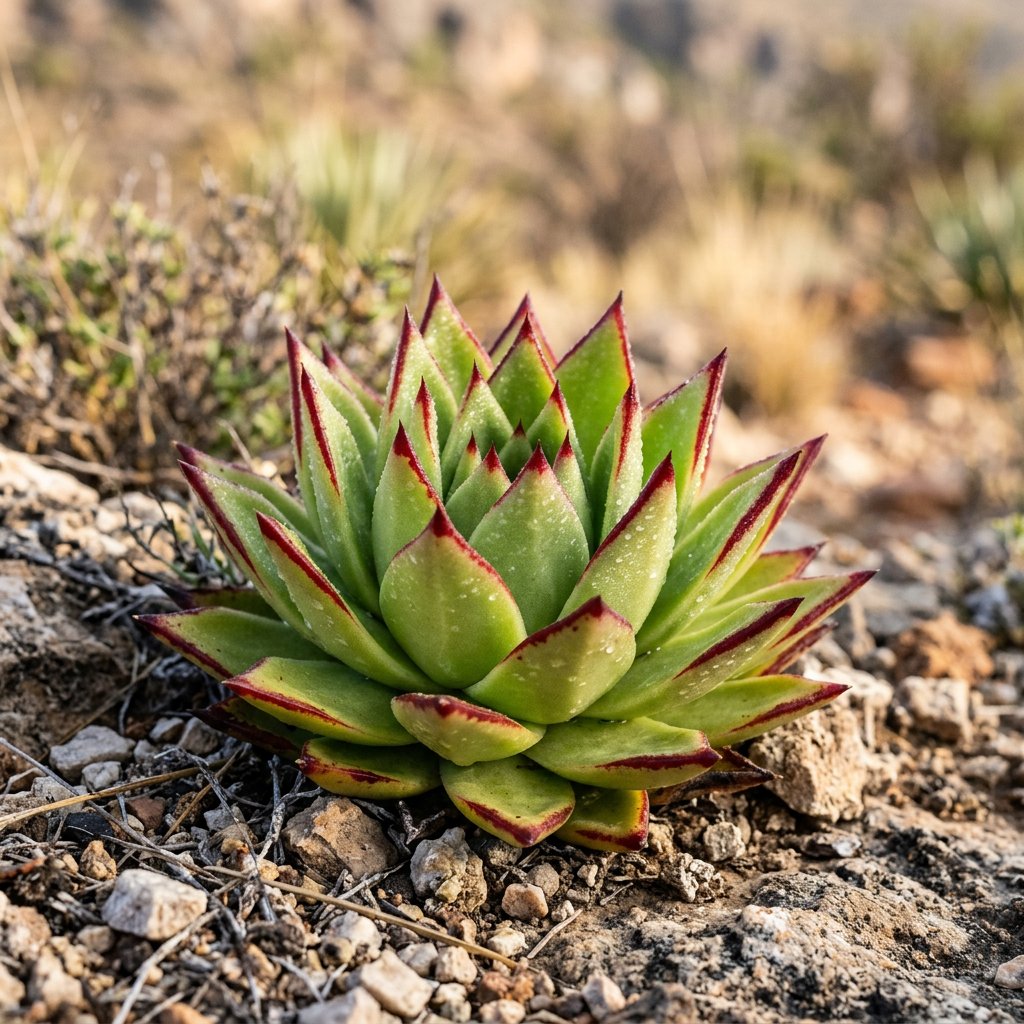
Often called the "Molded Wax Agave," this stunning succulent is the architectural rebel of the Echeveria family. While most of its cousins look like soft, dusty roses, Echeveria agavoides mimics the sharp, triangular look of a desert Agave. Originating from the rocky hillsides of Mexico, it is a favorite for those who love "living sculptures" that require almost no maintenance.
🔍 How to Identify
- 🍃 Agave-like Shape: Unlike typical rounded Echeverias, its leaves are stiff, fleshy, and come to a sharp, pointed tip, forming a tight, star-shaped rosette.
- ✨ Glossy Finish: Most Echeverias are covered in a powdery "farina," but this species is smooth and waxy, giving it a polished, high-shine appearance.
- 🎨 Red "Lipstick" Edges: While the base color is a vibrant apple-green, many varieties develop striking red or deep burgundy margins when exposed to bright sunlight.
🏡 In Your Garden
- ☀️ The Sun Blushing: To get those famous red tips, the plant needs "stress" from bright light. In low light, it will lose its color and turn entirely green as it stretches to find the sun.
- 💧 Built-in Water Tanks: Its incredibly thick leaves store water for long periods. It is far more likely to die from "kindness" (overwatering) than neglect; it prefers its soil to be bone-dry before receiving a deep soak.
- 🏺 Low-Profile Living: Because it is a slow grower and stays relatively compact, it is perfect for rock gardens or "dish gardens" where it won't outgrow its neighbors quickly.
⚠️ Safety & Toxicity
- 🐾 Non-Toxic: Good news for pet owners! Echeveria agavoides is considered safe and non-toxic to cats, dogs, and horses.
- 👶 Gentle Touch: Unlike the real Agaves it mimics, this plant lacks true sharp spines or irritating sap, making it a safe choice for households with curious children.
✨ Fun Fact
🏜️ The name agavoides literally means "looking like an agave." It is a master of visual mimicry, evolving to look like a much tougher, spikier plant to discourage thirsty desert animals from taking a bite out of its water-filled leaves!

Detailed Care Instructions
| Humidity | Dry |
| Lighting | Full Sun |
| Difficulty | Easy |
| Hibernation | Cold Period |
| Temperature | 15°C - 30°C |
| Hardiness Zones | 9A - 10B |
To grow Echeveria Agavoides plant, you can follow these steps:
- Choose a well-draining pot or container: Echeveria Agavoides prefers a sandy, well-draining soil mixture. Make sure the pot has drainage holes to prevent root rot.
- Select the right growing medium: Use a cactus or succulent potting mix or create your own by combining regular potting soil with perlite or coarse sand. This will allow excess water to drain away from the roots.
- Provide ample sunlight: Place the plant in a location that receives bright, indirect sunlight for at least 6 hours a day. Echeveria Agavoides needs plenty of light to grow and thrive.
- Water sparingly: Allow the soil to dry out between waterings. Overwatering can cause root rot and kill the plant. Water deeply but sparingly when the top inch of soil feels dry. Adjust watering frequency based on the climate and humidity levels.
- Fertilize occasionally: Echeveria Agavoides does not require frequent fertilization. You can use a balanced succulent or cactus fertilizer diluted to half strength, applied once a month during the growing season (spring and summer).
- Prune as needed: Remove any dead or decaying leaves and cut off spent flower stalks to improve the plant's appearance and overall health.
- Protect from frost: Echeverias are native to arid regions and are sensitive to frost. If you live in a cold climate, bring your Echeveria Agavoides indoors or provide frost protection during winter.
- Propagate: Echeverias can be propagated through leaf or stem cuttings. Simply allow the leaf or cut stem to dry and callus over for a few days, then plant them in well-draining soil.
Remember to monitor your plant regularly for pests like mealybugs or aphids. If you notice any pest infestation, treat it promptly with organic pest control methods.
Overall, Echeveria Agavoides is relatively easy to care for, as long as you provide it with the right amount of sunlight, well-draining soil, and a careful watering routine.

Place in a bright room that is sun drenched almost all day. Or directly in a south-facing window.
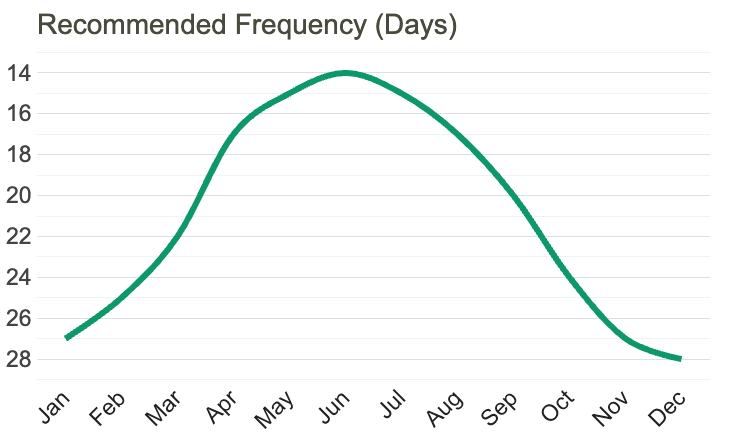
To properly water the plant, first, make sure the soil is completely dry before watering again. When watering, pour water slowly onto the base of the plant, avoiding getting any water on the leaves or in the center of the rosette. Make sure that the pot has drainage holes, as Echeveria Agavoides is susceptible to root rot if left in standing water. Only water the plant when the top inch of soil feels dry to the touch. In the winter months, watering frequency can be reduced.
To fertilize this plant, use a water-soluble fertilizer that is high in phosphorus and low in nitrogen. Dilute the fertilizer to half strength and apply it to the soil every two weeks during the growing season (spring and summer). Do not fertilize during the dormant season (fall and winter). Avoid getting fertilizer on the leaves, as this may cause damage.
When planting Echeveria Agavoides, it is important to choose a well-draining soil that allows excess water to flow through easily. The soil should be a nutrient-rich mix, with a good balance of organic matter, sand, and perlite. The soil should be slightly acidic, with a pH range between 6 and 7.5. In addition, it is recommended to use a soil that has a good amount of perlite or sand as it will help prevent root rot and promote better drainage. This type of soil will allow for proper airflow and prevent the likelihood of overwatering, which can lead to rotting of the root system. Additionally, it is important to avoid using heavy, clay soil as this can retain too much water and lead to root decay.
Echeveria Agavoides plant can be propagated through leaf cuttings. First, select a healthy leaf from the parent plant. Using a clean, sharp knife or scissors, cut the leaf at the base where it meets the stem. Make sure to use a healthy leaf with no signs of damage or disease.
Allow the cut end of the leaf to dry and callus over for a few days. Then, prepare a planting container with well-draining soil. Insert the callused end of the leaf into the soil, making sure the bottom half of the leaf is covered.
Water the soil lightly and place the container in a bright, indirect light location. Avoid direct sunlight, which can scorch the new growth. Keep the soil moist but not waterlogged.
After a few weeks, small roots should start to emerge from the bottom of the leaf and a small rosette of new growth should begin to form at the base of the leaf. Once the new plant has established itself and appears to be growing well, it can be transplanted into a larger container or outdoors in a garden bed.
Common pests of the lipstick echeveria include Mealybugs, aphids, thrips. Make a habit of checking your lipstick echeveria frequently for pests so that any infestations can be caught and managed early.