Plant Overview
Known as the "Pale Purple Coneflower," this elegant prairie native is the more slender, sophisticated cousin of the common garden Echinacea. Native to the central United States, it is celebrated for its ethereal, drooping petals that look like a shuttlecock frozen in mid-air. Historically, it was a vital medicinal plant for Great Plains tribes, used to treat everything from snakebites to toothaches.
🔍 How to Identify
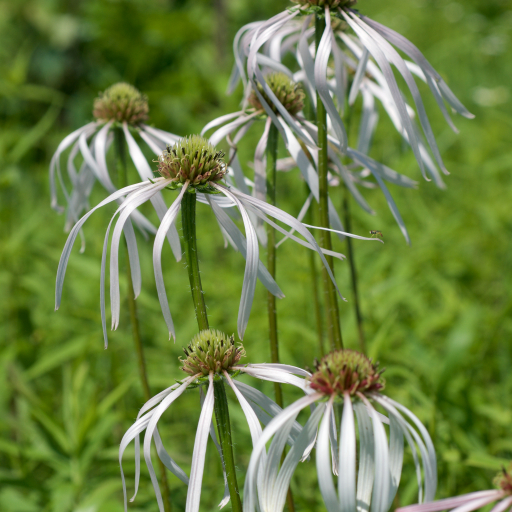
- 🌸 The Petals: Extremely narrow, thin ray florets that droop gracefully downward. They range in color from a ghostly pale pink to a soft lavender-white.
- 🌋 The Cone: A prominent, copper-colored central "cone" that is actually a cluster of tiny individual flowers. It feels prickly to the touch, like a tiny hedgehog.
- 📏 The Stature: Reaches about 2 to 3 feet tall with long, lance-shaped leaves that are covered in coarse, stiff hairs, giving the plant a rough, sandpaper-like texture.
- ☁️ The Pollen: Unlike many other coneflowers, Echinacea pallida produces distinct white pollen, which is a key identifier for botanists.
🏡 In Your Garden
- 🌱 The Deep Taproot: This plant develops a massive, carrot-like taproot early in life. This makes it incredibly drought-tolerant, but it also means it "hates" being moved. Pick a "forever home" for it to avoid transplant shock.
- 🦋 A Pollinator Magnet: It is a high-value nectar source. In mid-summer, expect to see a parade of Tiger Swallowtails and bumblebees. If you leave the dried seed heads standing in winter, Goldfinches will visit your garden to feast on the seeds.
- ☀️ Sun & Soil: It thrives in "tough" spots. It prefers full sun and well-drained soil; it actually performs better in rocky or lean soil rather than overly rich, fertilized garden beds.
⚠️ Safety & Toxicity
- ✅ Status: Non-toxic and generally safe.
- 🐾 Details: This plant is considered safe for cats, dogs, and horses. While it is famous for its use in herbal teas and supplements, always consult a professional before consuming garden plants, as some individuals may experience mild skin irritation from the prickly seed heads or allergic reactions if they are sensitive to the Aster family.
✨ Fun Fact
The name Echinacea comes from the Greek word echinos, meaning "hedgehog," referring to the spiky central cone. While most coneflowers have yellow pollen, the Pale Purple Coneflower is famous among scientists for its signature white pollen!

Detailed Care Instructions
To grow Echinacea Pallida, also known as Pale Purple Coneflower, you can follow these steps:
- Choose a suitable location: Echinacea Pallida thrives in full sun to partial shade. Select a spot in your garden that receives at least 6 hours of direct sunlight per day.
- Prepare the soil: Echinacea Pallida prefers well-draining soil with a pH between 6.5 and 7.5. Add organic matter like compost to improve soil fertility and drainage if necessary.
- Sow the seeds: Echinacea Pallida can be started from seeds. Sow the seeds in early spring, around 4 to 6 weeks before the last frost date in your area. Plant the seeds about 1/4 inch deep in the soil.
- Watering: Keep the soil evenly moist until germination occurs. Once the plants are established, they are relatively drought-tolerant but will benefit from regular watering during dry periods.
- Thin out seedlings: If you've sown the seeds densely, thin out the seedlings when they are around 2 inches tall. Space them about 12-18 inches apart to allow for proper growth.
- Mulch: Apply a layer of organic mulch around the plants to help retain moisture, suppress weed growth, and insulate the soil.
- Fertilization: Echinacea Pallida generally does not require heavy fertilization. However, you can apply a balanced slow-release fertilizer in early spring to provide some nutrients for healthy growth.
- Pruning: Deadhead the spent blooms regularly to encourage continuous flowering. In late fall or early spring, cut back the stems to a few inches above the ground to promote new growth.
- Pest and disease control: Echinacea Pallida has good resistance to pests and diseases. However, keep an eye out for common issues like aphids or powdery mildew, and take appropriate measures if necessary.
- Enjoy the blooms: Echinacea Pallida typically blooms from mid to late summer. The flowers are attractive to bees and butterflies and can add beautiful color to your garden.
Remember to check your local gardening guidelines and adjust these steps according to your specific region and climate.

Place in a bright room that is sun drenched almost all day. Or directly in a south-facing window.

To water this plant, you should first check the soil moisture level by inserting your finger into the soil up to the second knuckle. If the soil feels dry, it's time to water. Use a watering can or hose with a gentle stream to water around the base of the plant, taking care not to get water on the leaves or flowers. Water until the soil is moist but not saturated, and let any excess water drain away. Avoid letting the soil stay constantly wet or dry out completely, and adjust watering based on environmental factors such as temperature and rainfall.
Apply a balanced fertilizer with a 10-10-10 NPK ratio in early spring when new growth appears. Follow the recommended dosage on the fertilizer package. Repeat fertilization once or twice during the growing season. Avoid over-fertilizing as it can lead to excessive foliage growth and reduced flowering. Water the plant thoroughly after fertilization to help prevent burn and distribute the nutrients evenly.
It is recommended to use a well-draining soil with a pH level between 6.0 to 7.0 for this plant. The soil should also be rich in organic matter and have good aeration. Adding perlite or sand to the soil mix can help improve drainage. It is important not to use soil that is too heavy or compact, as this can cause waterlogging and root rot. Additionally, Echinacea Pallida prefers full sun to partial shade, so it is important to place the plant in a sunny location.
One way to propagate this plant is through division. In the fall or early spring, dig up the parent plant and carefully separate the root clumps into smaller sections, each with several shoots and roots. Replant these divisions in a moist and fertile soil in a location with full sun.
Another method is by taking semi-hardwood cuttings. In mid-summer, select healthy stems with firm, woody growth and no flowers or buds. Cut a 6-inch section below a leaf node and remove any lower leaves. Dip the cut end in rooting hormone and insert it into a moistened potting mix. Keep the cuttings in a warm and shaded area with high humidity until roots form.
Seed propagation is also possible. Collect ripe seeds in the fall and sow them in a prepared bed in the spring. Sow the seeds shallowly, cover with a thin layer of soil, and keep the area moist. Germination may take up to 3 weeks, and the seedlings can be transplanted when they have matured enough to form their own root systems.
Common pests of the purple coneflower include Spider mites, aphids. Make a habit of checking your purple coneflower frequently for pests so that any infestations can be caught and managed early.


