Plant Overview
Often called the Japanese Anemone or Windflower, Eriocapitella hupehensis is the undisputed royalty of the late-summer garden. While its name suggests a Japanese origin, this elegant perennial actually journeyed from China via the Silk Road centuries ago. It is beloved by gardeners for providing a "second spring" of delicate, dancing blooms just as the rest of the landscape begins to fade into autumn.
🔍 How to Identify
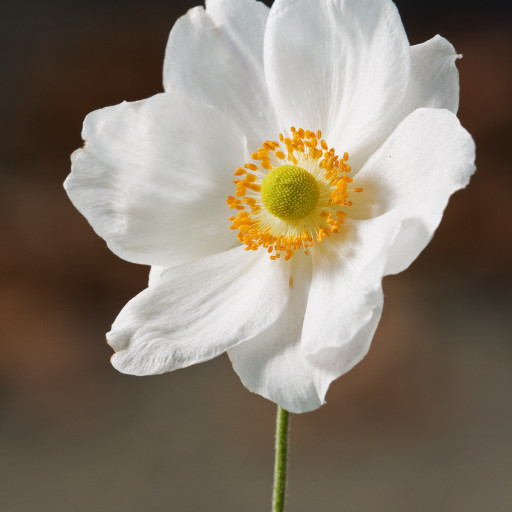
- 🌸 The Bloom: Simple, cup-shaped flowers with five to seven silky petals, usually in shades of silvery-pink or pure white, featuring a striking ring of bright yellow stamens at the center.
- 🍃 The Foliage: Large, dark green leaves that are deeply lobed and slightly fuzzy, resembling the leaves of a grape or maple tree. They form a dense, attractive mound at the base of the plant.
- 🎋 The Stems: Exceptionally tall, wiry, and branching stems that can reach up to 4 feet. Despite their height and delicate look, they are surprisingly "floppy-resistant" and rarely need staking.
🏡 In Your Garden
- 🏃 Space to Roam: This plant spreads through underground runners (rhizomes). In the right conditions, it can be quite assertive, creating a lush colony. It’s perfect for filling large gaps but may crowd out smaller, more timid neighbors.
- 🧘 The Homebody: Unlike many perennials that benefit from frequent division, the Japanese Anemone is famously grumpy about being moved. It has a deep root system and can take a year or two to recover and bloom again if transplanted.
- ⛅ Sun & Soil: It thrives in "woodland edge" conditions—think dappled sunlight and soil that stays consistently moist. If the soil dries out completely, the edges of the leaves will quickly turn crisp and brown.
⚠️ Safety & Toxicity
- 🚫 Toxic Status: Generally considered toxic to humans, cats, dogs, and horses.
- 🧤 Skin Irritant: The plant contains protoanemonin, an acrid sap that can cause skin irritation or even blistering in sensitive individuals. It is best to wear gloves when pruning or dividing the plant.
- 🤢 Ingestion: If eaten, it can cause mouth pain, drooling, and digestive distress. Luckily, the bitter taste usually prevents anyone (or any pet) from eating a significant amount.
✨ Fun Fact
📜 A Botanical Identity Crisis: For over 100 years, this plant was categorized under the genus Anemone. It wasn't until recently that DNA testing moved it to Eriocapitella. The name "Windflower" comes from the Greek word anemos, because it was once believed that the flowers would only open when the wind blew!

Detailed Care Instructions
To grow Eriocapitella Hupehensis (also known as the Chinese Hat Plant), follow these steps:
- Climate and sunlight: Chinese Hat Plants prefer a warm climate with temperatures around 60-75°F (15-24°C). They require bright, indirect sunlight, so place them near a window that provides filtered light.
- Soil: Use well-draining soil with good fertility. A mixture of organic compost, peat moss, and perlite or sand works well for their growth. The pH level should be slightly acidic to neutral.
- Watering: Allow the top inch of soil to dry between waterings. Chinese Hat Plants prefer slightly moist soil but can be sensitive to overwatering. It is better to underwater than overwater this plant.
- Humidity: These plants appreciate moderate humidity levels, so you can occasionally mist their leaves with water or place a tray of water nearby to create a humid environment.
- Fertilization: Apply a balanced, water-soluble fertilizer every two weeks during the growing season (spring and summer). Follow the instructions on the packaging for dosage.
- Pruning: Regularly trim off any dead or damaged leaves to maintain the plant's appearance. Chinese Hat Plants may become leggy over time, so pruning can help encourage bushier growth.
- Repotting: If the plant outgrows its current pot, transfer it to a slightly larger one. Repotting is typically done in the spring. Ensure the new pot has drainage holes.
- Propagation: Chinese Hat Plants can be propagated through stem cuttings or by division. Stem cuttings should be taken in spring or early summer and rooted in moist soil. Division of mature plants can be done during repotting.
- Pests and diseases: Monitor the plant regularly for common houseplant pests like mealybugs, aphids, and spider mites. Treat any infestations promptly with an appropriate insecticide or by cleaning the leaves with a mild soapy solution.
Remember to research specific care requirements for Eriocapitella Hupehensis, as individual variations may exist within the species.

Place in a window with dappled sun or a spot in the middle of a room. Or directly in a window facing west or east.
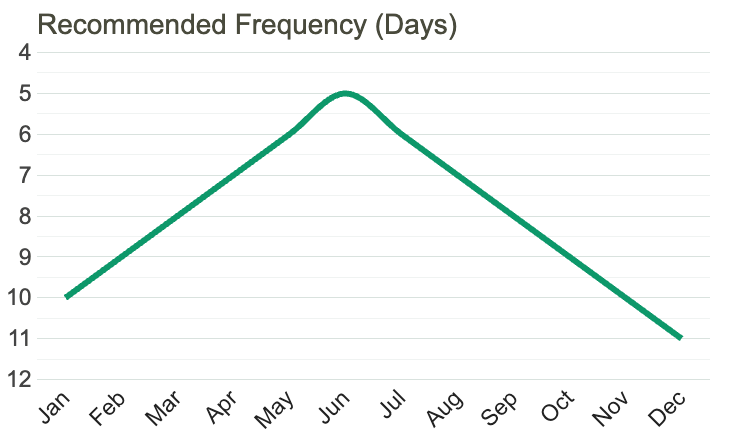
1. Observe the soil: Check the soil around the plant to determine if it is dry or damp. You can do this by sticking your finger about an inch into the soil, and if it feels dry, then it's time to water the plant.
2. Watering methods: The ideal way to water this plant is by using the 'bottom-up' method, placing the pot in a tray of water, and allowing the soil to soak up water through its drainage holes. If this method is not possible, the 'top-down' method can be used by slowly pouring water onto the soil, allowing it to absorb the water gradually.
3. Control the amount of water: To avoid overwatering, only water the plant when the soil has dried out, as this plant does not do well in waterlogged soil. Allow the excess water to drain out of the pot, and never let the plant stand in a tray of water for more than half an hour.
4. Watering frequency: The frequency at which you water this plant will depend on various factors such as humidity levels, temperature, and the amount of light it receives. Typically, this plant needs to be watered once a week, but during the hot summers, you may need to water it more frequently.
5. Keep track of the calendar: During the winter months, this plant does not require as much water as it goes into a dormant stage. So it's essential to reduce the watering frequency to every two weeks or according to the plant's needs.
6. Use filtered water: If possible, use filtered water when watering this plant as it's sensitive to harsh chemicals found in tap water, such as chlorine and fluoride.
7. Humidity: Maintaining the right humidity level will help this plant grow well. You can keep a tray of water near the plant or use a humidifier to keep the air moist.
By following these steps, you can provide the right amount of water to your Eriocapitella Hupehensis plant and ensure it thrives and grows beautifully.
To fertilize the Eriocapitella Hupehensis plant, follow these instructions:
- Choose a balanced, water-soluble fertilizer with an NPK ratio of 10-10-10 or a similar formula. This indicates the nitrogen (N), phosphorus (P), and potassium (K) content, respectively.
- Dilute the fertilizer according to the package instructions. Generally, it is recommended to use half the recommended strength to avoid over-fertilization.
- Water the plant thoroughly before applying the fertilizer to ensure the soil is moist.
- Pour the diluted fertilizer solution around the base of the plant, avoiding direct contact with the foliage. Slowly pour the solution to allow the roots to absorb it effectively.
- After applying the fertilizer, water the plant again lightly to further aid nutrient absorption and prevent any potential fertilizer burn.
- Fertilize the Eriocapitella Hupehensis plant once every four to six weeks during the growing season, typically from spring to early fall. Reduce or stop fertilizing during winter months when the plant enters a dormant phase.
Note: Always read and follow the instructions on the specific fertilizer product you choose, as different brands may have variations in application rates and frequencies. Additionally, monitor the plant's response to fertilization to ensure it does not suffer from over-fertilization, such as leaf burn or stunted growth. Adjust the fertilization regimen accordingly based on the plant's needs and any specific recommendations provided by a horticulturist or nursery.
The ideal soil for Eriocapitella Hupehensis plant should be well-draining, fertile, and rich in organic matter. It should be slightly acidic with a pH range of 5.5 to 6.5. The soil should have good aeration and moisture retention capacity. The plant prefers mildly moist soil but not waterlogged soil. It can tolerate sandy and loamy soils with good drainage. Adding compost or peat moss to the soil can improve its nutrient content and water retention capacity. Ensure that the soil has enough nutrients like nitrogen, phosphorus, and potassium for optimal growth. Avoid soils with high salinity or alkalinity levels and use potting soil for container plantings. Additionally, mulch the soil around the plant to conserve moisture and suppress weed growth.
To propagate Eriocapitella Hupehensis, follow these steps:
- Choose a healthy and mature plant: Select a well-established and disease-free Eriocapitella Hupehensis plant for propagation. This will ensure the new plants have a higher chance of thriving.
- Prepare a suitable potting mix: Eriocapitella Hupehensis prefers well-draining soil. Prepare a mix by combining equal parts of potting soil, organic compost, and sand or perlite to improve drainage.
- Take stem cuttings: Use a pair of clean and sharp gardening shears to take stem cuttings from the mother plant. Select healthy, non-flowering shoots that are around 4-6 inches long. Ensure the cutting has at least 3-4 nodes (points where leaves emerge).
- Remove lower leaves: Carefully remove the lower set of leaves from the cutting, leaving only the top few leaves intact. This reduces moisture loss and encourages root development.
- Apply rooting hormone (optional): Dip the cut end of the stem cutting into a rooting hormone powder or liquid. This can promote faster and more successful root development.
- Plant the cuttings: Make a planting hole in the prepared potting mix and gently insert the stem cutting into it, burying at least one node below the soil surface. Firmly press the soil around the cutting to secure it in place.
- Provide proper conditions: Place the potted cuttings in a warm and bright location, preferably with indirect sunlight. Maintain a temperature of around 70-75°F (21-24°C) for optimal root development. Avoid exposing the cuttings to direct sunlight, as it may cause wilting or sunburn.
- Mist regularly: Mist the cuttings with water using a spray bottle to maintain humidity around them. This helps prevent excessive moisture loss and aids in root development.
- Watering: Keep the potting mix slightly moist but not waterlogged. Water the cuttings when the top inch of soil feels dry to the touch. Avoid overwatering as it can lead to root rot.
- Be patient: Rooting and subsequent growth may take several weeks to a few months. Regularly check for new growth and gently tug on the cuttings after a few weeks to feel if they have developed roots. Once you feel resistance, it indicates successful root development.
- Transplanting: After the cuttings have developed a healthy root system, they can be transplanted into individual pots or directly into the garden. Ensure the new planting location provides suitable growing conditions for Eriocapitella Hupehensis, such as partial shade or dappled sunlight.
By following these steps, you can propagate Eriocapitella Hupehensis and expand your collection of these beautiful plants.
Common pests of the hubei anemone include Aphids, larvae, snails. Make a habit of checking your hubei anemone frequently for pests so that any infestations can be caught and managed early.