Plant Overview
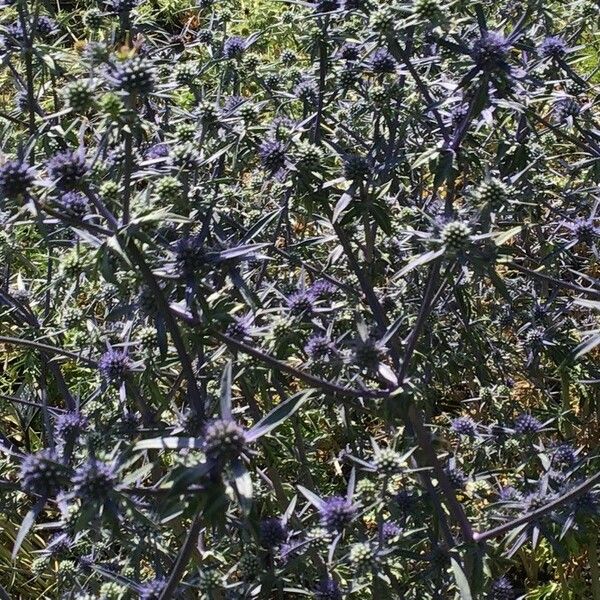
Often called the Blue Eryngo, this striking perennial looks like it was plucked from a science-fiction landscape. Native to the rocky slopes of Central Asia and the Caucasus, its metallic, cobalt-blue stems and flower heads offer a surreal, architectural beauty to any landscape. It is a favorite for "moon gardens" because its silver-blue sheen almost seems to glow under the light of the stars.
🔍 How to Identify
- 🔵 The Color: Both the egg-shaped flower heads and the upper stems transition from a dusty silver-green to a vivid, electric blue as the plant matures.
- 🗡️ Spiny Bracts: A dramatic "collar" of stiff, narrow, and prickly leaves surrounds each flower head like a sharp, geometric starburst.
- 🌿 Texture Shift: The base of the plant features softer, heart-shaped leaves, but as you move up the stem, the foliage becomes deeply lobed, stiff, and increasingly spiny.
🏡 In Your Garden
- 🏜️ Thrives on Neglect: This plant is perfect for xeriscaping. It actually prefers poor, sandy, or gritty soil. Giving it too much fertilizer or rich compost will make the stems "leggy" and dull its signature blue color.
- ⚓ The Taproot Rule: Like a carrot, it grows a long, deep taproot to find water in dry climates. This makes it incredibly drought-tolerant, but it also means it hates being moved. Once planted, avoid transplanting it, as the root is easily damaged.
- 🦋 Pollinator Party: Despite its prickly and defensive appearance, it is a high-octane nectar source. It is common to see dozens of bees and butterflies hovering around a single clump in mid-summer.
⚠️ Safety & Toxicity
- 🌵 Physical Hazard: While Eryngium caeruleum is not considered chemically toxic to humans or pets, its spines are very sharp. It can cause skin irritation or small puncture wounds if handled without protection.
- 🧤 Handling: Always wear thick leather gardening gloves when pruning or deadheading this plant to avoid the "thistle-like" stings of its leaves and bracts.
✨ Fun Fact
In various cultures throughout history, the roots of Eryngium species were boiled and "candied" in sugar to create sweets known as "Eringoes." These were once considered a powerful medicinal tonic and even a romantic aphrodisiac in Elizabethan England!

Detailed Care Instructions
Growing Eryngium caeruleum, also known as blue eryngo or alpine eryngo, can be a rewarding experience, as this unique plant is known for its striking blue flowers and spiny foliage. Here’s a step-by-step guide to help you successfully grow this plant:
1. Choosing the Right Location:
- Sunlight: Eryngium caeruleum thrives in full sun. Choose a location that receives at least 6-8 hours of direct sunlight each day.
- Soil: It prefers well-draining soil. Sandy or rocky soil is ideal. Avoid heavy clay soil that retains water.
2. Preparing the Soil:
- Drainage: Ensure good drainage by amending the soil with coarse sand or gravel if necessary.
- Soil pH: Eryngium caeruleum can tolerate a range of pH levels but performs best in neutral to slightly alkaline soil (pH 6.5-7.5).
3. Planting:
- Seeds: If growing from seeds, sow them in early spring. Lightly cover the seeds with a fine layer of soil or vermiculite.
- Seedlings/Transplants: If planting seedlings or transplants, space them about 12-18 inches apart to allow for adequate air circulation and growth.
- Planting Depth: Plant seedlings at the same depth they were in their pots. Firm the soil gently around the roots.
4. Watering:
- Initial Watering: Water thoroughly after planting to help establish the roots.
- Ongoing Watering: Once established, Eryngium caeruleum is quite drought-tolerant. Water sparingly, allowing the soil to dry out between waterings. Over-watering can lead to root rot.
5. Mulching:
- Mulch: Apply a thin layer of mulch around the plants to help retain moisture and suppress weeds, but keep it away from the crown of the plant to prevent rot.
6. Fertilizing:
- Fertilizer: Eryngium plants generally do not require much fertilization. If desired, you can apply a balanced, slow-release fertilizer in the spring. Avoid over-fertilizing, as it can lead to weak, leggy growth.
7. Maintenance:
- Pruning: Remove spent flowers and dead foliage to encourage new growth and maintain the plant’s appearance.
- Staking: In windy areas, you might need to stake taller plants to prevent them from toppling over.
8. Overwintering:
- Cold Tolerance: Eryngium caeruleum is generally hardy in USDA zones 4-9. In colder climates, a layer of mulch or straw can help protect the roots during winter.
- Cutting Back: In late fall or early spring, cut back any dead or damaged stems to promote new growth.
9. Pests and Diseases:
- Pests: Eryngium caeruleum is relatively pest-resistant. Keep an eye out for any common garden pests like aphids or slugs.
- Diseases: Proper spacing and well-drained soil help prevent most diseases. Watch for signs of fungal infections, especially in overly damp conditions.
By following these guidelines, you should be able to successfully grow and enjoy the unique beauty of Eryngium caeruleum in your garden.
Eryngium caeruleum, a perennial plant known for its striking, spiky foliage and vibrant blue flowers, requires careful watering to ensure its health and growth. Here's a detailed guide on how to properly water it:
Soil Preference
- Well-Draining Soil: Eryngium caeruleum thrives in well-draining soil. Overly dense or water-retentive soil can lead to root rot, so consider amending your soil with sand or gravel to improve drainage.
Watering Frequency
- Infrequent Watering: This plant prefers drier conditions once established. Watering too often can be detrimental. It's best to let the soil dry out between waterings.
- Initial Period: When first planting Eryngium caeruleum, keep the soil slightly moist to help establish roots. This typically involves more frequent watering during the first growing season.
Seasonal Adjustments
- Spring and Summer: During these active growing periods, water the plant thoroughly but allow the top 1-2 inches of soil to dry out before watering again.
- Fall and Winter: Reduce watering significantly during the colder months, as the plant's growth slows and it requires less moisture.
Watering Method
- Deep Watering: Ensure that you water deeply, which encourages the roots to grow downward. Shallow watering can lead to weak root systems.
- Avoid Overhead Watering: Aim to water at the base of the plant to avoid excess moisture on the foliage, which can lead to fungal diseases.
Mulching
- Optional Mulching: Applying a layer of mulch can help retain some moisture during dry conditions, but be cautious not to mulch too heavily as this can retain too much moisture and cause root problems.
Container Plants
- Drainage: If growing Eryngium caeruleum in containers, ensure that the pots have adequate drainage holes. The same principles apply: water deeply and infrequently, allowing the soil to dry out between waterings.
Monitoring the plant and adjusting your watering schedule based on the specific environmental conditions and soil type is key to success.
Here's a guide on how to fertilize Eryngium caeruleum effectively:
- Soil Preparation: Before planting, work compost or well-rotted manure into the soil to enrich it with organic matter. This helps improve soil structure and provides a slow-release of nutrients.
- Balanced Fertilizer: During the growing season, apply a balanced, water-soluble fertilizer (one with an equal ratio such as 10-10-10 NPK). You can do this once a month from early spring until the plant starts to flower.
- Timing: Start fertilizing in the spring when new growth appears. Stop fertilizing when flowering begins, as excessive nutrients at this stage can lead to lush foliage at the expense of flowers.
- Application Method: Dilute the fertilizer according to the manufacturer's instructions. Water the base of the plant thoroughly, avoiding the leaves to prevent any potential burn.
- Annual Feeding: If you prefer, you can also use a slow-release granular fertilizer in spring. Apply it around the base of the plant and lightly mix it into the top layer of the soil.
- Mulching: Consider adding a layer of organic mulch around the base of the plant. This will help retain moisture and gradually release nutrients into the soil as it decomposes.
- Monitoring: Keep an eye on the plant's growth. If you notice yellowing leaves or poor growth, it might indicate a deficiency in nutrients, and you may need to adjust your fertilizing regimen accordingly.
Remember, these plants thrive in well-drained soil and don't require heavy fertilization. Over-fertilizing can lead to weak plants and fewer flowers, so it's important to find the right balance.
Eryngium caeruleum thrives best in well-draining soil. It's important to ensure that the soil is not waterlogged, as this plant prefers drier conditions. Here are specific details about the type of soil that suits it:
- Soil Type: Sandy or sandy-loam soil is ideal because it allows for good drainage. These types of soil prevent water from sitting around the roots, which can lead to rot.
- Soil pH: This plant does well in neutral to slightly alkaline soil, with an optimal pH range between 6.0 and 8.0. You can test the soil pH with a soil testing kit and amend it if necessary.
- Nutrient Content: Eryngium caeruleum doesn’t require highly fertile soil. In fact, too rich a nutrient content, especially high nitrogen, can lead to poor flowering and floppy growth. A soil with moderate fertility is sufficient.
- Soil Amendments: If your soil is heavy clay or retains too much moisture, you can amend it with coarse sand, perlite, or fine gravel to improve drainage. Organic matter, like compost, can be added in moderate amounts to improve soil structure but should not be overdone.
- Mulching: While not a soil type per se, applying a layer of mulch such as gravel or coarse sand around the base of the plant can help prevent moisture retention and mimic its natural habitat conditions.
By providing the right soil conditions, Eryngium caeruleum can grow strong, healthy, and vibrant, reflecting its adaptability to a more arid and well-drained environment.
Propagating Eryngium caeruleum involves a few different methods, but the most common and successful one is through seeds. Here’s a step-by-step guide:
Seed Propagation:
- Seed Collection:
- Collect seeds from mature plants when the seed heads have dried. The seeds are typically ready in late summer to early fall.
- Collect seeds from mature plants when the seed heads have dried. The seeds are typically ready in late summer to early fall.
- Preparation:
- Clean the seeds by removing any remaining plant material.
- Store seeds in a cool, dry place if you are not planting them immediately.
- Clean the seeds by removing any remaining plant material.
- Stratification (Optional but Recommended):
- To improve germination rates, you can stratify the seeds. Place them in a damp paper towel inside a plastic bag and store them in the refrigerator for about 4-6 weeks.
- To improve germination rates, you can stratify the seeds. Place them in a damp paper towel inside a plastic bag and store them in the refrigerator for about 4-6 weeks.
- Sowing:
- Fill seed trays or pots with a well-draining seed-starting mix.
- Sow the seeds on the surface of the soil and lightly press them in. Do not cover them with soil as they need light to germinate.
- Water the soil gently to keep it moist but not waterlogged.
- Fill seed trays or pots with a well-draining seed-starting mix.
- Light and Temperature:
- Place the trays or pots in a location where they can receive plenty of light, such as a sunny windowsill or under grow lights.
- Maintain a temperature of around 65-75°F (18-24°C).
- Place the trays or pots in a location where they can receive plenty of light, such as a sunny windowsill or under grow lights.
- Germination:
- Germination can take several weeks, so be patient.
- Keep the soil consistently moist during this period.
- Germination can take several weeks, so be patient.
- Transplanting:
- Once seedlings have developed a few sets of true leaves and are large enough to handle, they can be transplanted into individual pots or directly into the garden if the danger of frost has passed.
- Choose a location with full sun and well-draining soil for planting.
- Once seedlings have developed a few sets of true leaves and are large enough to handle, they can be transplanted into individual pots or directly into the garden if the danger of frost has passed.
- Growing Conditions:
- Ensure the young plants receive adequate sunlight and water them moderately.
- They prefer dry to moderately moist conditions and are quite drought-tolerant once established.
Division (Less Common):
While division is less commonly used due to the taproot structure of the plant, it is possible.
- Ensure the young plants receive adequate sunlight and water them moderately.
- Timing:
- The best time for dividing is in the spring or early autumn when the plant is not in full growth or bloom.
- The best time for dividing is in the spring or early autumn when the plant is not in full growth or bloom.
- Digging Up:
- Carefully dig up the entire plant, trying to keep the root system as intact as possible.
- Carefully dig up the entire plant, trying to keep the root system as intact as possible.
- Splitting:
- Gently separate the plant into smaller sections, ensuring each section has a portion of the root system.
- Gently separate the plant into smaller sections, ensuring each section has a portion of the root system.
- Replanting:
- Replant the divisions immediately in their new location, spacing them adequately, and water them well to help establish.
General Care Tips:
- Replant the divisions immediately in their new location, spacing them adequately, and water them well to help establish.
- Soil: Eryngium caeruleum prefers poor to moderately fertile soil with excellent drainage.
- Watering: Water sparingly once established as they are drought-tolerant.
- Fertilization: They generally do not require much fertilization. Over-fertilizing can lead to less robust growth.
- Pruning: Deadheading spent flowers can encourage further blooming and prevent unwanted self-seeding if that is a concern.
By following these propagation steps and care tips, you should be able to cultivate healthy Eryngium caeruleum plants successfully.


