Plant Overview
Often called the Yellow Monkeyflower because its blooms resemble the face of a grinning monkey, this vibrant perennial is a splash of liquid sunshine. Originating from the cool, damp regions of the Andes in South America, it has become a favorite for gardeners looking to brighten up the edges of ponds or muddy patches where other plants might struggle. It is a moisture-loving gem that brings a playful energy to any landscape.
🔍 How to Identify
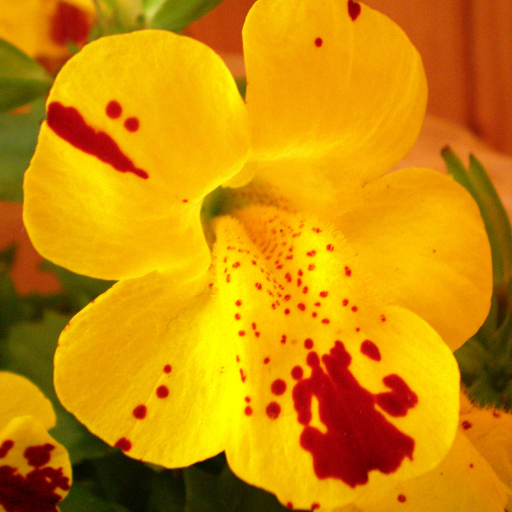
- 🌼 The "Monkey" Bloom: Large, trumpet-shaped flowers that are a brilliant lemon yellow, often featuring tiny reddish-brown freckles deep in the throat of the petal.
- 🍃 Toothed Foliage: The leaves are oval or heart-shaped with distinctly serrated (toothed) edges, usually appearing in pairs opposite one another along the succulent stems.
- 🌱 Low-Profile Growth: It typically grows in low, spreading clumps or mats, rarely exceeding 12 inches in height, making it an excellent "filler" for wet ground.
🏡 In Your Garden
- 💧 Thirst for Moisture: This plant is a true hydro-phile. Unlike most garden flowers that fear "wet feet," the Monkeyflower thrives in saturated soil. It is the perfect candidate for bog gardens, pond margins, or that one low spot in your yard that stays damp after a rain.
- ⛅ Cool Roots: While it loves bright light to produce its best colors, it hates getting overheated. In warmer climates, it performs best in partial shade to keep its root system cool and hydrated during the peak of summer.
⚠️ Safety & Toxicity
- ✅ Generally Safe: Erythranthe lutea is not known to be toxic to humans or common household pets like dogs and cats.
- 🧤 Mild Irritation: While it isn't poisonous, the stems are slightly succulent and hairy; people with highly sensitive skin might experience very minor irritation if handling large quantities without gloves.
✨ Fun Fact
- 🎭 The Mime Plant: The plant's former genus name, Mimulus, comes from the Latin word mimus, meaning "mime" or "actor." This refers to the way the flower's shape mimics a mask or a laughing face.

Detailed Care Instructions
To grow Erythranthe lutea, also known as the Yellow Monkeyflower, follow these steps:
- Select a suitable location: Erythranthe lutea prefers partial shade to full sun, so choose a spot that receives 4-6 hours of direct sunlight per day. Ensure the soil is well-draining.
- Prepare the soil: Loosen the soil in the chosen area with a garden fork or tiller. Clear away any weeds or stones that may impede the plant's growth. Amend the soil with organic matter like compost or well-rotted manure to improve nutrient content and moisture retention.
- Plant the seeds or seedlings: You can either start Erythranthe lutea from seeds or purchase established seedlings from a nursery. If using seeds, sow them directly into the prepared soil in late winter or early spring. Cover the seeds gently with a thin layer of soil and keep the area moist until germination occurs. If using seedlings, plant them at the same level they were growing in their nursery containers, ensuring proper spacing according to the plant's mature size.
- Water regularly: Keep the soil evenly moist, but not waterlogged. Water deeply when the top inch of soil feels dry. Avoid overhead watering, as Erythranthe lutea is susceptible to powdery mildew. Instead, water at the base of the plant to minimize moisture on the foliage.
- Mulch around the plants: Apply a layer of organic mulch, such as wood chips or shredded bark, around the base of the plant to help retain soil moisture, suppress weed growth, and maintain a more consistent temperature.
- Fertilize occasionally: Erythranthe lutea generally doesn't require heavy feeding. However, you can apply a balanced, slow-release fertilizer in early spring or a diluted liquid fertilizer every 4-6 weeks during the growing season to promote healthy growth and blooming.
- Prune and deadhead: Trim back any dead or damaged foliage throughout the growing season. Deadhead the spent flowers regularly by pinching them off at the base or cutting them back to encourage continuous blooming.
- Monitor for pests and diseases: Keep an eye out for common pests like aphids or spider mites. Treat infestations with organic insecticidal soap or neem oil, if necessary. Additionally, prevent powdery mildew by ensuring proper air circulation and avoiding overhead watering.
With proper care and maintenance, your Erythranthe lutea plant should thrive and produce beautiful yellow flowers throughout the growing season.

Place in a bright room that is sun drenched almost all day. Or directly in a south-facing window.

Erythranthe Lutea plant requires consistent watering, particularly during the growing season. When watering, make sure to apply the water directly to the soil to avoid wetting the plant foliage. Allow the soil to dry out slightly between watering events, but do not allow it to completely dry out. When the soil surface dryness is detected, water slowly until the soil is moistened evenly throughout the entire root system. Avoid overwatering, as this can lead to root rot and other issues. During periods of high humidity or rainfall, reduce watering to prevent the soil from becoming too wet. It is important to ensure adequate drainage to prevent water from accumulating around the roots.
To fertilize the Erythranthe Lutea plant, it is recommended to use a balanced fertilizer with equal amounts of nitrogen, phosphorus, and potassium. Fertilize the plant every two to three weeks during the growing season, which is typically from spring to fall. Dilute the fertilizer to half the recommended strength and apply it to the soil around the base of the plant. Be careful not to get the fertilizer on the leaves or stems, as this can cause damage. Water the plant thoroughly after fertilizing to ensure the nutrients are distributed evenly throughout the soil.
The best type of soil to use for Erythranthe Lutea is a well-draining soil that has a slightly acidic pH level. The soil should also be rich in organic matter and have good aeration to promote healthy root growth and development. Adding compost or peat moss to the soil can help improve its nutrient content and water retention capabilities. It is also important to avoid using heavy soils or soils that are prone to waterlogging, as this can lead to root rot and other fungal diseases. Additionally, fertilizing the soil with a balanced fertilizer can help promote healthy growth and flowering in the plant.
To propagate this plant, you will need to take stem cuttings from a mature and healthy plant. Use a sharp and sterile pair of scissors or pruning shears to cut a 4-6 inch section of the stem just below a node (where a leaf grows). Remove the lower leaves from the cutting, leaving only a few leaves at the top.
Prepare a potting mix that is well-draining and nutrient-rich. You can use a mix of peat moss, perlite, and vermiculite or a pre-made potting mix. Moisten the mix before planting.
Dip the cut end of the stem cutting in a rooting hormone powder (optional) to promote root growth. Make a small hole in the potting mix with a pencil or similar tool and insert the cutting in the hole. Gently press the mix around the cutting to anchor it in place.
Cover the pot with a clear plastic bag or plastic wrap to create a mini greenhouse effect. This will help to keep the cutting moist and increase humidity. Place the pot in a bright but indirect light location and maintain a warm and consistent temperature.
Check the soil moisture level daily and water if the top inch of the soil feels dry. Avoid overwatering as this can cause the cutting to rot. After a few weeks, check for roots by gently tugging on the stem. If you feel resistance, the roots have started to form.
Once the cutting has developed a strong root system, remove the plastic cover and transplant it into its own pot or directly into the garden. Remember to gradually acclimate the new plant to its new environment by increasing its exposure to sunlight and decreasing its watering frequency.


