Plant Overview
Known for its resilience against salt spray and coastal winds, Escallonia × rigida is the unsung hero of seaside gardens. Often nicknamed the "Coastal Sentinel," this evergreen shrub provides a year-round glossy green backdrop that erupts into a cloud of delicate white flowers during the summer months. It represents a perfect marriage of rugged toughness and refined, polished beauty.
🔍 How to Identify
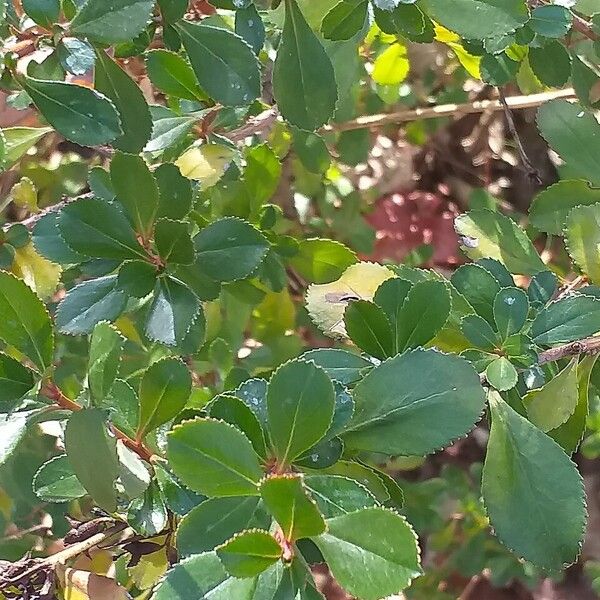
- 🍃 Glossy Foliage: The leaves are small, leathery, and dark green with a distinct "varnished" sheen and finely serrated edges.
- 🌸 Tubular Flowers: It produces dense clusters (panicles) of small, bell-shaped flowers, typically in pure white or ivory, that emit a very faint, sweet fragrance.
- 🌿 Upright Structure: Unlike some sprawling shrubs, this hybrid grows with a sturdy, upright habit, forming a dense wall of greenery that is difficult to see through.
🏡 In Your Garden
- 🌊 Salt-Air Specialist: This plant is famous for its "salt-tooth." It thrives in salty air and high winds where other shrubs would suffer from leaf burn, making it a staple for maritime landscapes.
- ✂️ The Pruning Secret: While it is low-maintenance, it responds beautifully to "deadheading" or shaping. Pruning immediately after the summer flowering fades ensures the plant stays bushy and prevents it from becoming "leggy" or woody at the base.
- ☀️ Sun and Drainage: It is happiest in full sun. While it isn't overly picky about soil, it hates "wet feet"—ensure your soil drains well to prevent root issues during rainy seasons.
⚠️ Safety & Toxicity
- ✅ Non-Toxic Status: Escallonia × rigida is generally considered safe and non-toxic to dogs, cats, and horses.
- 👶 Child Friendly: Because it lacks thorns and irritating saps, it is an excellent choice for family gardens and high-traffic areas where children might brush against the foliage.
✨ Fun Fact
The flowers of the Escallonia are often called "Pollinator Pubs." Because of their high nectar content and accessible tubular shape, they are a primary refueling station for honeybees and hoverflies. On a warm July afternoon, a single hedge can sound like it is physically vibrating from the sheer volume of busy bees!

Detailed Care Instructions
Growing Escallonia × Rigida, a hardy evergreen shrub known for its beautiful flowers and dense foliage, can be a rewarding experience. Here are some steps and tips to help you successfully cultivate this plant:
Selecting the Site
- Sunlight: Escallonia × Rigida thrives in full sun to partial shade. Aim for at least 6 hours of direct sunlight per day.
- Soil: The plant prefers well-draining soil that is rich in organic matter. It can tolerate a range of pH levels but performs best in slightly acidic to neutral soil.
Planting
- Timing: The best time to plant Escallonia × Rigida is in the spring or fall, when temperatures are moderate.
- Preparation: Dig a hole twice as wide and as deep as the root ball of the plant. If you're planting multiple shrubs, space them about 3-6 feet apart to allow for adequate growth and air circulation.
- Planting: Place the plant in the hole, ensuring that the top of the root ball is level with the surrounding soil. Fill the hole with soil, firming it gently around the base of the plant.
- Watering: Water the plant thoroughly after planting to help settle the soil and eliminate air pockets.
Care and Maintenance
- Watering: Keep the soil consistently moist but not waterlogged, especially during the first growing season. Once established, Escallonia × Rigida is relatively drought-tolerant, but regular watering during dry spells will promote better growth.
- Mulching: Apply a 2-3 inch layer of mulch around the base of the plant to help retain moisture, suppress weeds, and regulate soil temperature. Avoid placing the mulch directly against the stem to prevent rot.
- Fertilizing: Feed the plant with a balanced, slow-release fertilizer in the spring. Follow the package instructions for the appropriate amount and method of application.
- Pruning: Prune Escallonia × Rigida in late winter or early spring to maintain its shape and encourage healthy growth. Remove any dead, damaged, or diseased branches, and trim back overgrown areas to promote a more compact and bushy form.
- Pests and Diseases: Escallonia × Rigida is generally resistant to many pests and diseases. However, keep an eye out for common issues like aphids, spider mites, and powdery mildew. Treat infestations or infections promptly with appropriate measures such as insecticidal soap, neem oil, or fungicides.
Winter Protection
- In regions with harsh winters, protect your Escallonia × Rigida from severe frost by applying a thick layer of mulch around the base and covering the plant with burlap or frost cloth if necessary.
By following these guidelines, you should be able to grow a healthy and attractive Escallonia × Rigida in your garden. Enjoy the beautiful blooms and evergreen foliage this shrub offers!
Watering Escallonia × rigida effectively involves understanding its specific needs for moisture and ensuring the right conditions for healthy growth. Here's how to water this plant:
- Soil Check: Before watering, check the soil moisture. Insert your finger about an inch into the soil. If it feels dry at this depth, it is time to water.
- Watering Frequency: During the growing season (spring through early fall), aim to keep the soil consistently moist but not waterlogged. Newly planted specimens require more frequent watering until they establish a strong root system, typically for the first year.
- Deep Watering: It is better to water deeply and less frequently rather than giving light, shallow watering. Deep watering encourages the roots to grow deeper into the soil, enhancing the plant's drought resistance.
- Avoid Waterlogging: Ensure that the soil has good drainage to prevent water from pooling around the roots, which can lead to root rot. If the plant is in a container, make sure it has drainage holes.
- Morning Watering: Water in the early morning to allow the moisture to soak in before the heat of the day. This timing also helps to reduce the likelihood of fungal diseases, which can develop if the foliage remains wet overnight.
- Reduced Watering in Winter: During the dormant winter months, reduce watering frequency significantly. The plant requires less moisture when it is not actively growing, and overwatering during this period can be detrimental.
- Mulching: Apply a layer of mulch around the base of the plant. This helps to retain soil moisture and reduce the frequency of watering. Mulch also suppresses weed growth and adds organic matter to the soil as it decomposes.
By following these guidelines, you can ensure that your Escallonia × rigida receives adequate water, promoting healthy growth and overall plant vitality.
Here are the fertilizing instructions:
- Soil Testing: Before applying any fertilizer, it's a good idea to test your soil to determine its nutrient content and pH level. This will help you choose the appropriate type and amount of fertilizer.
- Type of Fertilizer: Use a balanced, slow-release fertilizer with an NPK ratio (Nitrogen-Phosphorus-Potassium) such as 10-10-10 or 14-14-14. Alternatively, a fertilizer specifically formulated for shrubs will also work well.
- Application Timing:
- Spring: Apply the fertilizer in early spring, just as new growth begins. This helps support the growth during the active growing season.
- Second Application: You can apply a second round of fertilizer in mid-summer if the plant appears to need an additional nutrient boost.
- Spring: Apply the fertilizer in early spring, just as new growth begins. This helps support the growth during the active growing season.
- Application Method:
- Measure the amount of fertilizer according to the product instructions. Generally, about 1 to 2 pounds of fertilizer per 100 square feet of planting area is common, but always follow label recommendations.
- Spread the fertilizer evenly around the root zone of the plant. Avoid getting fertilizer directly on the plant stems or leaves as it can cause burns.
- Lightly scratch the fertilizer into the top inch of soil to help it integrate into the soil.
- Water the area thoroughly after applying fertilizer to help activate the nutrients and move them down to the root zone.
- Measure the amount of fertilizer according to the product instructions. Generally, about 1 to 2 pounds of fertilizer per 100 square feet of planting area is common, but always follow label recommendations.
- Organic Options: If you prefer organic fertilizers, options like compost, well-rotted manure, or a balanced organic fertilizer blend can be used. These should be applied in the same manner as synthetic fertilizers.
- Mulching: After fertilizing, applying a 2-3 inch layer of mulch around the base of the plant can help retain moisture, regulate soil temperature, and reduce weed competition. Keep the mulch a few inches away from the stem to prevent rot.
- Observations: Monitor the plant for signs of nutrient deficiencies or excesses. Yellowing leaves, poor growth, or overly lush and weak growth can indicate issues that need adjusting.
- Maintenance Fertilization: In subsequent years, reduce the amount of fertilizer or switch to a maintenance schedule of fertilizing once a year in spring unless the plant shows signs of needing more frequent feeding.
Following these instructions will help ensure that your plant remains healthy and vigorous.
Escallonia × Rigida requires well-draining soil to thrive. While this plant is relatively adaptable, it performs best in soil that is fertile and rich in organic matter. Here are some detailed guidelines for soil preparation:
- Drainage: The soil must have excellent drainage to prevent root rot and other moisture-related issues. Sandy loam or a mix of garden soil with sand can help achieve this.
- Soil pH: Aim for a slightly acidic to neutral pH range, around 6.0 to 7.0. This can be tested with a soil pH testing kit and adjusted using amendments if necessary (e.g., sulfur to lower pH or lime to raise pH).
- Organic Matter: Incorporate plenty of organic material such as compost, well-rotted manure, or leaf mold. This not only improves soil texture but also provides essential nutrients.
- Consistency: The soil should be friable, meaning it crumbles easily in your hand. This texture allows roots to penetrate easily and ensures adequate airflow around the roots.
- Fertility: While not extremely nutrient-demanding, it benefits from a balanced, slow-release fertilizer at planting time. Thereafter, an annual top-dressing with compost or a balanced fertilizer will help maintain soil fertility.
- Moisture: Even though the soil should be well-draining, it’s important to keep it consistently moist, especially during the plant's establishment period. Use mulch to help retain moisture and regulate soil temperature.
Before planting, it's a good idea to perform a soil test to understand the current soil conditions and make any necessary amendments. Proper preparation and maintenance of soil will promote healthy growth and abundant blooming.
Propagating Escallonia × rigida can be accomplished effectively through several methods, primarily focusing on softwood and semi-hardwood cuttings. Here are the detailed steps for both techniques:
1. Softwood Cuttings
Timing: Early summer is the ideal time for softwood cuttings when the plant is experiencing active growth and the stems are still flexible but mature enough to snap when bent.
Steps:
- Selection of Cuttings: Choose healthy, non-flowering shoots from the current season’s growth. The cuttings should be about 3-5 inches (8-12 cm) long.
- Preparation:
- Use a sharp, sterilized knife or pruning shears to make a clean cut just below a node (the point on the stem where leaves emerge).
- Remove the lower leaves, leaving a few at the top to reduce moisture loss.
- Optionally, dip the cut end in rooting hormone to enhance root development.
- Use a sharp, sterilized knife or pruning shears to make a clean cut just below a node (the point on the stem where leaves emerge).
- Planting:
- Fill a pot with a well-draining, sterile rooting medium such as a mix of equal parts perlite and peat moss, or sand and peat moss.
- Insert the cuttings into the medium, ensuring that at least one node is below the surface.
- Fill a pot with a well-draining, sterile rooting medium such as a mix of equal parts perlite and peat moss, or sand and peat moss.
- Aftercare:
- Water the medium thoroughly and place the pot in a location with bright, indirect light.
- Maintain high humidity by covering the pot with a plastic bag or using a propagation dome.
- Keep the medium consistently moist but not waterlogged.
- After 4-8 weeks, roots should develop. You can check for rooting by gently tugging on the cuttings. Once rooted, gradually acclimate the new plants to lower humidity before transplanting them into individual pots or the garden.
2. Semi-Hardwood Cuttings
Timing: Late summer to early autumn when the current season’s growth begins to mature but is still flexible.
Steps:
- Water the medium thoroughly and place the pot in a location with bright, indirect light.
- Selection of Cuttings: Choose slightly firmer shoots that are starting to mature but are not fully hardened. Similar to softwood cuttings, they should be about 3-5 inches (8-12 cm) long.
- Preparation:
- Follow the same preparation steps as for softwood cuttings, ensuring clean cuts and optionally using rooting hormone.
- Follow the same preparation steps as for softwood cuttings, ensuring clean cuts and optionally using rooting hormone.
- Planting:
- Use the same type of well-draining rooting medium as described for softwood cuttings.
- Insert the cuttings into the medium, making sure that at least one node is below the surface.
- Use the same type of well-draining rooting medium as described for softwood cuttings.
- Aftercare:
- Water the medium and place it in a location with bright, indirect light.
- Maintain high humidity, either by using a propagation dome or a plastic bag.
- Keep the medium consistently moist but avoid waterlogging.
- Rooting may take longer than with softwood cuttings, usually around 6-10 weeks. Check for root development periodically.
Additional Tips
- Water the medium and place it in a location with bright, indirect light.
- Temperature: Maintain an optimal temperature range of 65-75°F (18-24°C) during the rooting process.
- Sanitation: Ensure all tools and containers are sterilized to prevent infections and diseases.
- Air Circulation: Maintain good air circulation around the cuttings to prevent mold and fungal issues.
- Hardening Off: Once rooted, gradually acclimate the new plants to outdoor conditions by exposing them to progressively longer periods of sunlight and outdoor air.
By following these detailed steps, you can successfully propagate Escallonia × rigida and enjoy the proliferation of this beautiful plant in your garden.