Plant Overview
Known as the Eastern Wahoo, this North American native is a show-stopper when autumn arrives. Its name "Wahoo" comes from the Dakota word wanhu, meaning "arrowwood," as its straight, sturdy branches were historically prized for crafting arrows. While it remains a quiet, green backdrop in the summer, it "screams" with brilliant color once the first frost approaches.
🔍 How to Identify
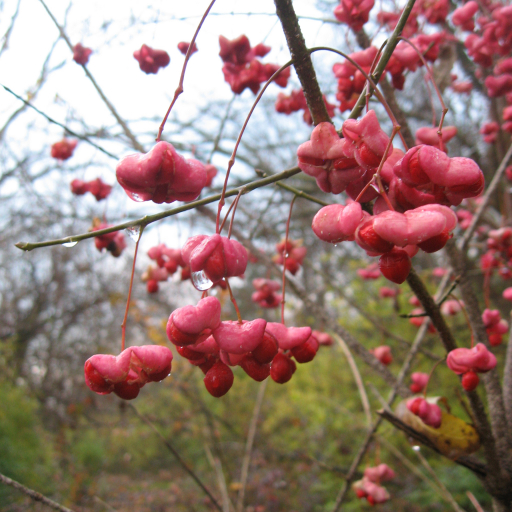
- 🍂 Autumn Foliage: The oval, finely-toothed leaves transform from a muted green to a breathtaking reddish-purple or scarlet as temperatures drop.
- 🎈 Ornamental Fruit: Its most striking feature is the four-lobed, fleshy pink-to-purple capsules that dangle from the branches, splitting open in late fall to reveal bright orange-red seeds.
- 🌿 Growth Habit: It typically grows as a multi-stemmed shrub or a small, airy tree, reaching up to 15–20 feet. Look for young twigs that appear slightly "square" or have subtle ridges.
🏡 In Your Garden
- 🌳 The Woodland Edge: This plant thrives in "in-between" spaces, preferring the moist, rich soil found at the edges of forests. It loves dappled sunlight but will produce its most vibrant red colors if it receives at least a few hours of direct sun.
- 🦋 Wildlife Value: While the berries are dangerous for us, they are a vital late-season food source for songbirds like bluebirds and catbirds. It serves as a fantastic native alternative to the invasive "Burning Bush" (Euonymus alatus).
⚠️ Safety & Toxicity
- 🚫 Toxic Status: All parts of the Eastern Wahoo are considered toxic to humans and most mammals if ingested.
- 🐾 Risk Factors: The plant contains cardiotoxic glycosides and alkaloids. Ingestion can lead to severe stomach upset, hallucinations, and heart irregularities. Ensure it is planted away from areas where curious pets or children play.
✨ Fun Fact
Native American tribes didn't just use the wood for arrows; the inner bark was historically used in very specific, traditional medicine as a "physic" (purgative). However, because the line between "medicine" and "poison" is so thin with this plant, it is strictly ornamental today!

Detailed Care Instructions
To grow Euonymus Atropurpureus, also known as burning bush or wahoo, follow these steps:
- Choose a suitable location: Select a spot in your garden that receives full sun to partial shade, as Euonymus Atropurpureus prefers these conditions.
- Prepare the soil: Ensure the soil is well-drained and fertile. If the soil is heavy clay, amend it with organic matter such as compost to improve drainage and nutrient content.
- Planting: Dig a hole that is twice as wide and deep as the root ball of the plant. Place the Euonymus Atropurpureus in the hole, making sure the base of the stem is level with or slightly above the soil surface. Backfill the hole with soil, gently firming it around the roots.
- Watering: Water the plant thoroughly after planting to settle the soil. Keep the soil moist but not waterlogged, especially during the first growing season, to help the plant establish a strong root system.
- Mulching: Apply a layer of organic mulch around the base of the plant. This helps retain moisture, suppress weed growth, and insulate the roots during extreme temperatures.
- Pruning: Euonymus Atropurpureus can be pruned as needed to shape the plant or remove dead or diseased branches. The best time to prune is in late winter or early spring before new growth emerges.
- Fertilizing: Apply a balanced, slow-release fertilizer in early spring to provide essential nutrients to the plant. Follow the manufacturer's instructions for proper application rates.
- Pests and diseases: Euonymus Atropurpureus is generally resistant to pests and diseases. However, keep an eye out for aphids, scale insects, and powdery mildew. If any issues arise, treat them promptly using appropriate organic or synthetic controls.
- Propagation: You can propagate Euonymus Atropurpureus through seeds or by taking semi-hardwood or hardwood cuttings in late spring or early summer. Follow established propagation methods for best results.
- Winter care: In colder climates, where temperatures drop below freezing, protect the plant during winter by applying a thick layer of mulch around the base. This helps insulate the roots and prevents damage from cold temperatures.
By following these steps, you can successfully grow Euonymus Atropurpureus plants in your garden.

Place in a window with dappled sun or a spot in the middle of a room. Or directly in a window facing west or east.

Euonymus Atropurpureus is a deciduous plant species that requires regular watering to grow and flourish. To water this plant, you will need to follow certain guidelines:
1. Identify the watering needs of Euonymus Atropurpureus: This plant prefers moist soil but can handle periods of drought once established. Providing regular watering, especially during hot and dry weather conditions, will ensure the plant stays healthy.
2. Water the plant deeply: When watering, it is important to water the plant deeply to penetrate the root zone. This helps the roots to grow deeper and results in a healthier plant.
3. Water the plant in the morning: The best time to water Euonymus Atropurpureus is in the morning, as it allows any excess water to evaporate during the day and prevents fungal growth.
4. Do not overwater the plant: Overwatering can lead to root rot and negatively affect the plant's health. Make sure that the soil is moist but not soggy.
5. Monitor the plant's response to watering: Depending on the plant's location, soil type, and weather conditions, the watering needs for Euonymus Atropurpureus may vary. Monitor the plant's response to watering and adjust the frequency and amount of water accordingly.
Overall, providing regular and deep watering while avoiding overwatering is key to ensuring the health and growth of Euonymus Atropurpureus.
To fertilize this plant, you should start by selecting a balanced slow-release fertilizer. Apply the fertilizer in early spring, just as new growth begins, and again in mid-summer. Be sure to follow the instructions on the fertilizer packaging regarding the amount to use and how to apply it. It's also a good idea to water the plant thoroughly after fertilizing to ensure that the nutrients are absorbed properly.
The recommended soil for this plant should be well-draining, slightly acidic, and rich in organic matter. A good option would be a soil mix that consists of equal parts peat moss, perlite, and sterilized loam. It is also important to ensure that the soil is not compacted, as this can hinder root growth and water absorption. When planting this plant, it is advisable to dig a hole slightly larger than the root ball and then backfill with the soil mix, ensuring that the base of the trunk is level with the soil surface. Regularly amending the soil with compost and organic fertilizers will help to maintain healthy growth and vigor. Additionally, taking care not to overwater the plant and providing adequate drainage can help prevent root rot and promote a healthy root system.
To propagate this plant, select a healthy stem that is at least 4-6 inches long and has several sets of leaves. Using a sharp, clean pair of scissors, make a clean cut just below a node. Remove any leaves from the bottom 1-2 inches of the stem. Dip the cut end of the stem in a rooting hormone powder, tapping off any excess. Insert the stem into a pot filled with moistened potting soil, making sure that at least one node is buried. Cover the pot with a plastic bag to create a humid environment. Place the pot in indirect sunlight and keep the soil moist. After several weeks, check for roots by gently tugging on the stem. You should feel resistance if roots have formed. Once well-established, transplant the new plants into individual pots and continue to care for them until they are ready to be planted outdoors.


