Plant Overview
Often called the Pinecone Plant, Euphorbia bupleurifolia is a geometric masterpiece of the succulent world. Hailing from the rocky grasslands of South Africa, it looks less like a typical leafy plant and more like a prehistoric artifact or a stray pinecone that decided to grow a crown of leaves. It is highly prized by collectors for its slow growth and distinct, architectural silhouette.
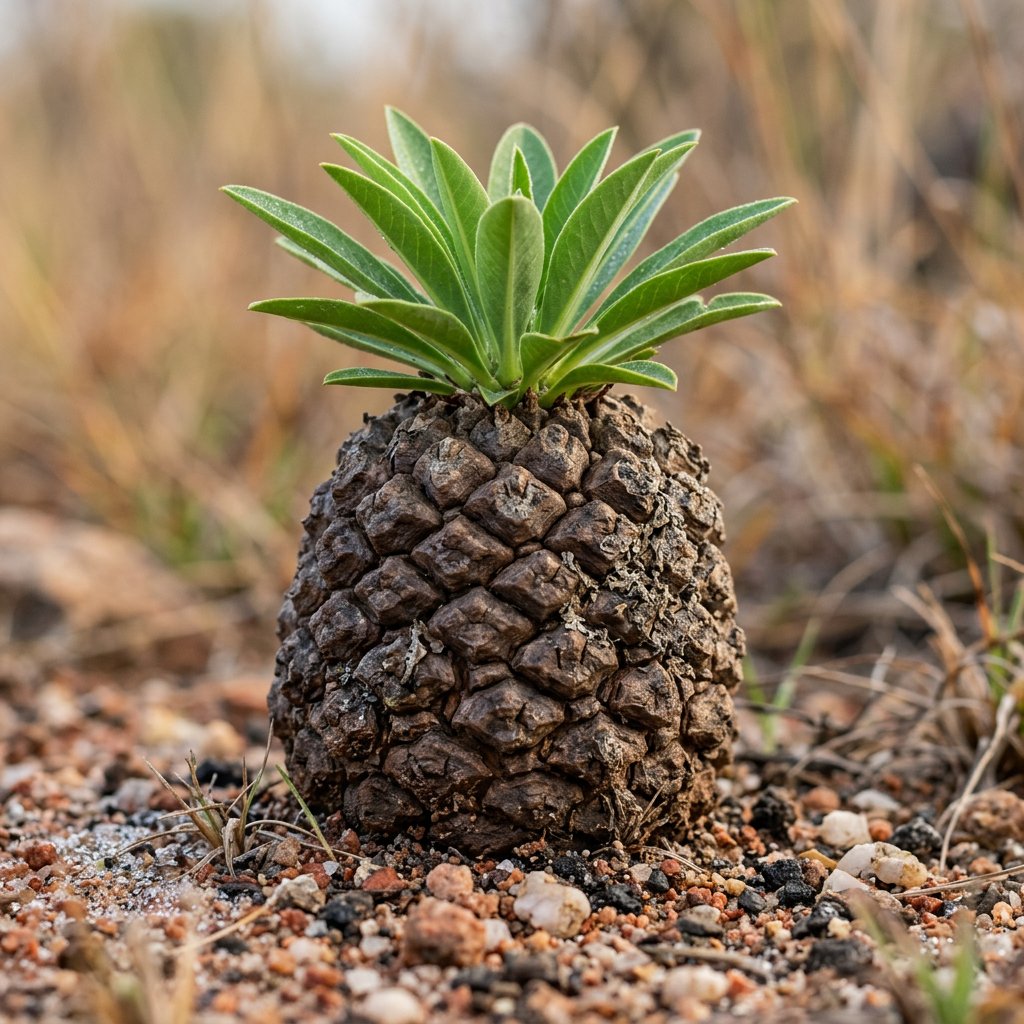
🔍 How to Identify
- 🍍 The Stem: The most striking feature is its brown, barrel-shaped stem covered in prominent, spiraling tubercles (bumps) that mimic the scales of a pinecone or a pineapple.
- 🌿 The Foliage: A lush tuft of long, narrow, willow-like leaves sprouts only from the very top of the stem. These leaves are a soft, bright green and can grow up to 6 inches long.
- 🌼 The Flowers: It produces small, greenish-yellow "cyathia" (false flowers) on short stalks that emerge from the center of the leaf crown, usually during the spring and summer.
🏡 In Your Garden
- 🏜️ Drainage is Vital: Because it has a thick, succulent stem designed to store water, it is extremely sensitive to "wet feet." It thrives best in a mineral-heavy soil mix (lots of pumice or grit) to prevent the dreaded stem rot.
- 💤 Winter Dormancy: Don’t panic if it drops all its leaves in late autumn! This plant is deciduous. It retreats into a dormant state during the colder months, during which it requires almost no water at all.
- ☀️ Light Balance: While it loves bright light, the "Pinecone" body can actually get sunburned in harsh, direct midday sun. It prefers "bright, filtered" light—think of a spot near a sunny window with a sheer curtain.
⚠️ Safety & Toxicity
- 🚫 Toxic Latex: Like all members of the Euphorbia family, this plant contains a thick, milky white sap (latex) that is highly irritating.
- 👁️ Contact Warning: If the plant is nicked or cut, the sap can cause skin rashes or severe eye irritation. Always wash your hands after handling or wear gloves during repotting.
- 🐾 Pet Safety: Keep this plant out of reach of curious cats and dogs, as ingestion of the sap can cause oral swelling and gastric distress.
✨ Fun Fact
The specific epithet bupleurifolia literally translates to "leaves like Bupleurum," a genus of herbs in the carrot family. It is considered a "caudiciform" succulent, meaning it is specifically evolved to survive long droughts by storing every drop of moisture in its armored, corky trunk.

Detailed Care Instructions
To grow Euphorbia Bupleurifolia, also known as spoonleaf spurge, follow these steps:
- Choose a suitable location: Euphorbia Bupleurifolia prefers bright, indirect sunlight. Select a spot with good air circulation and avoid placing it in direct sunlight as it can burn the leaves.
- Soil requirements: This plant thrives in well-draining soil. Use a mix of cactus soil or succulent potting mix with perlite to ensure good drainage.
- Watering: Allow the soil to dry out between waterings, as overwatering can lead to root rot. Water the plant thoroughly but allow excess water to drain away. During winter, reduce watering frequency as the plant enters a dormant phase.
- Temperature and humidity: Euphorbia Bupleurifolia prefers warm temperatures between 65-80°F (18-27°C). It can tolerate lower temperatures, but prolonged exposure to cold or frost can damage the plant. Maintain moderate humidity levels and avoid exposing it to sudden temperature changes.
- Fertilizer: Fertilize with a balanced, water-soluble fertilizer specifically formulated for cacti and succulents. Apply the fertilizer according to the instructions provided on the label, usually once a month during the growing season (spring and summer). Avoid fertilizing during winter when the plant is dormant.
- Pruning: If necessary, trim or prune the plant to maintain its shape and size. Use clean, sharp pruners to avoid damaging the plant. Wear gloves during the process, as Euphorbia species exude a milky sap that can be irritating to the skin and eyes.
- Propagation: Euphorbia Bupleurifolia can be propagated by stem cuttings. Take a stem cutting from a healthy plant, allow it to dry and callus for a few days, then plant it in well-draining soil. Water sparingly until roots form.
- Pests and diseases: Euphorbia plants are generally resilient to pests and diseases. However, keep an eye out for mealybugs, scale insects, or aphids. If you notice any infestation, remove the pests manually or use an appropriate insecticidal soap or spray.
Remember to handle Euphorbia Bupleurifolia with care as the sap can be toxic and irritating.

Place in a bright room that is sun drenched almost all day. Or directly in a south-facing window.

To water this plant, you should first ensure that the soil is completely dry before watering it again. This can be done by sticking your finger into the soil and checking if it feels dry to the touch. Once you have confirmed that the soil is dry, you can water the plant thoroughly, allowing the water to soak through the soil and drain out of the bottom of the pot. It is important to not let the plant sit in standing water, as this can lead to root rot. Watering once per week or when the soil is dry to the touch is typically sufficient.
To fertilize this plant, use a balanced water-soluble fertilizer once a month during the growing season. Make sure to dilute the fertilizer to half strength and apply it directly to the soil surrounding the plant. Avoid getting any fertilizer on the leaves or stem, as it may burn the plant.
The recommended soil for this plant is a well-draining, sandy soil mix with added organic matter. It should have a slightly acidic to neutral pH level in the range of 6.0-7.5. Avoid using heavy or clay soils as they retain too much moisture, which can lead to root rot and other fungal diseases. The ideal soil mix should allow for proper aeration and root development as well as drain excess water quickly. Adding perlite or coarse sand to the soil mixture can help improve drainage further. Additionally, it is essential to avoid overwatering this plant and also provide proper sunlight and temperature conditions for its healthy growth.
To propagate this plant, take a cutting of a healthy stem with a sharp, clean pair of scissors or pruners. Remove any leaves from the bottom few inches of the stem, leaving only a few at the top. If desired, you can also dip the end of the cutting in rooting hormone to encourage rooting.
Prepare a pot with well-draining soil and make a hole in the soil using a pencil or a chopstick. Insert the cutting into the hole, making sure the bottom of the stem is buried in the soil. Gently press the soil around the cutting to make sure it is secure.
Water the cutting lightly, being careful not to overwater. Place the pot in bright, indirect light, making sure to protect it from direct sunlight. Keep the soil consistently moist but not waterlogged, and mist the cutting every few days to provide additional moisture.
After a few weeks, watch for signs of new growth, such as new leaves or roots emerging from the stem. This indicates that the cutting has successfully rooted and is ready to be moved to its own pot or planted in the ground.
Common pests of the pine-cone plant include Scale insect, mealybugs, spider mites. Make a habit of checking your pine-cone plant frequently for pests so that any infestations can be caught and managed early.


