Plant Overview
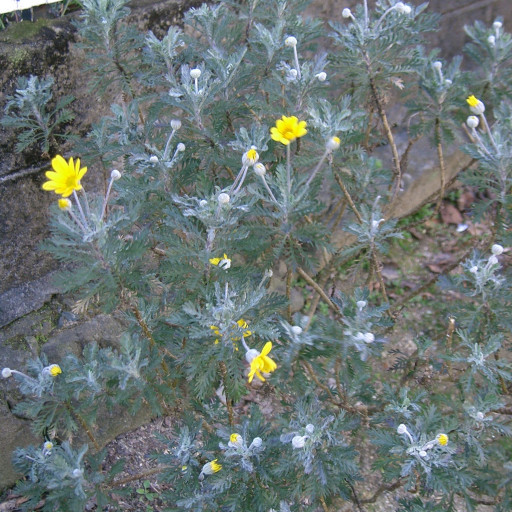
Often called the Golden Daisy Bush, Euryops pectinatus is a burst of sunshine for any landscape. Hailing from the rocky slopes of South Africa, it is beloved for its ability to bloom almost year-round in milder climates, providing a much-needed splash of color when other plants go dormant. Its striking contrast between shimmering silver-grey foliage and neon-yellow petals makes it a centerpiece of Mediterranean-style gardens.
🔍 How to Identify
- 🌼 The Blooms: Large, brilliant yellow daisy-like flower heads that sit proudly atop long, slender stalks, reaching about 2 inches in diameter.
- 🌿 The Foliage: Distinctive fern-like, deeply lobed leaves that feature a soft, silvery-grey or "glaucous" coating, giving the bush a metallic sheen from a distance.
- 🏗️ Growth Habit: A rounded, woody evergreen shrub that typically grows to about 3 to 5 feet tall, maintaining a dense and bushy appearance if properly maintained.
🏡 In Your Garden
- ☀️ Sun-Seeker Nuances: While it is incredibly hardy in the heat, this plant is a "drainage extremist." It thrives in rocky or sandy soils and will quickly suffer from root rot if its feet stay wet in heavy, clay-based soil.
- ✂️ The "Leggy" Fix: To prevent the plant from becoming thin and woody at the base, it requires a light "haircut" after its main flowering flush. This encourages the plant to stay compact and produce more of its signature silver leaves.
⚠️ Safety & Toxicity
- 🐾 Pet Safety: Euryops pectinatus is generally considered non-toxic to dogs, cats, and horses, making it an excellent choice for a worry-free family garden.
- 🧤 Skin Sensitivity: Some individuals with sensitive skin may experience mild contact dermatitis (itching or redness) when handling the sap or bruised foliage, so wearing gloves during pruning is recommended.
✨ Fun Fact
The genus name Euryops comes from the Greek words eurys, meaning "large," and ops, meaning "eye." This refers to the plant's wide, open, sun-like flower heads that seem to "watch" the sky throughout the day.

Detailed Care Instructions
| Humidity | Normal |
| Lighting | Full Sun |
| Toxicity | Poisonous |
| Difficulty | Easy |
| Hibernation | Cold Period |
| Temperature | 21°C - 28°C |
| Hardiness Zones | 9 - 11 |
To grow Euryops Pectinatus, also known as African Bush Daisy, follow these steps:
- Choose the right location: African Bush Daisy prefers full sun but can tolerate partial shade. It likes well-draining soil and plenty of air circulation.
- Prepare the soil: Amended the soil with compost or well-rotted manure to improve drainage and nutrient content. Remove any weeds or debris from the planting area.
- Propagation: You can grow Euryops Pectinatus from seeds or by dividing existing plants. If using seeds, sow them in containers filled with a well-draining seed starting mix. Keep the soil moist and place the container in a warm location until germination occurs. Transplant the seedlings when they are large enough to handle.
- Watering: Water the plants regularly, especially during the warmer months, to keep the soil evenly moist. Avoid overwatering, as this can lead to root rot.
- Fertilizer: Apply a balanced, slow-release fertilizer in spring and early summer to promote healthy growth and abundant blooms. Follow the manufacturer's instructions for proper application.
- Pruning: Trim back the plant in late winter or early spring to encourage compact growth and more flowers. Remove any dead or diseased branches as you notice them.
- Mulching: Apply a layer of organic mulch around the base of the plant to help conserve moisture, control weeds, and regulate soil temperature.
- Pest and disease control: African Bush Daisy is generally resistant to pests and diseases. However, keep an eye out for aphids, mealybugs, or spider mites. Treat any infestations promptly using organic insecticidal soap or other appropriate remedies.
- Provide support: Euryops Pectinatus can benefit from staking or tying to a support structure, especially if grown in windy areas or during heavy blooming periods.
- Winter care: In zones where temperatures drop below freezing, Euryops Pectinatus may not survive winter outdoors. Consider bringing potted plants indoors or providing protection with a frost cover or mulching to protect the root system.
Remember to check local gardening guidelines and recommendations specific to your region when growing Euryops Pectinatus to ensure successful growth.

Place in a bright room that is sun drenched almost all day. Or directly in a south-facing window.
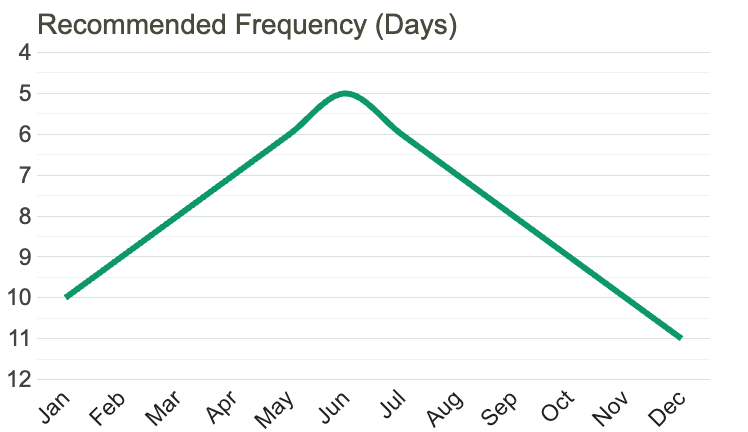
To properly water this plant, it is important to understand its specific watering needs. It prefers a well-draining soil that is moist but not waterlogged. To achieve this, you should water the plant deeply once or twice a week during the growing season, depending on the temperature and humidity levels in your area. Be sure to water around the base of the plant rather than over the foliage to prevent disease. Reduce watering in the winter when growth slows down. Check the soil moisture level regularly by inserting your finger an inch or two into the soil. If it feels dry, it's time to water. It is important not to overwater as this can lead to root rot and other issues.
To fertilize this plant, use a well-balanced fertilizer with an NPK ratio of 10-10-10. Apply the fertilizer every other month during the growing season, which is generally from spring to fall. Water the plant thoroughly before and after applying the fertilizer to prevent burning the roots. Be sure to follow the manufacturer's instructions on the fertilizer packaging for proper application rates. Avoid fertilizing during the plant's dormant period in the winter.
The ideal soil for Euryops Pectinatus plant is a well-draining, nutrient-rich soil with a pH level between 6 and 7. It should contain a good amount of organic matter and should be able to retain moisture without becoming waterlogged. This plant prefers sandy or loamy soil that is not too heavy or compacted. A mixture of sand, peat moss, and loam can be used as a good potting mix for growing Euryops Pectinatus indoors. It is important to avoid soil that is too acidic or alkaline, as it can negatively affect the plant's growth and health. Regular fertilization and watering will help ensure that the plant thrives in its chosen soil.
To propagate this plant, you will need to take cuttings from the parent plant. Start by selecting a healthy and mature stem that has several leaves. Using a sharp, sterilized knife, make a clean cut just below a node (the point where leaves attach to the stem).
Remove any lower leaves or buds from the cutting, leaving only a few leaves at the top. Dip the base of the cutting in rooting hormone powder, and then insert it into a moist mix of peat moss and sand.
Water the cutting thoroughly, and then cover it with a plastic bag to create a humid environment. Place the cutting in a warm, bright location, but not in direct sunlight. Mist the cutting regularly to keep the soil damp, but not waterlogged.
The cutting should root in 4-6 weeks. Once it has formed roots, remove the plastic bag and transplant the cutting into a pot filled with well-draining soil. Water the plant regularly and keep it in a bright location, but not in direct sunlight.
Wait until the plant has grown to a suitable size before transplanting it into the garden.
Common pests of the grey-leaved euryops include Spider mites, aphids. Make a habit of checking your grey-leaved euryops frequently for pests so that any infestations can be caught and managed early.