Plant Overview
Known affectionately as "Blue Fescue," Festuca cinerea looks like a collection of tiny, frozen fireworks bursting from the soil. This ornamental grass is a favorite for those seeking a "set it and forget it" plant that adds a cool, architectural edge to any landscape. Native to the rocky slopes of Europe, it brings a touch of the icy Alps to sunny garden borders.
🔍 How to Identify
- ❄️ Foliage Color: The most striking feature is its needle-like blades that range from a soft silvery-grey to an intense, metallic steel-blue.
- 🦔 Growth Habit: It grows in tidy, dense, spherical mounds that resemble living sea urchins, typically reaching only 10–12 inches in height.
- 🌾 Summer Blooms: During late spring and summer, thin stalks rise above the blue tufts, bearing light green flowers that eventually dry into golden, wheat-like plumes.
🏡 In Your Garden
- ☀️ Sun & Color Intensity: To keep that signature "icy" blue look, this plant needs full sun. In deep shade, the color often fades to a duller green, and the tight mound may begin to flop.
- 🏜️ The "Dry Feet" Rule: Blue Fescue is a survivor of poor, rocky soils. It hates "wet feet" and will quickly rot if planted in heavy clay or over-watered. It is an excellent candidate for rock gardens or xeriscaping.
- ✂️ Longevity Secret: These plants are relatively short-lived compared to other grasses. If you notice the center of the mound dying out (creating a "donut" shape), it’s time to dig it up and divide it in early spring to rejuvenate the plant.
⚠️ Safety & Toxicity
- 🛡️ General Safety: Festuca cinerea is considered non-toxic to humans, dogs, and cats, making it a safe choice for family-friendly landscapes.
- 🧤 Skin Sensitivity: While not poisonous, the fine, stiff blades can be slightly abrasive. If you are "combing" through the plant to remove dead foliage by hand, wearing gloves can prevent minor skin irritation or tiny scratches.
✨ Fun Fact
Unlike many other ornamental grasses that turn brown and go dormant in the winter, Blue Fescue is semi-evergreen. It maintains its striking blue hue throughout the coldest months, providing a rare pop of color against the winter snow or grey garden mulch.

Detailed Care Instructions
Here are some steps to help you grow the Festuca cinerea plant:
- Find the right location: Festuca cinerea prefers full sun but can tolerate partial shade. Choose a location in your garden that receives at least 6 hours of direct sunlight per day.
- Prepare the soil: Festuca cinerea prefers well-draining soil. If your soil is heavy or clay-like, amend it with organic matter such as compost to improve drainage and soil quality.
- Planting: Dig a hole deep and wide enough to accommodate the plant's root ball. Place the Festuca cinerea plant in the hole and backfill with soil. Firmly press down the soil around the plant to eliminate any air pockets.
- Watering: Water the plant thoroughly after planting to help settle the soil and provide initial moisture. Afterward, water the plant regularly, keeping the soil consistently moist but not waterlogged.
- Mulch: Apply a layer of organic mulch around the base of the plant to help retain moisture and suppress weed growth. This will also help insulate the roots during extreme temperatures.
- Pruning: Festuca cinerea is a low-maintenance plant that doesn't require much pruning. However, you can remove any dead or diseased leaves by gently pulling them from the base of the plant.
- Fertilizing: Festuca cinerea doesn't require heavy fertilization. If necessary, you can apply a balanced slow-release fertilizer in early spring or a light application of compost.
- Dividing: Over time, Festuca cinerea may become crowded and require division. This is best done in early spring or fall. Carefully dig up the plant, separate the clumps, and replant them in a new location or pot.
- Pest and disease control: Festuca cinerea is generally resistant to pests and diseases. However, you should regularly inspect the plant for any signs of aphids, slugs, or fungal issues. Treat with appropriate organic insecticides or fungicides if necessary.
Remember to research specific care requirements for your particular climate and growing conditions.

Place in a bright room that is sun drenched almost all day. Or directly in a south-facing window.
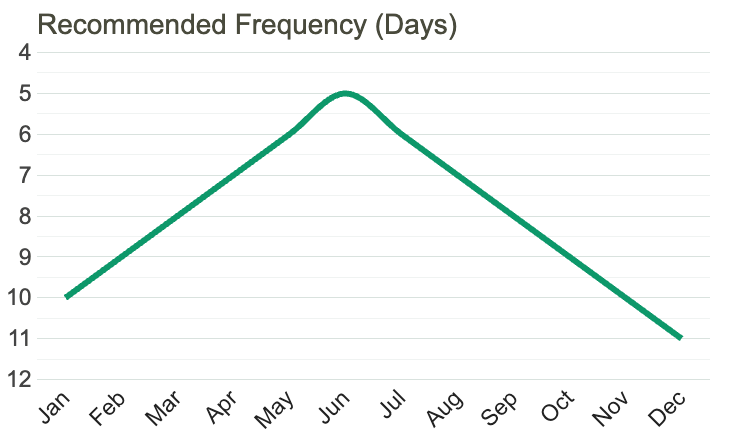
Festuca Cinerea is a type of plant that requires proper watering for healthy growth. To water this plant, you should follow the below steps:
1. Observe the soil moisture level: Before watering the plant, check the soil moisture level by touching the soil with your fingers to feel whether it's dry or moist.
2. Watering frequency: Festuca Cinerea requires moderate watering, meaning it does not need too much water or too little. You should water the plant once a week during the growing season, but be sure to adjust the watering frequency based on the weather conditions.
3. Water quantity: Ensure to water the plant thoroughly, allowing the water to soak into the soil and reach the root zone. Avoid over-watering as it can lead to root rot.
4. Watering method: You can either water the plant by using a watering can or a hose. If you use a watering can, pour the water slowly around the base of the plant. If you prefer using a hose, hold the hose close to the soil and let the water trickle slowly into the area around the base of the plant.
5. Time of day: It is best to water this plant in the morning or late in the afternoon when the temperature is cooler. Avoid watering during the hottest part of the day, as the water can evaporate quickly.
By following these steps, you can ensure that your Festuca Cinerea plant is properly watered and healthy.
To provide optimal growth for this plant, it is recommended to fertilize it with a balanced, slow-release fertilizer once in the spring and again in the fall. Apply the fertilizer evenly around the base of the plant and water thoroughly afterwards. It is important not to over-fertilize the plant, as this can cause damage to the roots and foliage. Additionally, it is important to maintain adequate soil moisture levels, as this plant prefers consistent moisture but can become stressed in waterlogged or overly dry conditions.
Festuca Cinerea is a type of plant that requires well-draining soil with good air circulation. The soil should be slightly acidic with a pH between 5.5 and 7.0. The soil should be relatively dry, as this plant does not require much water and too much moisture can cause root rot. The best soil for Festuca Cinerea is a sandy or gritty soil mixture with added organic matter to improve texture and fertility. It is important not to use heavy soils that retain moisture for too long as this can cause fungal diseases. Additionally, it is recommended to add perlite or coarse sand to the soil to improve drainage. Overall, the ideal soil for Festuca Cinerea is one that is well-draining, slightly acidic, and sandy with some organic matter for fertility.
One way to propagate this plant is through division. Begin by gently digging up the plant from the ground using a small garden fork or hand trowel. Carefully separate the plant into smaller sections, making sure each division has a healthy root system and at least one stem or tuft of leaves. Replant the divisions in a well-draining soil, spacing them apart by several inches to allow for growth.
Another method is through seed propagation. Wait until the plant produces seed heads in late summer or early fall. Harvest the seed heads by cutting them off with sharp scissors or pruning shears and placing them in a paper bag to dry. Once the seeds have fully matured and dried, extract them from the seed heads and store them in a cool, dry place until ready to plant.
To plant the seeds, prepare a seed bed by loosening the soil and adding a layer of compost or well-rotted manure. Scatter the seeds evenly over the surface of the soil and cover lightly with a thin layer of soil or sand. Water gently to keep the soil moist but not waterlogged, and keep the area shaded until the seeds germinate. Thin out the seedlings as needed, leaving several inches of space between each plant.
Common pests of the blue fescue include Thrips. Make a habit of checking your blue fescue frequently for pests so that any infestations can be caught and managed early.