Plant Overview
Often called the Large-fruited Fig or the White-stemmed Fig, Ficus caulocarpa is a dramatic giant of the tropical world. While many figs are evergreen, this species is famous for its "brief deciduous" phase, where it sheds every single leaf in a sudden, spectacular display before bursting back to life with fresh, bronze-tinted foliage. In the wild, it often begins its life as a "strangler," hitching a ride on a host tree before eventually claiming the space for itself.
🔍 How to Identify
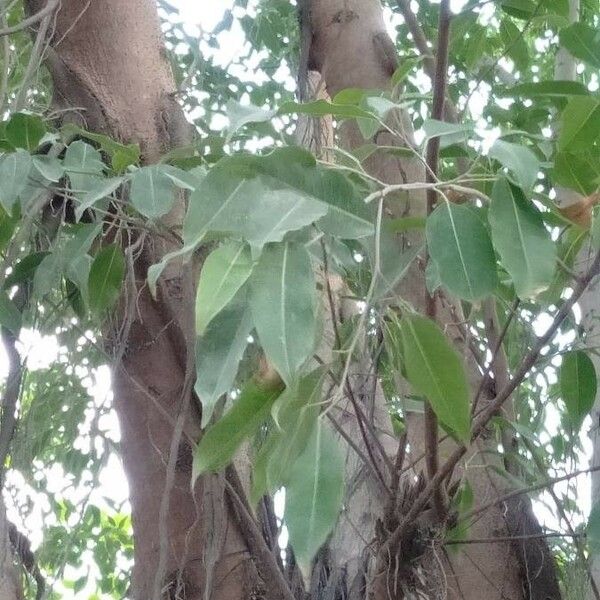
- 🍃 The Leaves: Glossy, oblong-shaped leaves with a distinct pointed tip. They are thinner and more delicate than the common Rubber Plant, and they turn a beautiful yellowish-bronze just before they drop.
- 🍒 The Fruit: Unlike most trees, its tiny figs (syconia) grow in dense clusters directly on the older branches and trunk. They transition from a pale green to a creamy white or soft pink when ripe.
- 🪵 The Bark: The trunk is typically smooth and grey, often developing impressive "buttress roots" or aerial roots that hang like wooden curtains as the tree matures.
🏡 In Your Garden
- 🌳 Space Requirements: If planting outdoors, give this giant a wide berth. Its root system is incredibly vigorous and "thirsty"; it has a reputation for seeking out cracked pipes or lifting pavement if planted too close to home structures.
- 💧 The "Drop" Reflex: Don't panic if your Ficus caulocarpa suddenly goes bald. Unlike other plants where leaf drop signals death, this species naturally sheds its canopy once or twice a year to prepare for a flush of new growth. It prefers consistent humidity during this "reset" period.
⚠️ Safety & Toxicity
- 🚫 Status: Mildly toxic to pets and humans.
- 🧪 The Sap: Like most members of the Moraceae family, this tree contains a milky white latex sap. This sap can cause skin irritation (dermatitis) in humans and can lead to gastrointestinal upset, drooling, or vomiting if leaves are chewed by curious cats or dogs.
✨ Fun Fact
The Ficus caulocarpa is a "Keystone Species" in its native Southeast Asian habitats. Because it produces such massive quantities of figs all at once, it acts as a vital 24-hour buffet for local birds, bats, and monkeys, supporting entire ecosystems during seasons when other fruits are scarce!

Detailed Care Instructions
To grow Ficus Caulocarpa plant, follow these steps:
- Choose the right location: Ficus Caulocarpa prefers bright, indirect light. Place it near a window where it can receive filtered sunlight throughout the day. Avoid direct sunlight as it can scorch the leaves.
- Use well-draining soil: The plant needs a well-draining soil mixture. You can use a combination of potting soil, perlite, and peat moss. This will ensure that excess water drains away from the plant's roots.
- Watering: Keep the soil evenly moist, but not soggy. Allow the top inch of soil to dry out before watering again. Avoid overwatering as it can lead to root rot. In winter, reduce the frequency of watering, allowing the soil to dry out a bit more between waterings.
- Fertilizer: Feed the plant with a balanced, water-soluble fertilizer during the growing season (spring and summer). Follow the instructions on the fertilizer package for the correct dosage. In winter, you can reduce or stop fertilizing, as the plant's growth slows down.
- Humidity: Ficus Caulocarpa appreciates higher humidity levels. You can increase humidity by placing a tray filled with water near the plant, using a humidifier, or misting the leaves with water.
- Pruning: Prune the plant to maintain its desired shape and size. Regular pruning also helps to encourage new growth. Use clean pruning shears to remove any dead or damaged branches.
- Propagation: Ficus Caulocarpa can be propagated through stem cuttings. Take a 4-6 inch cutting from the plant's healthy stem, remove the lower leaves, and plant it in a pot filled with moist soil. Keep the cutting in a warm and humid environment until it roots.
- Pests and diseases: Keep an eye out for common houseplant pests such as aphids, mealybugs, and spider mites. Treat any infestations promptly with insecticidal soap or neem oil.
Remember that Ficus Caulocarpa is a tropical plant and can thrive in warm, humid conditions. Providing the right care and environmental conditions will help your plant grow and thrive.

Place in a bright room that is sun drenched almost all day. Or directly in a south-facing window.

Ficus Caulocarpa is a plant that requires moderate watering levels. It is important to ensure that the soil is moist but not waterlogged, as this can lead to root rot. When watering, it is recommended to use room temperature water to avoid shocking the plant. The frequency of watering will depend on various factors such as the humidity level of the surrounding environment, the plant's location, and the type of soil it is planted in. It is important to monitor the soil moisture levels regularly and adjust the watering schedule as needed. Additionally, the plant benefits from occasional misting of its leaves to increase humidity levels around the plant.
To fertilize Ficus Caulocarpa, use a balanced fertilizer with equal parts nitrogen, phosphorus, and potassium. Apply the fertilizer every four to six weeks during the growing season, which is usually between early spring and late summer. Be cautious not to over-fertilize the plant as it can lead to root burn. It is also recommended to water the plant thoroughly before applying the fertilizer to prevent the roots from getting burnt.
The soil that is best for Ficus Caulocarpa plant is acidic, well-draining, and rich in organic matter. It should have a pH between 5.5 and 6.5. A soil mixture consisting of peat moss, perlite, and sand is suitable for this plant. The soil should be able to retain moisture while also allowing excess water to drain out. Additionally, it should be free of pathogens and weeds. A good practice is to amend the soil with compost or organic matter regularly to provide adequate nutrients to the plant. It is also important to ensure that the soil is not too compacted and allows for adequate air flow to the roots.
To propagate this particular plant, you will need to first take a cutting from a mature, healthy plant. This cutting should be around 5-6 inches long and should include several leaves and a node (where the leaves meet the stem). It is important to use clean, sharp pruning shears to avoid damaging the plant.
Once you have a cutting, remove the bottom leaves and any flowers or buds. This will help the cutting put all its energy into growing new roots rather than supporting existing growth.
Then, dip the cut end of the stem into rooting hormone. This will increase the likelihood of the cutting taking root.
Next, plant the cutting in a well-draining soil mix and water thoroughly. Cover the cutting with a clear plastic bag or plastic wrap to create a humid environment.
Place the cutting in a bright, indirect light location, and keep the soil moist but not soggy. After a few weeks, you should start to see new growth and roots forming.
Once the new plant has established roots, you can then transplant it into its own container or into a larger pot with other plants. Be sure to keep the new plant in the same light and soil conditions as the parent plant for best results.


