Plant Overview
Meet the Ficus rubra, commonly known as the Red-leaved Fig or the "Gommier." Hailing from the volcanic landscapes of the Mascarene Islands, this hardy tree is a master of adaptation, often beginning its life high in the canopy of another tree before eventually grounding itself. With its deep green foliage and striking reddish accents, it brings an air of ancient, tropical resilience to any collection.
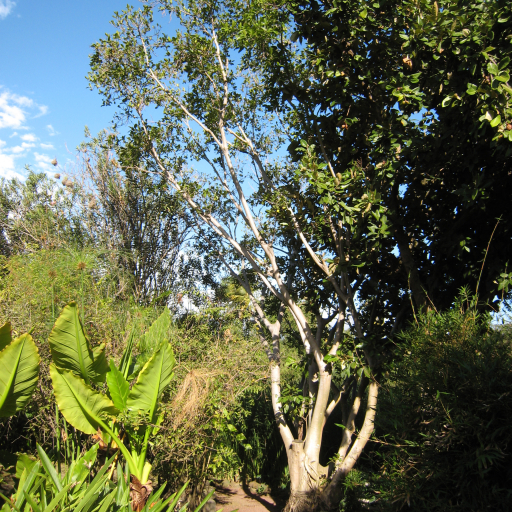
🔍 How to Identify
- 🍃 The Foliage: Large, elliptical, and leathery leaves. While the mature leaves are a deep, glossy green, the new growth often emerges with a stunning bronzed or reddish tint.
- 🎋 The Stems: Look closely at the petioles (leaf stalks) and young branches; they frequently display a characteristic deep red or purplish hue that gives the plant its name.
- 🌳 Growth Habit: It features smooth, light-grey bark and, in humid environments, may produce thin aerial roots that reach down toward the soil like spindly fingers.
🏡 In Your Garden
- 🏗️ Root Ambition: This fig is a "strangler" by nature. If planted outdoors, give it plenty of space away from pipes, sidewalks, or foundations, as its roots are incredibly strong and persistent in their search for moisture.
- 🧘 The Fig "Tantrum": Like many in the Ficus family, Ficus rubra values stability. If you move it to a new corner of the room or change its environment suddenly, it may drop its leaves in a dramatic display of stress before eventually acclimating.
- 🚿 Humidity Lover: Coming from an island habitat, it thrives when the air is moist. Misting the leaves or placing it near a humidifier prevents the leaf tips from browning and keeps the "red" highlights vibrant.
⚠️ Safety & Toxicity
- 🚫 Status: Mildly toxic to humans and pets.
- 🧪 The Sap: The plant contains a milky white latex sap. This sap can cause itchy skin irritation or rashes (dermatitis) upon contact. If leaves are chewed or swallowed by cats or dogs, it can lead to vomiting or oral irritation.
✨ Fun Fact
In its native Mauritius and Réunion, the Ficus rubra is a vital "canteen" for the local wildlife; it is a primary food source for the endangered Mauritius Fruit Bat, which helps spread the tree's seeds across the islands.

Detailed Care Instructions
To grow a Ficus Rubra plant, also known as Red Leaf Fig, you can follow these steps:
- Choose the right location: Ficus Rubra prefers bright but indirect light. Place it near a window where it can receive filtered sunlight or in a well-lit room. Avoid placing it in direct sunlight, as it can burn the leaves.
- Temperature and humidity: Ficus Rubra prefers temperatures between 65-75°F (18-24°C). It also enjoys a relatively high humidity level, so consider placing a tray with water near the plant or using a humidifier to maintain the desired humidity.
- Watering: Water your Ficus Rubra regularly, allowing the top inch of soil to dry out between waterings. Overwatering can lead to root rot, so ensure proper drainage by using a well-draining potting mix and a container with drainage holes.
- Fertilization: Feed your Ficus Rubra with a balanced, water-soluble fertilizer during the growing season (spring and summer). Follow the instructions on the fertilizer package for the appropriate dosage and frequency.
- Pruning: Regularly prune your Ficus Rubra to maintain its shape and to remove any dead or damaged leaves. Pruning also promotes bushier growth.
- Repotting: When the plant outgrows its current pot, plant it in a slightly larger container using a well-draining potting mix. Repotting should be done annually or whenever the roots become crowded.
- Pest control: Keep an eye out for common houseplant pests like spider mites, mealybugs, and scale insects. If you notice any pests, treat them promptly with insecticidal soap or by using natural remedies like neem oil.
Remember, Ficus Rubra is native to the rainforests of Southeast Asia, so try to recreate similar growing conditions as much as possible. With proper care and attention, your Ficus Rubra should thrive and grow into a beautiful plant.

Place in a bright room that is sun drenched almost all day. Or directly in a south-facing window.

Watering Ficus Rubra plant requires a moderate approach to ensure adequate hydration without over-saturating the soil. This plant should be watered when the topsoil feels dry to the touch, but not completely dried out. To avoid drowning the plant's roots, it is crucial to let excess water drain from the pot after watering. If the plant is exposed to bright sunlight or hot weather, it may require more frequent watering. However, during the winter months or in low-light conditions, the plant may need less water. It is important to avoid letting the plant sit in standing water, as this can lead to root rot and other issues. Overall, a consistent and cautious watering schedule will contribute to the healthy growth and longevity of Ficus Rubra plant.
For best growth results, apply a balanced fertilizer every two weeks during the plant's growing season. Use half the recommended amount of fertilizer and mix it in well with the soil. Be sure to water the plant thoroughly after fertilizing. Avoid fertilizing during the winter months when the plant enters a period of dormancy.
The ideal soil for the plant in question should be well-draining, with a slightly acidic pH level between 5.5 and 6.5. It should have a combination of organic matter such as peat moss, compost, or leaf mold, and inorganic materials like sand or finely crushed granite to increase soil porosity. It is essential to ensure that the soil is loose and aerated to prevent water logging and promote healthy root growth. The soil should also be evenly moist, but not waterlogged, as this can cause root rot and other moisture-related problems. Finally, it is essential to use soil that is free of pathogens and pests that could harm the plant, such as nematodes and fungi.
To propagate this plant, take stem cuttings that are approximately six inches in length. Remove the leaves from the bottom half of each cutting, and dip the cut end of the stem into rooting hormone powder.
Place the cuttings into a pot filled with slightly moistened potting soil, making sure that the bottom nodes of the stem are buried in the soil. Cover the pot with a clear plastic bag, creating a humid environment for the cuttings to root.
After about four to six weeks, remove the plastic bag and check for roots by carefully tugging on the base of the stem. If there is resistance, the cutting has rooted and can be watered regularly. If not, replace the bag and check again in another week or two.
Once the cuttings have developed strong roots and new growth, they can be transplanted into individual pots or into a larger container if desired.


