Plant Overview
Often called Narrowleaf Yellowtops, this sun-loving native looks like a burst of golden fireworks against a coastal landscape. It is a true "pollinator magnet," serving as a critical nectar source for hundreds of butterflies and bees during the late summer and fall. If you want a garden that hums with life, this golden-crowned beauty is an essential addition to any sunny patch of soil.
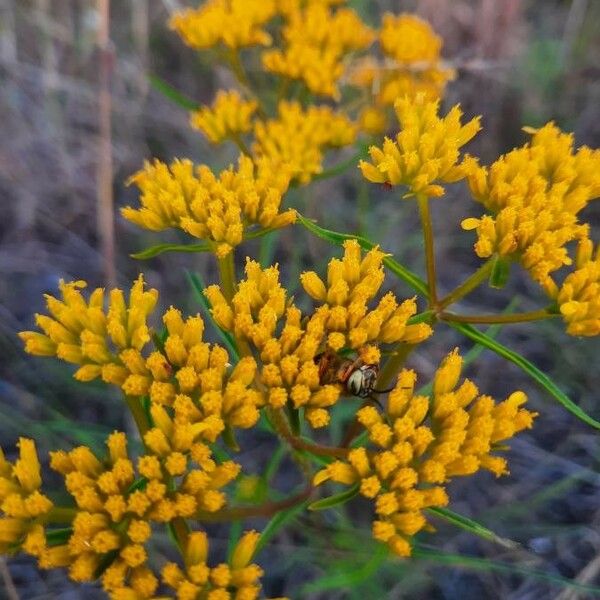
🔍 How to Identify
- 🌼 The Flowers: Dense, flat-topped clusters of tiny, bright yellow flower heads. Each "flower" is actually a collection of even smaller blossoms that create a fuzzy, golden texture.
- 🍃 The Foliage: True to its name, the leaves are "linear"—long, very narrow, and grass-like—growing in opposite pairs along the stems.
- 🎋 The Growth: It grows as an upright, bushy perennial that can reach up to 3 feet tall, often featuring reddish-tinted stems that become slightly woody at the base.
🏡 In Your Garden
- ☀️ Coastal Champion: This plant is incredibly salt-tolerant and thrives in sandy, poor-quality soils. It is the perfect choice for seaside gardens or "problem areas" where the sun is intense and the soil is dry.
- ✂️ The Haircut Rule: To prevent the plant from becoming too "leggy" or flopping over, give it a light pruning in early summer. This encourages a bushier shape and results in a much more dramatic explosion of yellow blooms in the autumn.
⚠️ Safety & Toxicity
- ✅ Generally Safe: Narrowleaf Yellowtops is not considered toxic to humans, dogs, or cats. It is a wildlife-friendly plant that is safe to handle for most gardeners.
- 🧤 Skin Sensitivity: As a member of the Aster family, the sap may cause very mild skin irritation or "contact dermatitis" in people with sensitive skin. It is best to wear gloves if you are doing extensive pruning.
✨ Fun Fact
Flaveria linearis is a botanical superstar in climate research. It utilizes a highly efficient form of photosynthesis (known as C4-like) that allows it to continue growing and creating energy even during the hottest, most punishing summer days when other plants are forced to "shut down" to save water.

Detailed Care Instructions
To grow Flaveria linearis, also known as narrowleaf yellowtops, follow these steps:
- Choosing the right location: Flaveria linearis is a sun-loving plant. Select a location that receives at least 6-8 hours of direct sunlight per day.
- Soil preparation: The plant thrives in well-draining soil. Prepare the soil by removing any weeds or debris and tilling the soil to a depth of several inches. Add organic matter like compost to improve soil fertility and drainage.
- Planting: Flaveria linearis can be grown from seeds or cuttings. If starting from seeds, sow them about ¼ inch deep in the prepared soil, following the packet instructions. As for cuttings, take 4-6 inch stem cuttings from a healthy parent plant and plant them at a similar depth.
- Watering: Keep the soil consistently moist but not waterlogged. Flaveria linearis prefers regular watering, especially during dry spells, but overwatering can lead to root rot. Water deeply when the top inch of soil feels dry.
- Fertilization: Apply a balanced fertilizer, such as a slow-release granular or a water-soluble fertilizer, once a month during the active growing season. Follow the package instructions for proper application rates.
- Maintenance: Remove any weeds that compete with the Flaveria linearis plant for nutrients and water. Regularly check for pests and diseases, such as aphids or powdery mildew, and take appropriate measures to control them if necessary.
- Pruning: If the plant becomes leggy or overgrown, prune it back to encourage bushy growth. You can trim the stems to maintain the desired shape. Additionally, removing spent flowers will encourage more blooms.
- Propagation: Flaveria linearis can be propagated by allowing it to self-seed. Collect the seeds once they are fully mature, and sow them in the desired area or pots.
- Winter care: Flaveria linearis is generally not cold-hardy and may not survive freezing temperatures. In colder regions, it's best to grow these plants as annuals or bring potted plants indoors during winter.
With proper care, Flaveria linearis should grow well and provide vibrant yellow flowers throughout the growing season.

To water this plant, it is important to examine the soil and determine its moisture level. The best way to do this is to stick your finger a few inches into the soil. If it is dry, it's time to water. When watering, make sure to thoroughly soak the soil and allow excess water to drain out from the bottom of the pot. It is recommended to water this plant about once a week, but as always, the frequency of watering will depend on factors such as the humidity of the room and the size of the pot. Avoid over-watering, as this can cause root rot and other issues.
To fertilize this plant, begin by selecting a balanced, water-soluble fertilizer with an equal ratio of nitrogen, phosphorus, and potassium. Mix the fertilizer with water according to the instructions on the package. Apply the fertilizer solution to the plant's soil every two to three weeks during the growing season, following the package's recommended dosage. Avoid over-fertilizing, as this can lead to salt buildup and damage the plant's roots.
Flaveria Linearis plants thrive in well-draining soil that is rich in nutrients. The soil should also have a pH level that ranges from slightly acidic to slightly alkaline. It is best to avoid using heavy soils that retain moisture for extended periods as it can lead to root rot and other diseases. A mixture of garden soil, compost, and sand can create an ideal growing medium for Flaveria Linearis. Additionally, the plant prefers full sunlight to partial shade and can tolerate drought-like conditions, although regular watering can help maintain its health and vigor.
To propagate this plant, take cuttings from mature stems that are at least 6 inches in length. Use clean, sharp scissors or pruning shears to make a clean cut just below a leaf node. Remove any leaves that are too close to the bottom of the cutting to ensure that only the top leaves remain.
Dip the cut end of the stem in rooting hormone powder to encourage speedy rooting. Place the cutting in moist, well-draining potting soil. Use a container with drainage holes and fill it with the soil, making sure it is moist.
Cover the cutting with a plastic bag or airtight container to create humidity and support faster rooting. Keep the soil moist but not waterlogged by misting the cutting daily or when the soil appears dry. Check for roots in a few weeks.
Once roots have formed, transfer the rooted cutting to a larger container with potting soil or plant it in the garden in a sunny, well-draining location. Water it according to its needs and keep any visible leaves misted to prevent drying out until the plant is established.


