Plant Overview
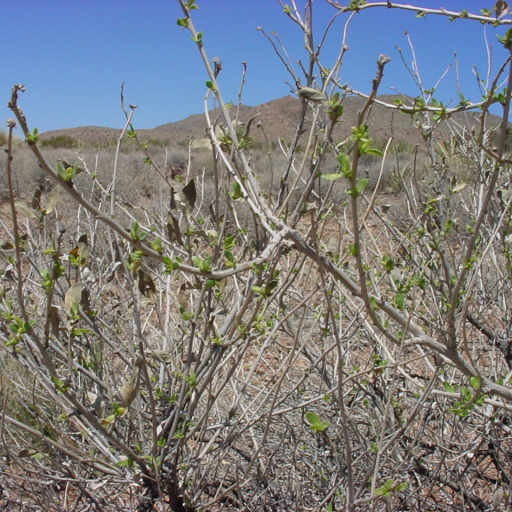
Often called the Tarbush or Hojasen, this resilient shrub is a hallmark of the Chihuahuan Desert. It earns its nickname from the thick, sticky resin that coats its leaves, which releases a pungent, tar-like aroma—especially after a desert rain. While it may appear as a humble scrub, it is a master of survival in some of the harshest environments in North America.
🔍 How to Identify
- 🍃 Resinous Leaves: The small, oval leaves are dark green and covered in a shiny, sticky resin that acts as a natural varnish to prevent water loss.
- 🌼 Nodding Flowers: Unlike many sunflowers that face the sky, the small yellow flower heads of the Tarbush "nod" or droop downward (the meaning of the species name cernua).
- 🪵 Branched Structure: It grows as a low, multi-branched shrub with dark, almost blackish bark on older stems, typically reaching 3 to 6 feet in height.
🏡 In Your Garden
- 🌵 Xeriscaping Star: For those in arid climates, the Tarbush is the ultimate "set it and forget it" plant. It thrives in poor, rocky, or limestone-heavy soils where most other plants would wither.
- 🌤️ Sun & Space: It requires full, blistering sun to maintain its compact shape. In shaded areas, it becomes leggy and loses the intense resinous fragrance that many desert enthusiasts prize.
⚠️ Safety & Toxicity
- 🐐 Livestock Warning: While historically used in folk medicine, the Tarbush is toxic to sheep, goats, and cattle. The flowers and fruit contain compounds that can be fatal to grazing animals if consumed in large quantities.
- 🐾 Home Safety: While not typically a high-risk plant for indoor pets, the resinous leaves can cause digestive upset if chewed. It is best treated as an ornamental plant rather than an edible herb.
✨ Fun Fact
The resin on the leaves isn't just for show—it contains a complex cocktail of chemicals that protects the plant from hungry insects and reflects intense UV rays, acting like a built-in "sunscreen" for the desert heat!

Detailed Care Instructions
To grow a Flourensia cernua plant, also known as the tarbush or the white bursage, you can follow these steps:
- Obtain seeds or young plants: You can either purchase seeds from a reputable online or local nursery or find young plants in a natural habitat if you live in an area where Flourensia cernua is native.
- Choose a suitable location: Flourensia cernua prefers full sun, so select a sunny spot in your garden that receives at least 6-8 hours of direct sunlight per day. The soil should be well-draining with a pH range of 6.0 to 7.5.
- Prepare the soil: Remove any weeds, stones, or debris from the chosen planting area. Loosen the soil and amend it with organic matter like compost or well-rotted manure to improve its fertility and drainage.
- Sow the seeds or plant the seedlings: If using seeds, scarify them by mechanically or chemically breaking the hard outer seed coat to improve germination rates. Sow the seeds directly in the prepared soil or plant the young seedlings at a spacing of 12-24 inches apart.
- Watering and maintenance: Water the plants regularly, keeping the soil moist but not waterlogged. Once established, Flourensia cernua is drought-tolerant and doesn't require frequent watering. Mulching around the plants can help retain soil moisture and suppress weed growth. Prune the plants, if needed, to maintain their shape and encourage bushier growth.
- Pest and disease control: Flourensia cernua is generally resistant to pests and diseases. However, you may need to keep an eye out for common garden pests like aphids, caterpillars, or spider mites. Use organic pest control methods or insecticidal soap to deal with any infestations.
- Harvesting and propagation: Flourensia cernua produces small yellow flowers and seed heads with white bristles. You can collect and save the seeds for future plantings. Propagation can also be done using semi-hardwood cuttings taken in early summer.
Remember to check if Flourensia cernua is native to your region and consider its invasive potential before introducing it to your garden.

Place in a bright room that is sun drenched almost all day. Or directly in a south-facing window.

To water this plant, you should first ensure that the soil is dry to the touch before watering. Once you confirm that the soil is evenly dry, water the plant using a watering can or a hose. Ensure that the water is evenly distributed over the entire root system and avoid getting water on the leaves. It is crucial to never let the soil get too soggy, as this can cause root rot. Watering every two weeks may be sufficient, depending on the location and climate. If the plant is in a hot and dry environment, it may require more frequent watering.
To fertilize this plant, you should use a well-balanced fertilizer with equal proportions of nitrogen, phosphorus, and potassium (N-P-K). Apply the fertilizer to the soil around the plant during the growing season, which typically lasts from spring to fall. Be sure to follow the instructions on the fertilizer package for the correct amount and frequency of application. Consider using a slow-release fertilizer for a more gradual application. Additionally, it is important to monitor the soil moisture levels and adjust watering accordingly to avoid over-fertilization or under-fertilization.
The Flourensia Cernua plant thrives in well-draining soil that has a neutral to slightly alkaline pH level. A mixture of sandy loam and gravel can be used to create the ideal soil conditions for this plant. The soil should be moderately fertile and should be able to hold moisture without becoming waterlogged. The addition of organic matter, such as compost or leaf mold, can help to improve soil fertility and structure, as well as increase its ability to hold moisture. It is also important to ensure that the soil is free from contaminants such as heavy metals, pesticides, or other harmful chemicals that can negatively affect plant growth and health.
Flourensia Cernua plant can be propagated through seed or stem cuttings. To propagate through stem cuttings, select a healthy stem that is at least 4-6 inches long, with 2-3 leaves at the top. Make a clean cut with a sharp knife just below a leaf node.
Remove the bottom leaves and any flowers or buds from the cutting. Dip the cutting in rooting hormone powder and plant it in a small pot filled with well-draining potting soil. Keep the soil moist and place the pot in a warm, bright location out of direct sunlight.
Cover the pot with a plastic bag to create a humid environment and promote root growth. After a few weeks, check for root development by gently tugging on the stem. If it resists, roots have formed. Once the plant has established roots, gradually remove the plastic bag and acclimate the plant to its new growing conditions.
Propagating through seed involves collecting ripe seeds from the plant and sowing them in a well-draining potting soil mix. Cover the seeds lightly with soil, water well, and keep the soil moist until germination occurs. Germination time may vary depending on the growing conditions.
Once the seedlings have grown a few sets of leaves, they can be transplanted to individual pots. Gradually increase their exposure to direct sunlight and outdoor conditions over time to prepare them for planting in the garden.


