Plant Overview
Known as the "Kramer’s Cranesbill," this hardy perennial is a woodland treasure native to the grassy slopes and forest edges of East Asia, particularly Japan and Korea. While many people confuse true Geraniums with the common garden Pelargonium, this plant is a rugged, "true" wild geranium built to survive cold winters. Its name, Cranesbill, comes from the peculiar, long, beak-like shape of its seed pods that appear after the flowers fade.
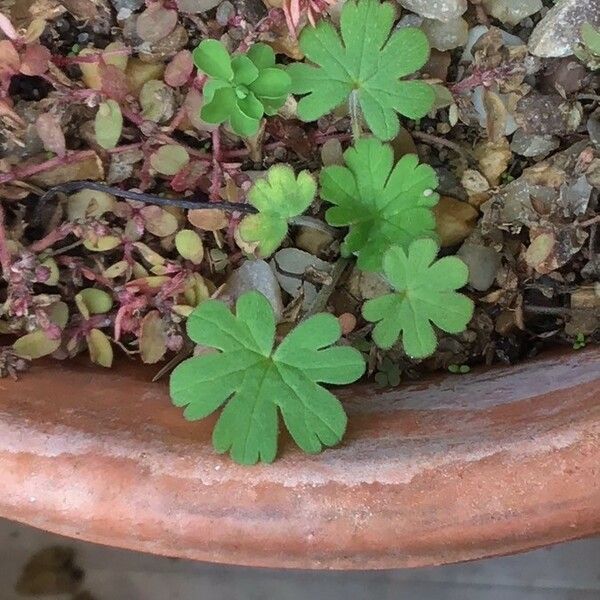
🔍 How to Identify
- 🌸 The Blooms: Features delicate, five-petaled flowers typically ranging from soft pink to a deep magenta, often marked with intricate, darker purple veins that act as "nectar guides" for pollinators.
- 🍃 The Foliage: The leaves are deeply lobed and "palmate" (shaped like a hand), often with a slightly fuzzy texture and a rich green color that can turn reddish in the autumn.
- 🌱 Growth Habit: It forms a low, sprawling mound of foliage, making it an excellent groundcover that weaves between taller shrubs or perennials.
🏡 In Your Garden
- ⛅ Woodland Preference: Unlike its sun-loving cousins, Geranium krameri thrives in the "dappled light" of a garden. It mimics its natural habitat best when planted under the canopy of deciduous trees where it gets morning sun and afternoon relief.
- 💧 Moisture Balance: It prefers "cool feet." While it is relatively resilient, it dislikes baking in dry, compacted soil. Adding a layer of organic mulch helps retain the consistent moisture it needs to keep its leaves from crisping at the edges.
⚠️ Safety & Toxicity
- ✅ Low Risk: This plant is generally considered non-toxic to humans and is not known for causing severe reactions.
- 🐾 Pet Safety: While true Geraniums (Cranesbills) are much safer than Pelargoniums (which can cause skin irritation or upset stomachs in dogs and cats), it is always best to discourage pets from grazing on garden plants to avoid mild digestive upset.
✨ Fun Fact
- 🚀 Botanical Ballistics: The "Cranesbill" name isn't just for show; the plant uses a spring-loaded mechanism to launch its seeds away from the parent plant. When the seed pod dries, it snaps upward like a catapult, flinging the seeds several feet away to find a new place to grow!

Detailed Care Instructions
To grow Geranium Krameri plants, follow these steps:
- Choose a suitable location: Geranium Krameri plants prefer full sun to partial shade, so select a spot in your garden that receives at least 4-6 hours of direct sunlight per day.
- Prepare the soil: Geranium Krameri plants thrive in well-draining soil that is rich in organic matter. Amend the soil with compost or well-rotted manure to improve its fertility and drainage.
- Planting: Dig a hole slightly larger than the root ball of the plant. Place the plant in the hole, ensuring that it is at the same level as it was in its previous container. Backfill the hole with soil and gently firm it around the plant.
- Watering: Regular watering is essential for the initial establishment of Geranium Krameri plants. Water deeply but infrequently, making sure the soil is evenly moist. Avoid overwatering, as it can cause root rot.
- Fertilizing: Apply a balanced slow-release fertilizer once in early spring and again in mid-summer to provide necessary nutrients to the plant. Follow the package instructions for specific dosage recommendations.
- Pruning: Deadhead spent flowers regularly to encourage continuous blooming. Pruning the plant back by one-third in late summer or early fall can help rejuvenate its growth and maintain its shape.
- Mulching: Apply a layer of organic mulch around the plants to conserve moisture, suppress weed growth, and insulate the roots during extreme temperatures.
- Pests and diseases: Geranium Krameri plants are relatively pest and disease resistant. However, occasional pests like aphids or slugs may appear. Monitor your plants regularly and take appropriate measures if needed, such as using organic insecticides or handpicking pests.
- Winter care: Geranium Krameri plants are typically hardy and can withstand mild frosts. However, in areas with severe winters, it is advisable to provide some winter protection, such as covering the plants with mulch or bringing potted plants indoors.
By following these guidelines, you can successfully grow Geranium Krameri plants and enjoy their beautiful flowers throughout the growing season.

Place in a bright room that is sun drenched almost all day. Or directly in a south-facing window.

1. Check the moisture level: Before watering the Geranium Krameri plant, it is crucial to assess the moisture level of the soil. This can be done by inserting your finger about an inch deep into the soil. If it feels dry, it's time to water the plant.
2. Choose the right watering method: The preferred method for watering Geranium Krameri plants is from the bottom. Fill a saucer or tray with water and place the pot on top. Allow the plant to sit and absorb water through the drainage holes at the bottom of the pot. This helps prevent waterlogged soil and promotes better root growth.
3. Avoid wetting the foliage: It is essential to avoid wetting the leaves of Geranium Krameri plants while watering, as it can lead to fungal diseases. Wet foliage encourages the growth and spread of pathogens, so direct the water towards the soil and roots rather than spraying the plant from above.
4. Watering frequency: Geranium Krameri plants prefer a slightly drier soil, so it is important not to overwater them. Water the plant deeply when the top inch of soil feels dry. This ensures that the water reaches the deeper roots, promoting a strong and healthy root system. Additionally, allowing the soil to dry out partially between watering cycles prevents the risk of root rot.
5. Consider the climate and season: Factor in the climate and season when determining the watering needs of the Geranium Krameri plant. During hot and dry weather, the plant may require more frequent watering, while in cooler and more humid conditions, watering can be reduced. Adjust the frequency accordingly to ensure the plant receives adequate hydration without being waterlogged.
6. Drainage is crucial: Geranium Krameri plants dislike sitting in stagnant water, so it is vital to ensure proper drainage. Use well-draining soil and a pot with drainage holes to allow excess water to escape. Remove any standing water from the saucer or tray after watering to avoid problems associated with water accumulation.
7. Monitor plant health: Observing the plant's overall health is important to determine if it requires more or less water. If the leaves are turning yellow or drooping, it may be a sign of overwatering. Conversely, if the leaves are wilting or the plant appears stressed, it may need more water. Regularly inspect the plant for any signs of moisture stress or excess water.
Remember, each Geranium Krameri plant may have slightly different watering requirements, so it is important to observe the plant closely and adjust watering practices accordingly.
To properly fertilize the Geranium Krameri plant, use a balanced, water-soluble fertilizer with equal NPK (Nitrogen, Phosphorous, Potassium) ratios. Dilute the fertilizer according to package instructions, usually around 1/2 to 1 teaspoon per gallon of water.
Apply the fertilizer every two to four weeks during the plant's active growing season, which is typically from spring to summer. Remember to water the plant thoroughly before applying the fertilizer to prevent chemical burn.
Pour the diluted fertilizer solution directly onto the soil, avoiding contact with the leaves or stems of the plant. Ensure that the fertilizer is evenly distributed around the base of the plant.
If the leaves of the Geranium Krameri plant start showing signs of yellowing or stunted growth, reduce the frequency of fertilization to prevent overfeeding. Always follow the instructions provided by the specific fertilizer brand for the best results.
The ideal soil for the Geranium Krameri plant is well-draining, fertile, and loamy in texture. It should have a balanced composition of organic matter, sand, and clay particles. This type of soil allows for proper root development and ensures that excess water can drain out without causing waterlogging.
The pH level of the soil should be slightly acidic to neutral, ideally ranging from 6.0 to 7.0. This pH range promotes efficient nutrient absorption and supports overall plant health.
Furthermore, it is recommended to incorporate a good amount of organic matter, such as compost or well-rotted manure, into the soil before planting the Geranium Krameri. This enriches the soil with essential nutrients and improves its overall structure.
While the Geranium Krameri plant is relatively adaptable, it prefers a soil that retains some moisture but doesn't become waterlogged. Therefore, maintaining appropriate moisture levels is crucial. Regular watering is required, especially during hot and dry periods, but overwatering should be avoided to prevent root rot.
In summary, the Geranium Krameri plant thrives in well-draining, fertile, and loamy soil with a slightly acidic to neutral pH. Preparing the soil with organic matter and ensuring proper moisture levels will help support healthy growth and vibrant blooms.
To propagate Geranium Krameri plant, you can follow these steps:
- Selecting a mature plant: Choose a healthy and well-established Geranium Krameri plant from which you want to propagate. Look for a plant with strong stems and vibrant foliage.
- Gathering necessary supplies: Prepare a sharp and clean pair of pruning shears, a clean container, potting soil or a suitable propagation medium, and water.
- Preparing the container: Select a container that has drainage holes at the bottom. Fill it with a well-draining potting mix or a mixture of perlite and peat moss to provide an ideal rooting environment.
- Taking cuttings: Using the pruning shears, take 4-6 inch long stem cuttings from the parent plant. Make sure to cut just below a leaf node. Remove any lower leaves from the cuttings to expose the nodes.
- Preparing the cuttings: Dip the cut end of the stem into a rooting hormone powder or gel, if desired, to promote root development. This step is optional but may enhance success rates.
- Planting the cuttings: Make small holes in the prepared container's potting mix using a pencil or a similar tool. Insert the prepared Geranium Krameri cuttings into these holes, gently patting the soil around them to secure them in place.
- Providing proper care: Place the container in a location with bright, indirect sunlight. Avoid direct sunlight as it may scorch the cuttings. Keep the soil slightly damp but not overly saturated. Water the cuttings when the top inch of soil feels dry.
- Encouraging root growth: To promote root development, you can cover the container with a plastic bag or place it in a propagator or a plastic dome. This creates a humid environment that aids in rooting. Make sure to provide good ventilation periodically to prevent the growth of mold or fungal diseases.
- Monitoring and transplanting: Check the cuttings regularly for signs of rooting, such as the appearance of new growth or resistance when gently tugged. This usually takes 4-6 weeks. Once roots have developed, you can transplant the young Geranium Krameri plants into individual pots or the desired planting location.
By following these steps, you can successfully propagate Geranium Krameri plants and expand your collection or share them with fellow gardening enthusiasts.


