Plant Overview
Known affectionately as the Austral Cranesbill, Geranium solanderi is a charming, hardy wildflower native to the grasslands and forests of Australia and New Zealand. Unlike its flamboyant cousins found in florist shops, this native beauty has a delicate, scrambling habit that makes it look like a living lace draped across the garden floor. Its name honors Daniel Solander, a famous botanist who traveled with Captain Cook on the Endeavour.
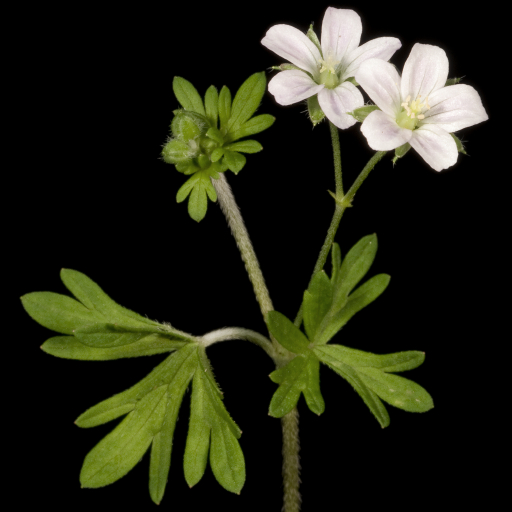
🔍 How to Identify
- 🌸 The Bloom: Small, five-petaled flowers that range from pale pink to a deep magenta, often featuring delicate darker veins that act as "nectar guides" for pollinators.
- 🍃 The Foliage: Round or kidney-shaped leaves that are deeply divided into five to seven lobes, giving them a jagged, "toothed" appearance.
- 🦒 The "Crane's Bill": After flowering, it develops a long, pointed seed pod that looks remarkably like the beak of a crane or a stork, a hallmark of the Geranium family.
- 🌱 The Texture: The stems and leaves are covered in fine, soft hairs, giving the plant a slightly fuzzy or velvety feel when touched.
🏡 In Your Garden
- 🌿 Root Resilience: This plant develops a thick, fleshy taproot. This makes it incredibly drought-tolerant once established, but it also means it "hates" being moved—pick a permanent spot to avoid transplant shock.
- 🕸️ The Weaver: Rather than growing into a stiff bush, it prefers to scramble and weave its way through taller grasses or over rocks. It is a fantastic choice for a naturalistic, "cottage-style" native garden.
- 🐝 Pollinator Magnet: It is a vital source of nectar for native bees and small butterflies, acting as a bridge between more seasonal flowering plants.
⚠️ Safety & Toxicity
- ✅ Status: Non-toxic to humans and generally considered safe for a backyard environment.
- 🐾 Pet Caution: While not high-risk, many wild geraniums contain essential oils (like geraniol) that can cause mild digestive upset or skin irritation in curious cats or dogs if consumed in large quantities.
- 🖐️ Skin Sensitivity: The fine hairs on the stems can occasionally cause a mild "itchy" sensation for people with very sensitive skin.
✨ Fun Fact
The "Crane's Bill" seed pod is a botanical catapult! When the seeds are ripe and the pod dries out, it suddenly curls upward with enough force to fling the seeds several feet away from the parent plant, ensuring the next generation has plenty of space to grow.

Detailed Care Instructions
To grow Geranium Solanderi (also known as Native Geranium), follow these steps:
- Choose the right location: Geranium Solanderi prefers a spot with full sun to partial shade. Find an area that receives at least 4-6 hours of direct sunlight each day.
- Soil preparation: The plant thrives in well-draining soil. Before planting, amend the soil with organic matter or compost to enhance its drainage capabilities. This will prevent waterlogging and root rot.
- Planting: Dig a hole slightly larger than the root ball of the Geranium Solanderi. Place the plant in the hole, making sure the top of the root ball is level with the soil surface. Fill the hole with soil, gently firming it in place.
- Watering: Initially, water the plant thoroughly right after planting to settle the soil around the roots. Afterward, water consistently to keep the soil evenly moist but not waterlogged. Aim for about an inch of water per week, adjusting based on rainfall and soil conditions. Avoid overwatering as it can lead to root rot.
- Mulching: Apply a layer of organic mulch, such as shredded bark or straw, around the plant to help retain moisture and suppress weeds. Keep the mulch a few inches away from the stem to prevent rot.
- Pruning: Regularly prune Geranium Solanderi to maintain its shape and promote bushier growth. Cut back any leggy or overgrown stems in spring or after flowering. Pruning can also help prevent disease and increase air circulation.
- Fertilizing: Native Geraniums generally don't require heavy fertilization. However, you can apply a balanced slow-release fertilizer in early spring to provide some nutrients. Follow the instructions on the fertilizer packaging for proper application.
- Pests and diseases: Inspect the plant regularly for common pests, such as aphids or spider mites. If detected, treat them with insecticidal soap or a suitable insecticide. Monitor for signs of diseases like fungal leaf spots and treat accordingly.
- Propagation: Geranium Solanderi can be propagated through stem cuttings or division. Take stem cuttings in late spring or early summer, ensuring they have several leaf nodes. Remove the lower leaves, dip the cut end in rooting hormone, and plant the cutting in a well-draining potting mix. Keep it moist and in a warm, bright location until roots develop.
By following these steps, you can successfully grow Geranium Solanderi and enjoy its beautiful flowers.

Place in a bright room that is sun drenched almost all day. Or directly in a south-facing window.

Geranium Solanderi plant belongs to the Geranium family of flowering plants. This plant is typically grown in a wide range of soils and requires moderate watering. When it comes to watering Geranium Solanderi, it is wise to keep in mind that the plant prefers slightly moist soil that is not waterlogged.
To water Geranium Solanderi plant, it's advisable to conduct a finger test. You can do this by inserting your index finger into the soil up to the second knuckle. If the tip of your finger feels dry, then it's time to water the plant.
It's best to water Geranium Solanderi plant in the morning or late afternoon when the sun is less intense. This is because watering in the middle of the day can cause evaporation, which will result in less water being absorbed by the plant.
When watering Geranium Solanderi plant, avoid over-watering it. Over-watering can lead to root rot and cause the plant to die. Make sure that the water penetrates deep into the soil, and the excess water drains out of the container.
The amount of water required by Geranium Solanderi plant can vary depending on the size of the container, the temperature, and humidity of the environment it is growing in. As a general rule of thumb, water the plant once a week in the summer and once every two weeks in the winter.
Lastly, it's best to avoid getting water on the foliage of the plant. Water droplets on the leaves can act as a magnifying glass and scorch the foliage in direct sunlight. Instead, water the soil around the plant base.
To fertilize this plant, it is recommended to use a balanced, water-soluble fertilizer with equal parts nitrogen, phosphorus, and potassium. You should dilute the fertilizer to half strength and apply it every two to four weeks during the growing season. Be sure to water the plant thoroughly before and after fertilization to avoid any burning of the roots. Additionally, it is important to avoid over-fertilization as this can lead to weak growth and susceptibility to pests and diseases.
Geranium Solanderi plant prefers loose, well-draining soil with a pH between 6.0 and 7.0. It should be a fertile soil that contains organic matter, such as compost or leaf mold. A soil mix that contains equal parts of garden soil, compost, and coarse sand or perlite is ideal for this plant. It is important to avoid heavy, clay soils that can retain too much moisture and drown the roots. Additionally, the soil should be amended with lime if it is too acidic to create a more neutral pH. This plant does not require excessive fertilization, but a slow-release fertilizer can be applied at the beginning of the growing season to provide necessary nutrients.
Geranium Solanderi plant can be propagated through stem cuttings. Begin by selecting a healthy stem that measures around 4-6 inches in length. Cut the stem just below a set of leaves, making sure to use sharp and sterilized pruning shears.
Next, remove all the leaves from the lower two-thirds of the stem. Dip the cut end in rooting hormone powder to aid in the formation of roots.
Prepare a pot with a well-draining soil mix and create a hole using a pencil. Insert the cutting into the hole and firm the soil around it.
Water the cutting thoroughly and cover the pot with a plastic bag. This helps to create a humid environment that encourages rooting. Keep the pot in a bright but shaded area and mist the cutting with water every few days to keep it moist.
After a few weeks, new growth should appear, indicating that the rooting has taken place. You can then remove the plastic bag and transfer the new plant into its permanent pot or outdoor location.


