Plant Overview
Known as the Wallich Crane’s-bill, this Himalayan treasure is a favorite for those who want a long-lasting burst of color in their garden. Unlike many perennials that fade by mid-summer, this hardy plant is a "weaver," gracefully scrambling through its neighbors to fill gaps with delicate, saucer-shaped blooms until the first frost. Its ability to thrive in the cool shadows of the mountains makes it a resilient choice for temperate gardens.
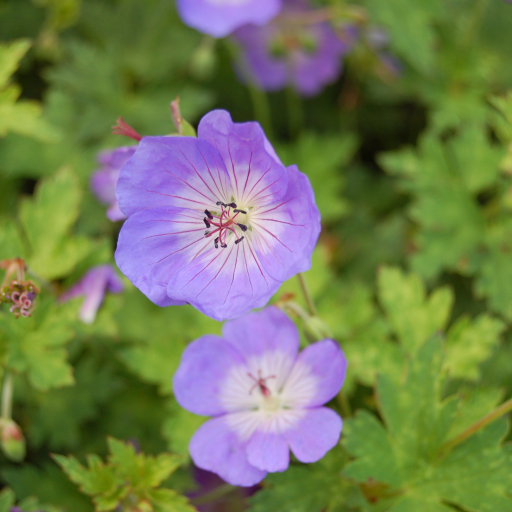
🔍 How to Identify
- 🌸 Saucer Blooms: Features five-petaled flowers, typically in shades of lavender, violet, or sky blue, often showcasing a bright white "eye" at the center with distinct dark veins.
- 🌿 Intricate Foliage: The leaves are deeply lobed and textured, frequently displaying subtle silvery or reddish-mottled patterns that add visual interest even when the plant is not in bloom.
- 🏗️ Sprawling Habit: It grows in a prostrate, mounding fashion, sending out long, trailing stems that like to lean on other plants or drape over the edges of stone walls.
🏡 In Your Garden
- 🏔️ Himalayan Roots: Because it originates from high-altitude regions, it thrives in spots where the soil stays cool and moist. In hotter climates, it appreciates a bit of afternoon shade to prevent its petals from wilting in the midday sun.
- ✂️ The Mid-Summer Haircut: It is an incredibly forgiving plant. If the stems start to look "leggy" or tired in August, you can shear it back significantly; it will respond with a fresh flush of vibrant green leaves and a new round of flowers.
⚠️ Safety & Toxicity
- ✅ Safe for the Family: Geranium wallichianum is generally considered non-toxic to humans and common household pets like dogs and cats.
- 🧤 Contact Sensitivity: While not poisonous, some gardeners with very sensitive skin may experience mild irritation from the fine hairs on the stems. Wearing gloves during heavy pruning is always a good practice.
✨ Fun Fact
The common name "Crane's-bill" refers to the plant's unique seed pods, which look exactly like the long, pointed beak of a crane. When the seeds are ripe, the "beak" dried up and acts like a catapult, springing open to launch the seeds several feet away to start a new colony!

Detailed Care Instructions
Here are some steps to help you grow the Geranium wallichianum plant:
- Choose a suitable location: Geranium wallichianum plants prefer full sun to partial shade. Select a location with well-draining soil that is not prone to waterlogging.
- Prepare the soil: Amend the soil with organic matter, such as compost, to improve its fertility and drainage. Geraniums appreciate slightly acidic to neutral soil with a pH of around 6.0 to 7.0.
- Planting: Dig a hole that is slightly larger than the root ball of the plant. Place the plant into the hole, making sure the crown or base of the plant is level with the soil surface. Fill the hole with soil and firmly press it down to eliminate any air pockets.
- Watering: Water the plant thoroughly after planting and continue to keep the soil evenly moist but not waterlogged. Avoid overwatering, as excessive moisture can lead to root rot.
- Mulching: Apply a layer of organic mulch around the plant to help conserve moisture, suppress weed growth, and maintain a stable temperature for the roots.
- Fertilizing: Fertilize the plant every four to six weeks during the growing season with a balanced, slow-release fertilizer. Follow the instructions on the fertilizer package for application rates.
- Pruning: To encourage bushier growth and prolong flowering, remove faded flowers regularly. You can also prune back the plant lightly in early spring to remove any dead or damaged growth.
- Protection from frost: Geranium wallichianum plants are generally hardy, but they may require protection from severe frost. Consider covering them with a frost cloth or moving potted plants indoors during extreme cold.
- Pests and diseases: Monitor the plant for common pests like aphids, mealybugs, and spider mites. Treat infestations promptly using appropriate organic or chemical controls if necessary. Also, avoid overcrowding and provide good air circulation to minimize the risk of fungal diseases.
- Division and propagation: Every few years, in early spring, you can divide the plant to rejuvenate it. Carefully dig up the plant and separate the clumps, ensuring each division has healthy roots. Replant the divisions in fresh soil or share them with fellow gardening enthusiasts.
With proper care and attention, your Geranium wallichianum plant should thrive and provide beautiful blooms throughout the growing season.

Place in a bright room that is sun drenched almost all day. Or directly in a south-facing window.

Geranium Wallichianum is a type of plant that requires proper watering to thrive. To water this plant, you should use a watering can or a hose with a gentle spray nozzle. Avoid using harsh water as it may damage the plant.
When watering Geranium Wallichianum, ensure that the soil is completely dry before watering. This will prevent overwatering and root rot. You can check the soil moisture by touching the top layer of the soil with your fingers. If it feels dry, it's time to water the plant.
Water the plant deeply, ensuring that the water reaches the roots. Watering should be done in the morning or evening when the sun is not too hot to avoid evaporation. Avoid wetting the leaves as this can promote the growth of fungal disease.
During the warmer months, Geranium Wallichianum may require more frequent watering. However, during the cooler months, watering can be reduced to prevent waterlogged soil.
In summary, to water Geranium Wallichianum, use a gentle spray nozzle or watering can. Water deep enough to reach the roots, avoiding wetting the leaves. Water only when the soil is completely dry to prevent overwatering.
To fertilize this plant, begin by mixing a balanced, water-soluble fertilizer with water according to the package directions. Water the plant with the fertilizer solution every two to three weeks during the growing season, making sure to saturate the soil and avoid getting any fertilizer on the leaves. Be cautious not to over-fertilize as it can lead to burnt roots and foliage.
The ideal soil for the Geranium Wallichianum plant should be well-draining and aerated. It should be a mix of sand, compost, and loam. The soil should have a pH between 6.0 to 7.0 and should be rich in nutrients. The plant thrives in a soil that is slightly acidic to neutral. It should be a fertile soil that is high in organic matter. The soil should be moist but not waterlogged, and it should also be able to retain moisture for prolonged periods. The plant prefers soil that is slightly cool and shaded. The soil should be free from weeds, debris, and other dead plant material to prevent fungal diseases. Regular soil testing and amending could help maintain the ideal soil conditions for Geranium Wallichianum.
To propagate a certain plant species, you will first need to select a healthy and mature specimen. Look for a stem that does not have any signs of disease or damage, and has several nodes along its length. The ideal time for propagation is during the spring or summer when the plant is actively growing.
Using a sharp and sterile pair of scissors or garden shears, cut a stem off from the mother plant. Make sure the stem is at least 3-4 inches long and has several nodes along its length. Remove any leaves from the lower half of the stem.
Dip the cut end of the stem into rooting hormone powder. This will stimulate root growth and increase your chances of success. Tap off any excess powder.
Fill a small pot with moist and well-draining soil. Using a pencil or finger, make a small hole in the soil and gently insert the stem into the hole, making sure the cut end is buried.
Water the soil thoroughly and place the pot in a bright, partially shaded area. Keep the soil moist but not waterlogged, and avoid direct sunlight as it can burn the cutting.
After a few weeks, the cutting should start developing roots. You can gently tug on the stem to test for resistance, which indicates the roots have formed. Once the roots are established, the new plant can be potted or planted outside.


