Plant Overview
Named after the Russian botanist Simeon Wlassov, this "Cranesbill" is a rugged beauty originating from the wilds of Siberia and Mongolia. While many geraniums are prized only for their summer blooms, this species is a seasonal shapeshifter, famous for its dramatic transition from soft green foliage to fiery autumn reds. It is the perfect choice for gardeners who want a plant that works hard from the first thaw until the first frost.
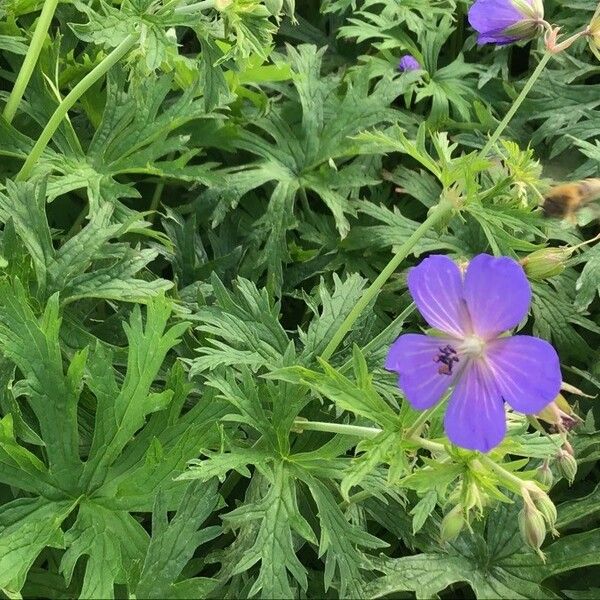
🔍 How to Identify
- 🌸 The Bloom: Dusky violet-purple petals featuring deep, intricate dark veining that draws the eye toward a pale, almost white "eye" at the center.
- 🍃 Fuzzy Foliage: The leaves are soft to the touch, deeply lobed, and covered in fine hairs, giving the plant a matte, velvety appearance.
- 🍂 Autumn Flare: As the weather cools, the entire plant transforms, with the leaves turning a brilliant, glowing shade of mahogany or burnt orange.
🏡 In Your Garden
- ❄️ Siberian Strength: Because of its northern heritage, this plant is exceptionally cold-hardy and "wakes up" early in the spring, making it ideal for high-latitude or high-altitude gardens.
- 💧 Woodland Preferences: Unlike some drought-tolerant Mediterranean geraniums, Wlassov’s Cranesbill prefers "cool feet." It thrives in soil that stays consistently moist and appreciates afternoon shade to protect its leaves from scorching.
- 🌱 Low Maintenance Mound: It grows in a polite, sprawling mound. It doesn't require "deadheading" (removing old flowers) to stay tidy, as it naturally maintains a clean shape throughout the season.
⚠️ Safety & Toxicity
- 🐾 Pet Safety: True Geraniums (like this species) are generally non-toxic to dogs and cats. This distinguishes them from Pelargoniums, the common "window box geraniums," which can be irritating to pets.
- 👶 Family Friendly: It is safe for children’s gardens and public spaces. The plant is non-poisonous, though the hairy stems may trap dust or pollen, which could bother those with extreme hay fever.
✨ Fun Fact
🌸 The Spring-Loaded Seed: The common name "Cranesbill" refers to the plant’s seed pod, which looks exactly like the long beak of a crane. When the seeds are ripe, the "beak" acts like a catapult, snapping upward to fling the seeds several feet away from the mother plant!

Detailed Care Instructions
To grow Geranium wlassovianum plants, follow these steps:
- Choose a suitable location: Geranium wlassovianum plants prefer full sun to partial shade. Ensure the area has well-draining soil.
- Prepare the soil: This plant thrives in slightly acidic to neutral soil (pH 6.0-7.0). If your soil is not within this range, amend it with organic matter or compost to improve its quality.
- Planting: Dig a hole big enough to accommodate the plant's root ball. Place the plant in the hole and backfill with soil, gently firming it around the base. Ensure the crown of the plant is level with the soil surface.
- Watering: Immediately after planting, water the Geranium wlassovianum thoroughly. Afterward, water plants deeply once a week, providing enough moisture to soak the soil to a depth of a few inches, but avoid overwatering.
- Mulching: Apply a layer of organic mulch around the base of the plant, keeping it a few inches away from the stem. Mulch helps retain moisture, suppress weeds, and regulate soil temperature.
- Fertilization: Geranium wlassovianum does not usually require heavy fertilization. However, you can apply a balanced slow-release fertilizer once in spring, following the manufacturer's instructions.
- Pruning: To maintain a tidy shape and encourage bushier growth, you can lightly prune Geranium wlassovianum plants in early spring. Remove any dead or damaged stems and cut back old growth.
- Protection: If you live in an area with harsh winters, it's recommended to cover the plant with a layer of straw or mulch during the coldest months to protect the roots.
- Propagation: You can propagate Geranium wlassovianum by taking stem cuttings in spring or early summer. Use a sharp, clean knife to cut a section of healthy stem, remove any lower leaves, and place the cutting in a pot filled with moist, well-draining soil. Keep the cutting in a warm, bright location and mist it occasionally until roots develop.
By providing suitable growing conditions and proper care, your Geranium wlassovianum plant should thrive and produce beautiful flowers.

Place in a bright room that is sun drenched almost all day. Or directly in a south-facing window.

To water this particular plant, it is important to keep the soil consistently moist but not overly saturated. One way to achieve this is to water deeply once a week, allowing the soil to dry out slightly in between waterings. It is also important to water at the base of the plant, avoiding getting water on the leaves as this can promote disease. If the plant is potted, make sure it has proper drainage to prevent waterlogging the roots. Adjust watering frequency based on the plant's needs, taking into account factors such as temperature, humidity, and soil moisture levels.
To fertilize this plant, use a balanced, slow-release fertilizer in the spring. Apply the fertilizer at the base of the plant and water thoroughly. Repeat this process every four to six weeks until mid-summer. Be sure to follow the manufacturer's instructions for application rates and frequency.
It is recommended to use soil that is well-draining and has a pH level between 6.0 and 7.0 for this plant. The soil should be rich in organic matter and should have good aeration to prevent waterlogging. A mixture of sand, peat moss, and compost can be used to create an ideal soil for Geranium Wlassovianum. It is important to avoid using heavy clay soils as they retain too much water and can cause root rot. Additionally, the plant prefers full sun to partial shade and should be watered regularly, but not overwatered.
- Select a healthy parent plant: Choose a Geranium Wlassovianum that has good foliage and a sturdy stem.
- Take cuttings: Using a clean and sharp pair of scissors, cut a stem of the parent plant that's around 4-6 inches long. Make the cut about 1/4 inch below a leaf node.
- Remove lower leaves: Remove the lower leaves from the cutting, leaving only the top two or three leaves.
- Dip the cutting into rooting hormone: Coat the base of the cutting with rooting hormone.
- Plant into a pot: Fill a small pot with moistened potting soil and make a hole in the center. Gently plop the cutting into the hole, being careful not to rub off the rooting hormone.
- Water thoroughly: Water the cutting and the potting soil until it is damp but not waterlogged.
- Cover with plastic: Cover the pot with a clear plastic bag or a plastic wrap to maintain humidity.
- Place in a bright but shaded area: Place the pot in a warm, bright spot that receives indirect sunlight. Don't put the plant in direct sunlight as it may lead to leaf scorching.
- Monitor the rooting progress: Check on the plant every few days and mist it with water if the soil appears to be dry. After 2-3 weeks, new growth should emerge, which indicates successful rooting.
- Transplant the new plant: After the roots have begun to establish themselves, you can move the plant into a larger pot or transplant it into your garden.


