Plant Overview
Meet the Spiny Hopsage, a resilient desert warrior known for its vibrant, papery seed pods that look like clusters of tiny hops. Thriving in the wind-swept basins of Western North America, this woody shrub provides a stunning splash of rose and cream against the dusty greys of the high-desert scrubland. It is a master of survival, often found standing strong where other plants succumb to salt and drought.
🔍 How to Identify
- 🌵 The Spines: True to its name, the older branches are stiff and end in sharp, woody points that act as a natural defense system against grazing animals.
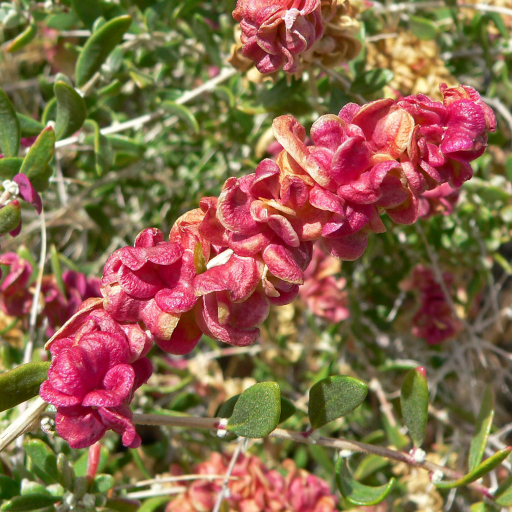
- 🌸 Papery Bracts: The most striking feature is the fruit; small seeds are encased in circular, papery "wings" (bracts) that turn brilliant shades of pink, red, or white as they mature.
- 🍃 Foliage: The leaves are small, fleshy, and spoon-shaped with a distinct grayish-green hue, often covered in tiny scales that help the plant retain moisture.
🏡 In Your Garden
- 🏜️ Tough Transitions: This plant is a specialist for "difficult" landscapes. It thrives in alkaline, salty, or sandy soils where most garden plants would fail, making it an excellent choice for high-desert xeriscaping.
- ☀️ Sun & Stability: It requires full, unabated sunlight to develop its iconic colors. Because it develops a deep, tenacious taproot to hunt for water, it hates being transplanted—ensure you choose its permanent home before planting.
⚠️ Safety & Toxicity
- 🟢 Non-Toxic: The Spiny Hopsage is not known to be poisonous to humans, dogs, cats, or livestock.
- 🩹 Physical Hazard: While chemically safe, the sharp, spine-tipped branches can cause painful punctures or scratches. It is best planted away from narrow walkways or areas where children and pets play frequently.
✨ Fun Fact
📜 Scientific Tribute: The genus name Grayia was created to honor Asa Gray, the "Father of American Botany." He was a pivotal figure in 19th-century science and one of the few people Charles Darwin trusted with his theories before publishing On the Origin of Species.

Detailed Care Instructions
To grow Grayia Spinosa (spiny hopsage or hop sage), you can follow these steps:
- Choose a suitable location: Grayia Spinosa prefers full sun exposure but can tolerate partial shade. It grows well in well-draining, sandy or loamy soil.
- Prepare the soil: Till the soil to break up any compacted areas and remove any weeds or rocks. Adding organic matter like compost can improve the soil's fertility and drainage.
- Obtain seeds or cuttings: Grayia Spinosa can be propagated from seeds or cuttings. Seeds are usually collected in late summer or fall. Cuttings can be taken in spring or early summer.
- Planting from seeds: Sow the seeds in the prepared soil in early spring, around the last frost date in your area. Sow the seeds at a depth of about 1/4 inch and keep the soil slightly moist during germination.
- Planting from cuttings: Take 4 to 6-inch long cuttings from a healthy Grayia Spinosa plant. Dip the cut end in rooting hormone to enhance root development. Plant the cuttings in the soil, burying about half of their length.
- Watering: Grayia Spinosa is drought-tolerant but needs regular watering during the establishment phase. Water deeply but infrequently, allowing the soil to dry out between waterings.
- Mulching: Apply a layer of organic mulch around the base of the plant to help conserve moisture and suppress weed growth. Leave a small gap around the stem to prevent rotting.
- Pruning: Grayia Spinosa may benefit from occasional pruning to maintain its shape and remove any dead or diseased branches. Prune in early spring before new growth appears.
- Fertilizing: Grayia Spinosa generally doesn't require regular fertilization. However, if the soil is poor, you can apply a balanced fertilizer in early spring.
- Pests and diseases: Grayia Spinosa is relatively resistant to pests and diseases, but keep an eye out for common garden pests like aphids or spider mites. Treat any infestations accordingly.
- Winter care: Grayia Spinosa is hardy and can tolerate freezing temperatures. However, in colder regions, adding a layer of mulch around the base of the plant can provide some protection during winter.
By following these guidelines, you can successfully grow Grayia Spinosa and enjoy its unique aesthetic in your garden.

Place in a bright room that is sun drenched almost all day. Or directly in a south-facing window.

Watering the plant should be done regularly, but with caution. The soil should be watered thoroughly until it is moist, but not waterlogged. It is important to avoid overwatering, as this can lead to root rot. The plant should be allowed to dry out partially before watering again. It is best to water early in the morning or late in the evening to prevent evaporation, and to avoid getting water on the foliage to prevent fungal growth. During the winter months, the plant should be watered less frequently, as it tends to go dormant during this time.
For optimal growth and health, the Grayia Spinosa plant should be fertilized once every two weeks during the growing season with a balanced, water-soluble fertilizer that is formulated for woody plants. Be sure to dilute the fertilizer according to package instructions to avoid burning the roots. It is also important to water the plant well before and after fertilizing to help distribute the nutrients evenly. Avoid fertilizing during periods of high heat or drought as this can be stressful for the plant.
The recommended soil for this plant is a well-draining, sandy soil mix with a neutral to slightly alkaline pH. It should have good moisture retention capabilities while also being able to allow excess water to drain away to prevent waterlogging. The soil should contain organic matter such as compost or well-rotted manure to provide nutrients for the plant. Additionally, adding a layer of mulch around the base of the plant can help retain moisture and suppress weed growth.
Grayia Spinosa plant can be propagated through cuttings. Take a healthy stem cutting, about 6 inches long, from the parent plant using a clean pruning shear. Remove the leaves from the lower half of the stem and make a clean cut just below a leaf node using a sharp knife.
Dip the cut end of the stem into a rooting hormone powder and gently tap off any excess. Insert the stem into a pot filled with well-draining soil mix, making sure the bottom half of the stem is buried in the soil.
Water the soil thoroughly until it's evenly moist and place the pot in a bright location with indirect sunlight. Cover the pot with a clear plastic bag to create a humid environment for the cutting. Mist the cutting once or twice a day to keep it moist.
Check for root formation after a few weeks by gently tugging on the cutting. If there is resistance, roots have formed and the plastic bag can be removed. Continue to keep the soil moist and gradually expose the cutting to more light.
Once the cutting has established roots and is growing well, it can be transplanted into a larger pot or planted outdoors in a suitable location.


