Plant Overview
Often found hugging the sun-baked edges of sandy paths or gravel driveways, Hexasepalum teres is better known by its humble nickname, "Poor Joe." It earned this title because it thrives in the poorest of soils where other plants simply give up. This North American native is a tough-as-nails ground-hugger that balances a rugged, wiry structure with surprisingly delicate, star-shaped flowers.
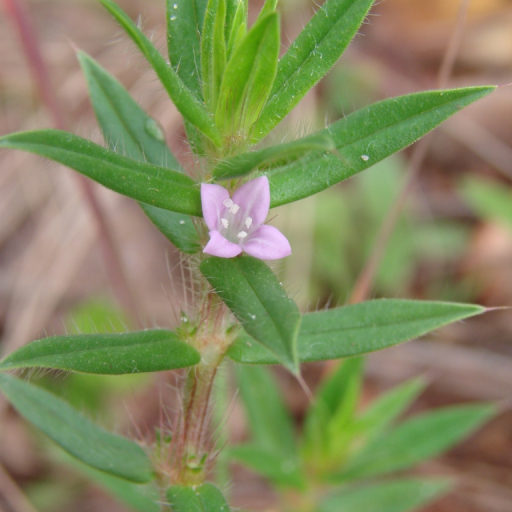
🔍 How to Identify
- 🌿 Square Stems: The stems are distinctly four-sided and often take on a reddish or purplish tint. They are covered in fine, stiff hairs that give the plant a noticeably rough, sandpaper-like texture.
- 🍃 Pointed Leaves: Narrow, lance-shaped leaves grow opposite each other along the stem. They sit "sessile," meaning they are attached directly to the branch without a leaf stalk.
- 🌸 Axillary Blooms: Tiny, four-petaled flowers—usually pale pink to lavender or white—bloom directly where the leaves meet the stem (the axils). They look like small, four-pointed stars nestled against the foliage.
🏡 In Your Garden
- 🏜️ The Ultimate Scrappy Groundcover: This plant doesn’t just tolerate poor soil; it prefers it. If you have a patch of dry, sandy earth or a rocky "hellstrip" where nothing else will grow, Poor Joe will likely move in to stabilize the soil and prevent erosion.
- 🐝 Pollinator Support: While often dismissed as a weed in manicured lawns, it is a valuable source of nectar for small native bees, flies, and butterflies during the heat of mid-to-late summer when other flowers might be wilting.
⚠️ Safety & Toxicity
- ✅ Generally Safe: Poor Joe is not known to be toxic to humans, dogs, or cats. It is a common "pasture weed" that is generally ignored by livestock.
- 🖐️ Skin Irritation: As the name "Rough Buttonweed" suggests, the plant is covered in bristly hairs. While it isn't "stinging" like a nettle, the coarse texture can be slightly abrasive to sensitive skin if you are pulling it up by the handful without gloves.
✨ Fun Fact
The name "Poor Joe" is a bit of botanical slang from the American South, referencing the plant's association with "poor" land that lacks nutrients. However, it is a master of self-reliance; if pollinators don't visit, the flowers are capable of pollinating themselves to ensure the next generation survives!

Detailed Care Instructions
To grow Hexasepalum Teres, follow these steps:
- Obtain seeds or a cutting from a mature plant. Seeds can be purchased online or obtained from nurseries.
- Choose a suitable location for planting. Hexasepalum Teres prefers partial shade or filtered sunlight. Ensure the area has well-draining soil.
- Prepare the soil before planting by loosening it with a garden fork or shovel. Remove any weeds or debris.
- Sow the seeds or plant the cutting in the soil at a depth of ¼ to ½ inch. Space the plants about 12 inches apart if planting multiple ones.
- Water the plant thoroughly after planting. Keep the soil moist but not waterlogged during the growing season. Avoid over-watering as it can lead to root rot.
- Fertilize the plant every 4-6 weeks with a balanced, slow-release fertilizer. Follow the instructions on the fertilizer packaging for dosage and application method.
- Prune the plant as needed to maintain its shape and promote bushier growth. Remove any dead or damaged branches to keep the plant healthy.
- Protect the plant from extreme temperatures. If temperatures dip below freezing, provide a layer of mulch around the base of the plant to insulate the roots.
- Monitor the plant for pests and diseases. If any issues arise, take appropriate action, such as using organic insecticides or fungicides.
- Hexasepalum Teres is tolerant of drier conditions, but it's still important to water regularly during dry spells. Monitor the soil moisture and adjust watering accordingly.
By following these steps, you should be able to successfully grow Hexasepalum Teres.

Place in a bright room that is sun drenched almost all day. Or directly in a south-facing window.

Hexasepalum Teres is a type of plant that requires regular watering in order to thrive. To properly water this plant, it is important to pay attention to its soil moisture levels. The soil should be kept lightly moist at all times, but not overly saturated or soaking wet.
To achieve this optimal soil moisture level, the plant should be watered deeply at least once a week. The amount of water required will depend on the size of the plant and the conditions it is growing in, so it is best to check the soil with a finger or moisture meter before watering.
When watering, it is important to avoid getting water on the leaves and flowers, as this can lead to disease and fungal growth. Instead, direct the water to the soil around the base of the plant. If the plant is potted, be sure to let the excess water drain out of the bottom of the pot to prevent waterlogging.
During periods of extreme heat or drought, the plant may require more frequent watering to prevent dehydration. Conversely, during periods of heavy rainfall, it may be necessary to reduce watering to avoid over saturating the soil. Regular monitoring of soil moisture levels and adjusting watering accordingly is key to maintaining a healthy Hexasepalum Teres plant.
To properly fertilize the Hexasepalum Teres plant, follow the instructions below:
- Choose a balanced, water-soluble fertilizer with a ratio of 10-10-10 or 20-20-20.
- Dilute the fertilizer according to the packaging instructions. Typically, a few tablespoons of fertilizer per gallon of water is recommended.
- Water the plant thoroughly before applying the fertilizer. This helps prevent fertilizer burn and ensures even distribution.
- Pour the diluted fertilizer mixture around the base of the plant, avoiding foliage contact as much as possible.
- Take care not to over-fertilize, as it can harm the plant. Follow the recommended dosage guidelines provided by the fertilizer manufacturer.
- Fertilize the Hexasepalum Teres plant every two to four weeks during the growing season, typically from spring to early fall.
- During the dormant winter period, reduce or halt fertilization, as the plant's nutrient requirements are lower.
- Monitor the plant's response to the fertilizer. If it shows signs of nutrient deficiencies or excesses, adjust the fertilization schedule or dilution ratio accordingly.
- Regularly water the plant, as it helps distribute the fertilizer and prevents buildup around the roots.
- Finally, do not fertilize a Hexasepalum Teres plant that is stressed, diseased, or newly potted until it has had time to acclimate and recover.
Hexasepalum Teres is a plant that belongs to the family Rubiaceae. It thrives well in soil that is well-drained, moist, and rich in organic matter. The soil pH should range from slightly acidic to neutral, with a pH of 6.0 to 7.0 being ideal for its growth. This type of plant prefers soil that is light to medium-textured, with good aeration and drainage.
The soil should also be fertile and nutrient-rich, with adequate levels of nitrogen, phosphorus, and potassium. Adding compost or aged manure to the soil can help fortify its nutrient content. It is also essential to avoid soils that are heavy and compacted, as this can impede the plant's root growth and cause it to die.
When it comes to soil preparation, it is advisable to loosen and aerate the soil by tilling or digging before planting the Hexasepalum Teres. The soil should be sufficiently moist, but not waterlogged, before planting. After planting, it is crucial to water the plant regularly to keep the soil moist but not waterlogged.
Overall, the soil plays a significant role in the growth and development of Hexasepalum Teres. By providing the right soil conditions, the plant can grow vigorously, produce healthy foliage and flowers, and thrive for many years.
Hexasepalum Teres is a plant that can be propagated through various methods, such as seeds, stem cuttings, or division. Each method requires different steps and conditions for successful propagation. Here are the details for each method:
- Seed propagation:
a. Collect mature seeds from the plant by harvesting the seed pods once they have turned brown and started to dry out.
b. Remove the seeds from the pods and clean them gently to remove any debris or leftover pod material.
c. Prepare a seed tray or small pots with a well-draining potting mix.
d. Sow the seeds by placing them on the soil surface and lightly pressing them down. As these seeds require light for germination, they should not be buried.
e. Mist the soil with water to ensure it is evenly moist but not waterlogged.
f. Cover the seed tray or pots with a plastic dome or plastic wrap to create a greenhouse-like environment, which helps retain moisture and warmth.
g. Place the tray or pots in a warm location with indirect sunlight.
h. Keep the soil consistently moist by misting or light watering as needed.
i. Germination typically occurs within 2-4 weeks, and once the seedlings have established roots, they can be transplanted to individual pots or an outdoor location.
- Stem cutting propagation:
a. Select a healthy stem from the Hexasepalum Teres plant, preferably one that is not flowering and has several nodes.
b. Using clean, sharp pruning shears, cut a 4-6 inch (10-15 cm) section of the stem just below a leaf node.
c. Trim off the lower leaves, leaving a few at the top.
d. Dip the cut end in a rooting hormone powder to promote root growth (optional).
e. Prepare a well-draining potting mix or a mixture of perlite and peat moss that will retain moisture.
f. Make a hole in the soil mix using a pencil or a dibber and place the cutting into it, burying at least one or two nodes in the soil.
g. Firmly press the soil around the cutting to secure it in place.
h. Mist the soil lightly to settle it around the cutting.
i. If desired, cover the pot with a plastic bag or create a mini-greenhouse using a clear plastic container to create a humid environment.
j. Place the pot in a warm location with bright, indirect light. Avoid direct sunlight, as it may scorch the cutting.
k. Ensure the soil remains slightly moist but not waterlogged, misting as needed.
l. After a few weeks, the cutting should start developing roots. You can gently tug on it to check for resistance, indicating root growth.
m. Once the cutting has established roots, it can be transplanted into a larger pot or an outdoor location.
- Division:
a. Choose a mature Hexasepalum Teres plant that has multiple stems or clumps.
b. Carefully dig up the entire plant, taking care not to damage the roots.
c. Shake off excess soil to expose individual clumps or stems.
d. Use a clean, sharp garden knife or pruners to divide the clumps or stems into smaller sections. Each section should have a good root system and a sufficient number of stems.
e. Trim any damaged or overly long roots.
f. Pot each divided section into its own container filled with a well-draining potting mix.
g. Gently press the soil around the roots, ensuring that each plant is adequately supported.
h. Water the newly potted divisions thoroughly, allowing excess water to drain.
i. Place the pots in a location with bright but indirect light.
j. Keep the soil consistently moist but not waterlogged, making sure not to let the plants dry out.
k. Once the divisions have established themselves and show signs of new growth, they can be transplanted into larger pots or an outdoor location.
By following these steps, you can successfully propagate Hexasepalum Teres plants using seeds, stem cuttings, or division, depending on your preference and the resources available to you.


