Plant Overview
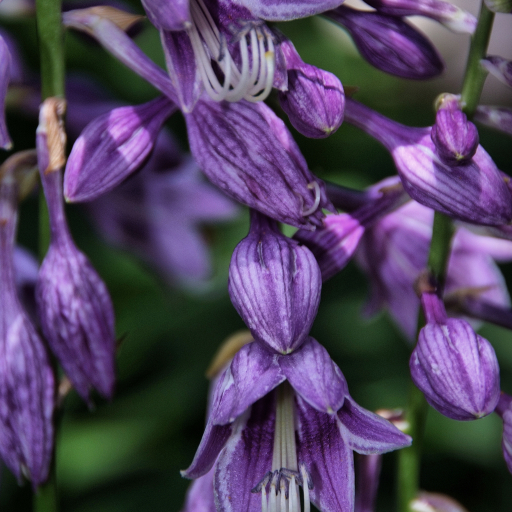
Often referred to as the Blue Plantain Lily, Hosta ventricosa is a classic heavyweight of the shade garden. Native to China, it is one of the oldest species of Hosta introduced to Western gardens and is beloved for its unusually dark, bell-shaped flowers. While most Hostas are grown primarily for their foliage, this variety is a "double threat," offering both lush architectural leaves and a stunning floral display in midsummer.
🔍 How to Identify
- 🍃 Heart-Shaped Foliage: The leaves are large, broadly ovate, and heart-shaped at the base, typically featuring a rich, glossy dark green color with a subtle twisted tip.
- 📏 Prominent Veining: Look for the deeply "quilted" look; the leaves have 7 to 9 pairs of veins that are strongly impressed into the surface.
- 🔔 Distinctive Blooms: Unlike the pale lavender flowers of many cousins, these are deep violet-purple and distinctly bell-shaped (urceolate), hanging from tall, leafless stems that can reach up to 3 feet high.
🏡 In Your Garden
- 🌑 The Shade Specialist: This plant is a true "woodlander." It thrives in spots where other plants struggle, specifically in full to partial shade where its deep green leaves won't scorch under the afternoon sun.
- 💧 Moisture Consistency: While it is surprisingly hardy, it hates "wet feet" in the winter but craves consistent moisture during the summer heat to prevent the leaf edges from turning crispy and brown.
- 🐌 The Slug Factor: Because of its lush, low-growing canopy, it can become a five-star hotel for slugs and snails. Placing it in well-draining soil with a bit of organic mulch helps, but keep an eye out for "Swiss cheese" holes in the spring.
⚠️ Safety & Toxicity
- 🐾 Pet Warning: Hosta ventricosa contains saponins, which are toxic to dogs, cats, and horses.
- 🤢 Symptoms: If ingested, it can cause vomiting, diarrhea, and abdominal pain. While not typically fatal, it is best kept in areas where curious pets don't like to nibble.
- 👐 Skin Safety: The sap is generally non-irritating to humans, making it safe to handle during division or pruning.
✨ Fun Fact
Hosta ventricosa is one of the few plants in the world that exhibits apomixis. This means it can produce seeds that are genetic clones of the mother plant without any pollination or fertilization required. If you find a seedling under your Hosta, it is likely an exact "mini-me" of the parent!

Detailed Care Instructions
To grow Hosta Ventricosa plants, follow these steps:
- Choose a suitable location: Hosta plants prefer shaded or partially shaded areas. Select a spot that receives morning or evening sunlight but is protected from intense afternoon sun.
- Prepare the soil: Hostas prefer rich, well-draining soil. Amend the soil with organic matter, such as compost, to improve its fertility and drainage.
- Planting: Dig a hole that is slightly larger than the root ball of the Hosta plant. Place the root ball in the hole and backfill with soil, gently firming it around the plant. Make sure the crown of the plant (where the leaves emerge) is level with the soil surface.
- Watering: After planting, water the Hosta thoroughly to settle the soil and eliminate any air pockets. Keep the soil consistently moist but not waterlogged throughout the growing season.
- Mulching: Apply a layer of mulch around the base of the plant to help retain moisture, suppress weeds, and moderate soil temperature. Use organic mulch, such as shredded bark or wood chips.
- Fertilizing: Hostas benefit from regular feeding. Apply a balanced, slow-release fertilizer suitable for shade-loving plants in early spring. Follow the package instructions for the recommended dosage.
- Maintenance: Hostas require minimal maintenance. Keep the plants well-watered during dry periods and remove any dead or yellowing leaves. Divide mature plants every few years to prevent overcrowding and promote vigorous growth.
- Pest and disease control: Hostas are generally resistant to pests and diseases. However, regularly check for common issues such as slugs or snails. If necessary, use non-toxic methods or organic pest control products to manage these pests.
By following these steps, you can successfully grow and maintain Hosta Ventricosa plants in your garden.

Place in a window with dappled sun or a spot in the middle of a room. Or directly in a window facing west or east.
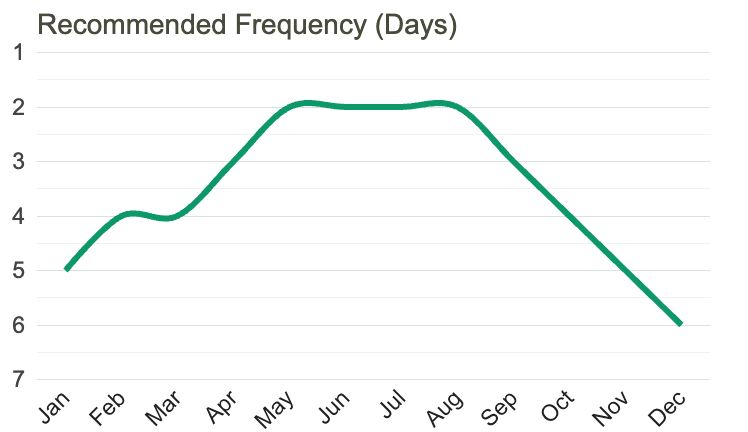
To water the type of plant identified as Hosta Ventricosa, it is important to first assess the soil moisture level by sticking your finger approximately one inch into the soil. If the soil feels dry, it is time to water the plant. Use a watering can or hose to apply water directly to the soil, avoiding getting water on the leaves. Aim to provide enough water to thoroughly wet the soil but avoid overwatering, as excessive moisture can lead to root rot. The frequency of watering will depend on factors such as temperature, humidity, and soil type, but a general guideline is to water when the top inch of soil is dry. It may also be beneficial to add a layer of organic mulch around the base of the plant to help retain moisture in the soil.
To fertilize this plant, apply a balanced fertilizer with equal parts nitrogen, phosphorus, and potassium in early spring before new growth appears. Repeat the fertilizer application in midsummer. Follow the instructions on the fertilizer package to determine the amount to use based on the size of the plant. Spread the fertilizer evenly around the plant, but avoid getting the fertilizer in direct contact with the leaves or stem to prevent burning. Water the plant deeply after fertilizing to help the nutrients reach the roots.
When planting a Hosta Ventricosa plant, it is recommended to use a rich and well-draining soil that is slightly acidic with a pH range between 5.0 to 7.5. The soil should be moist but not waterlogged, as this may cause root rot. Ideally, the soil should also have high organic matter content to promote healthy root growth and nutrient uptake. It can be helpful to amend the soil with compost, peat moss, or well-rotted manure to improve its quality. Additionally, adding a slow-release fertilizer at the time of planting can help provide necessary nutrients for the plant's growth.
To propagate this plant, one can choose from several methods, including division, leaf cuttings, and seed germination. One option is to divide the plant by carefully separating the roots and foliage into several smaller sections. These sections can then be replanted in moist soil and watered regularly until new growth begins to emerge. Another method is to take leaf cuttings and plant them in a well-draining soil mix. These cuttings should be kept moist and in a protected, shaded area until roots and new foliage develop. Finally, seeds can be harvested from the plant and sown in a suitable germination medium, but this method can take longer to produce viable plants. Regardless of the propagation method chosen, it is important to provide the newly propagated plant with the same care and growing conditions as the parent plant to promote healthy growth and development.


